HOW TO INSTALL MOJO FATTY MOUNT
Credit for this goes to DarthEmma. It is a cut and paste of the original TR post in order to try and retain the old technical content. If anyone knows DarthEmma, tell this Rucker to come and claim their post!
This write up is entirely a courtesy for other Total Ruckus members. I am in no way affiliated with MOJO Customs.
If you have questions about installing your mount, please call MOJO. As he says in all his threads, you can call him day or night. MOJO (JOHN) AT 801-687-4079
Here is what I did to install my MOJO kit. Please PM me if you find errors or want to make suggestions to improve this DIY. Thanks.
Part 1 - Get Nekid
I am going to show you how I installed my kit on my scoot. I had not seen a complete detailed DIY on this, so I thought I’d write mine up. I am new to owning a Ruckus, so I was a bit nervous about taking it apart so extensively to do this mod, especially the wiring harness. However, it turned out to be easy because Honda has color coded the plugs and made many plugs unique, so you really can’t put it back together incorrectly.
Here is what I did…
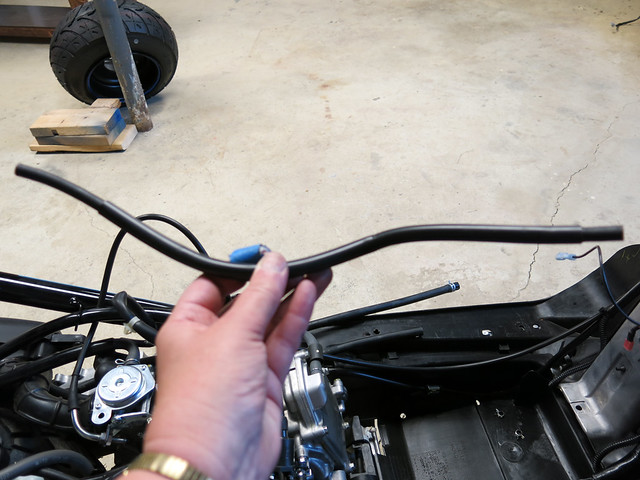
Order one MOJO GET FATTY kit.
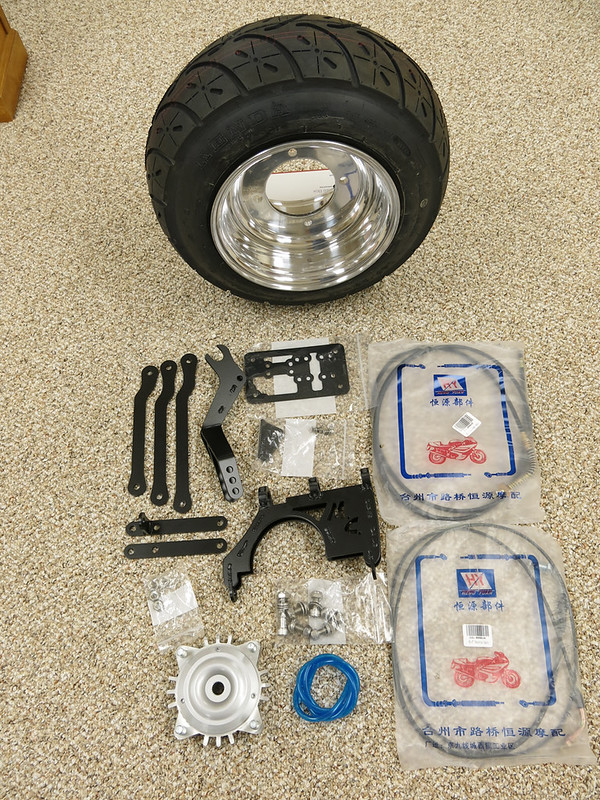
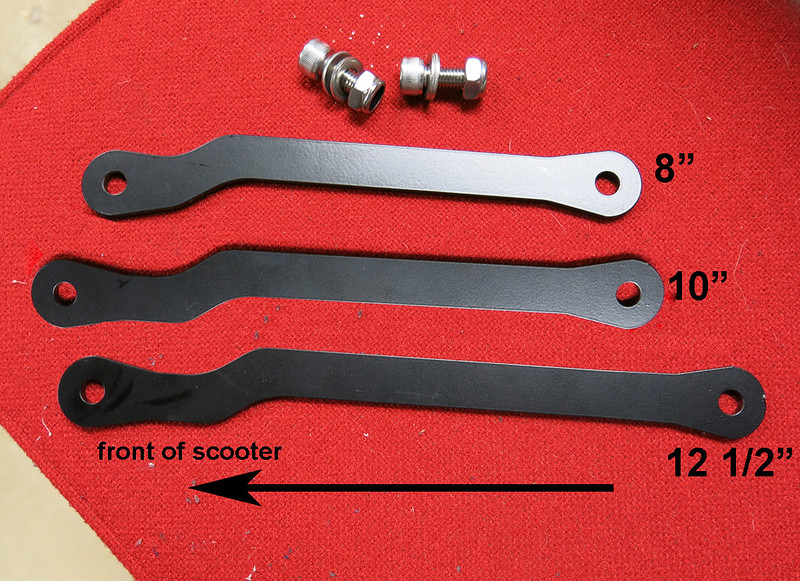
It comes with (from top) one fatty wheel with tire, 3 extension bars for 8", 10", or 12 1/2" stretch (I went with the 12 1/2"), license plate relocation kit (I didn’t use this, but you can. It just mounts to the back of the engine in an available bolt hole), long cables (throttle and brake), 2 brackets to mount the extension bar of your choice, the MOJO Mount, Kymco hub, extended gas line, and hardware.
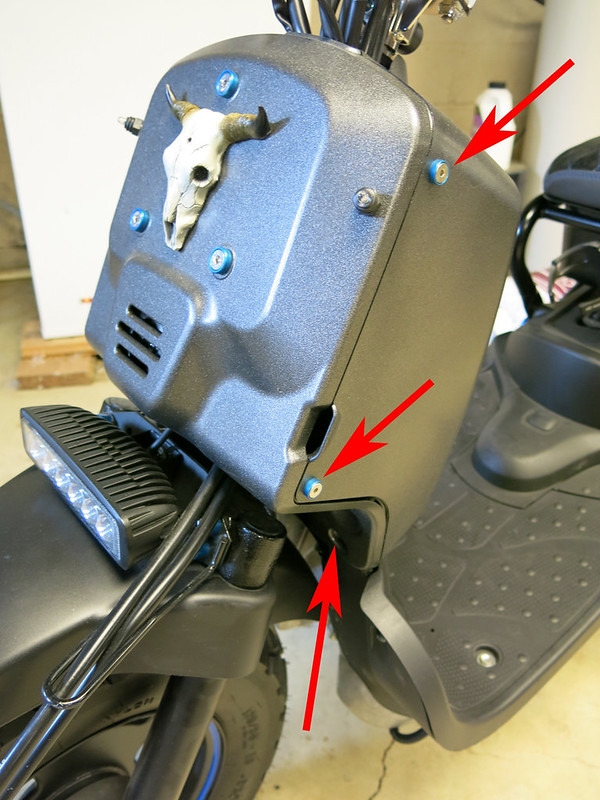
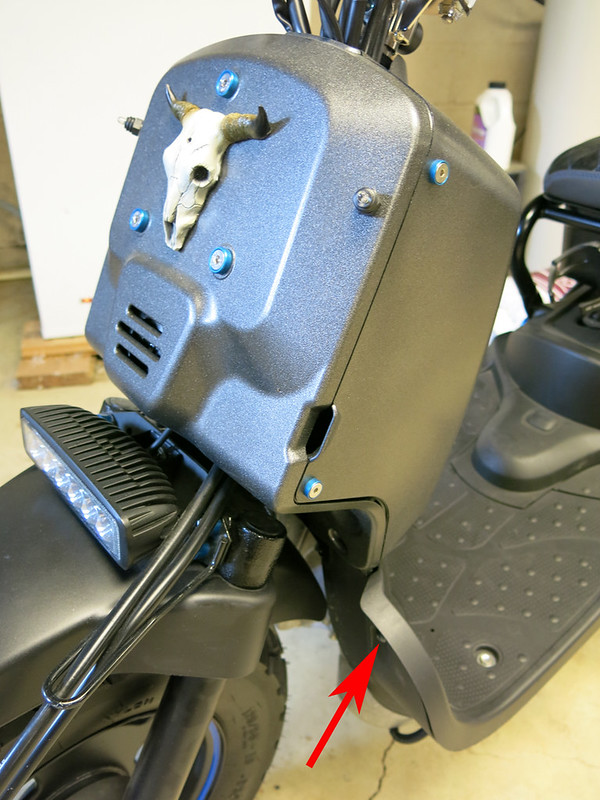
Remove the back of the battery box by unscrewing the 2 screws on each side of the battery box and the screw at the bottom (one on each side). You can then tilt the back of the battery box and gently slide it off.
I also removed the front of the battery box, but you don’t really need to.
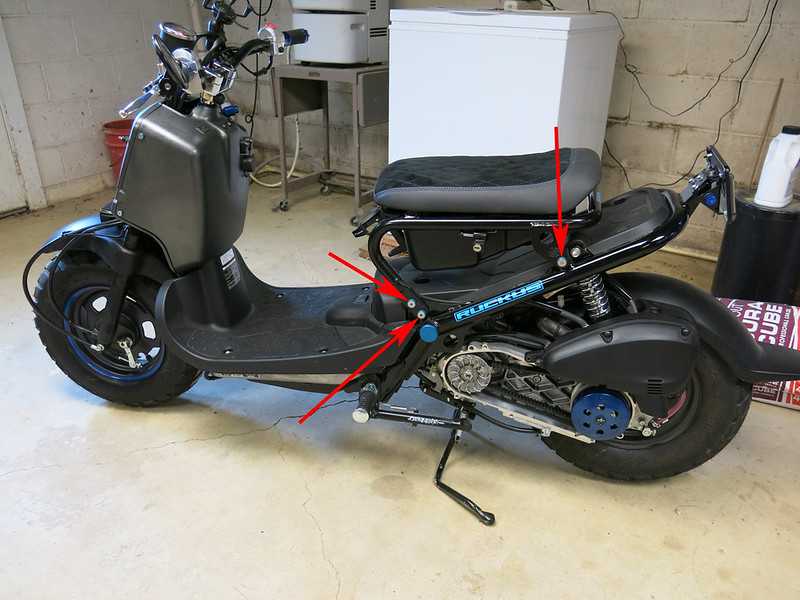
Remove the seat by unscrewing the 3 bolts on each side.
Remove the floor plastics by removing the 8 bolts and the 2 screws at the front that hold the top plastic piece to the bottom piece. (Most of the bolts are identified in the pics, but a couple are hidden… you’ll figure it out.)
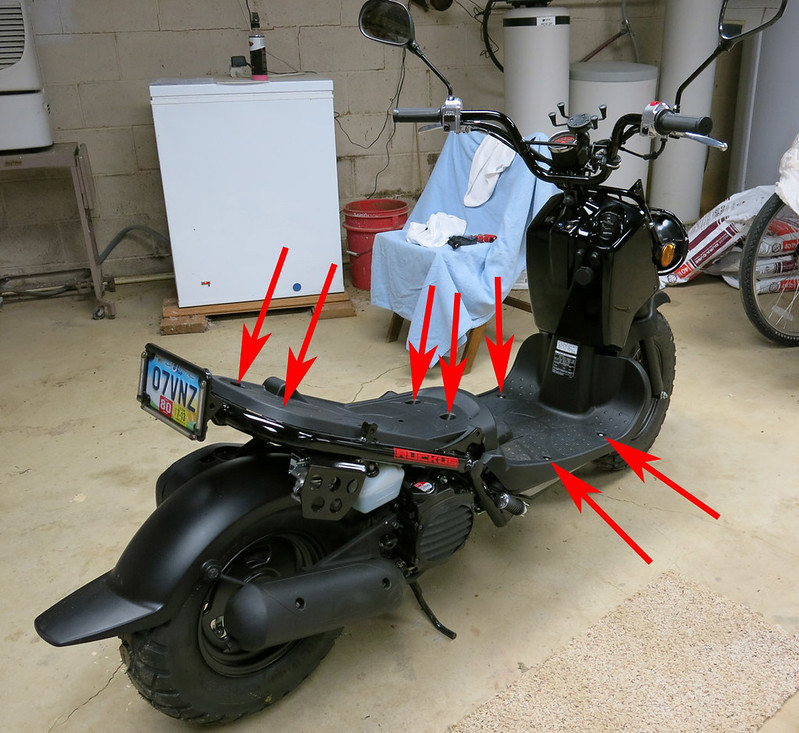
I always forget this bolt…
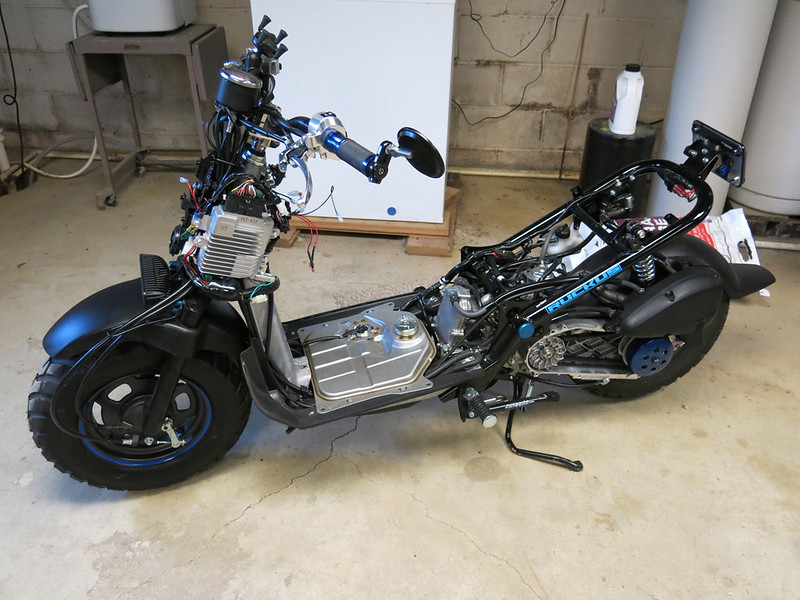
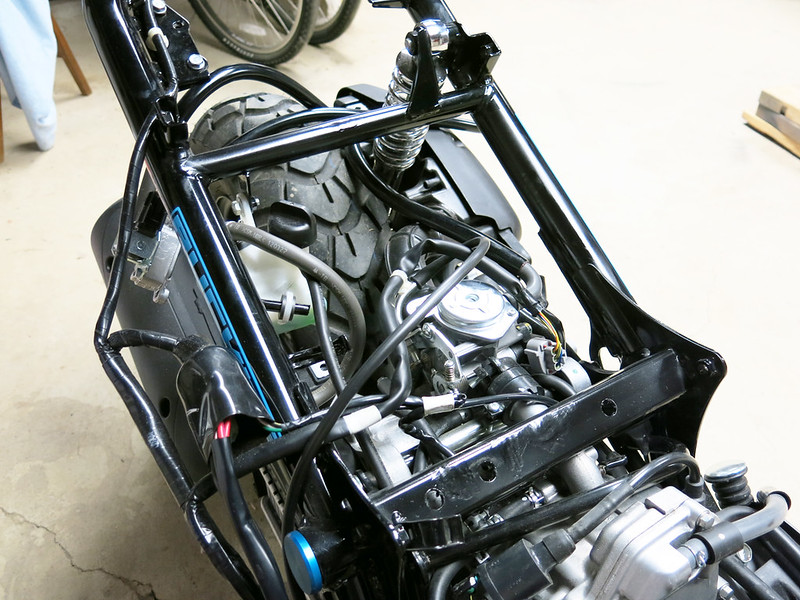
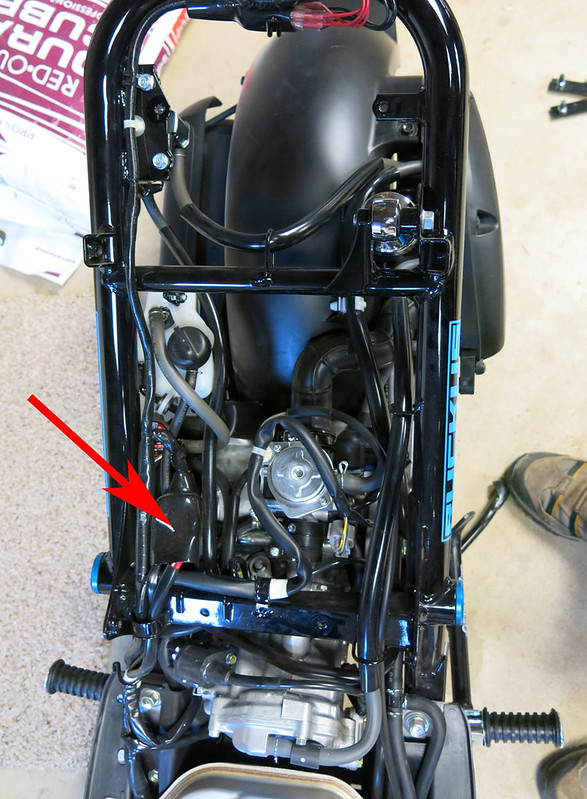
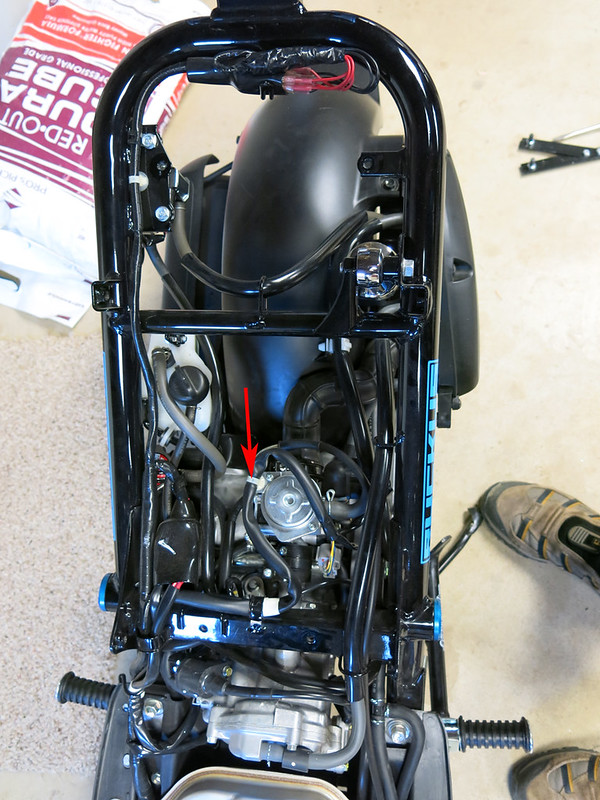
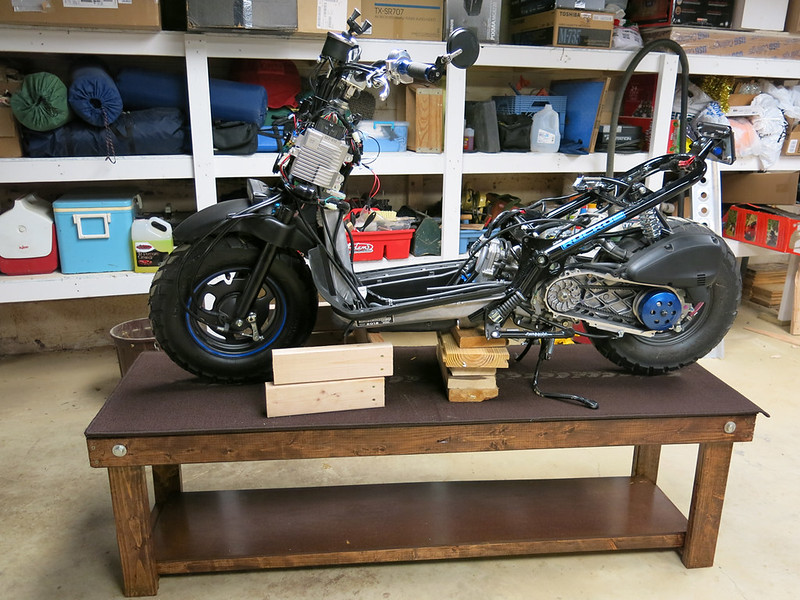
Here is my naked Ruckus.
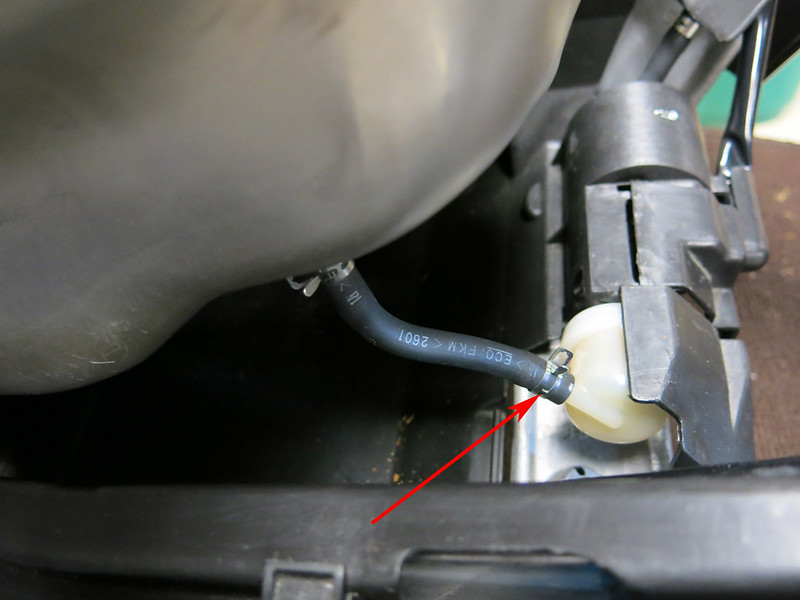
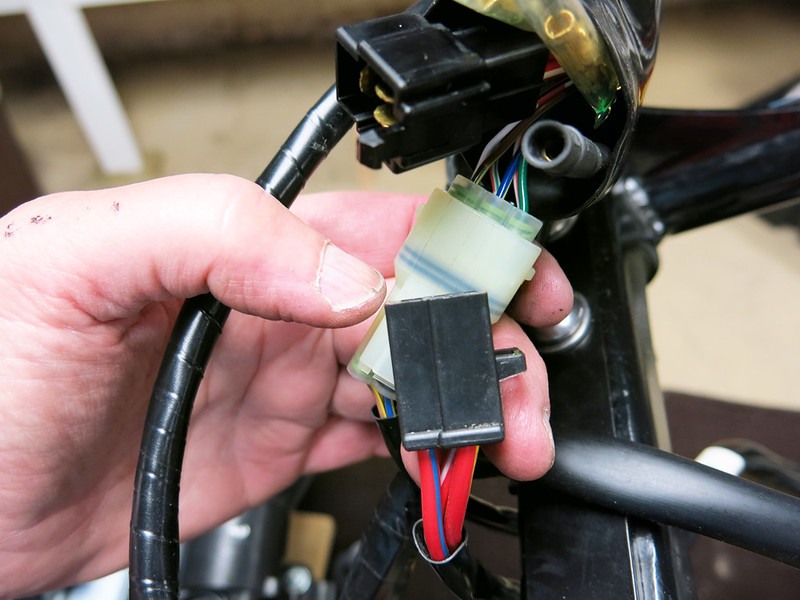
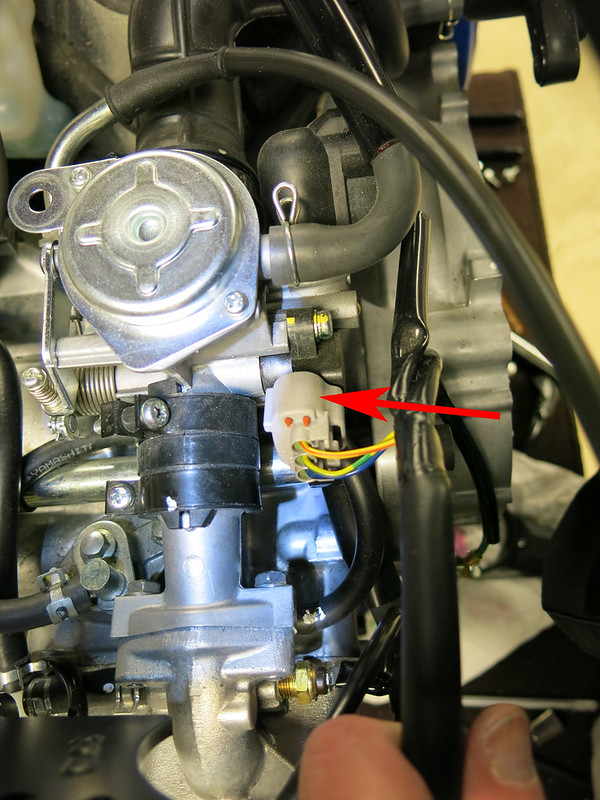
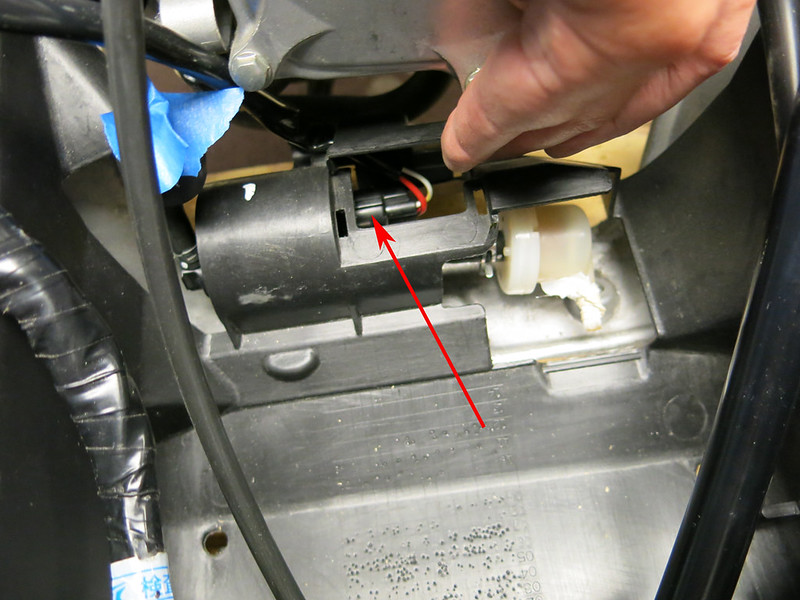
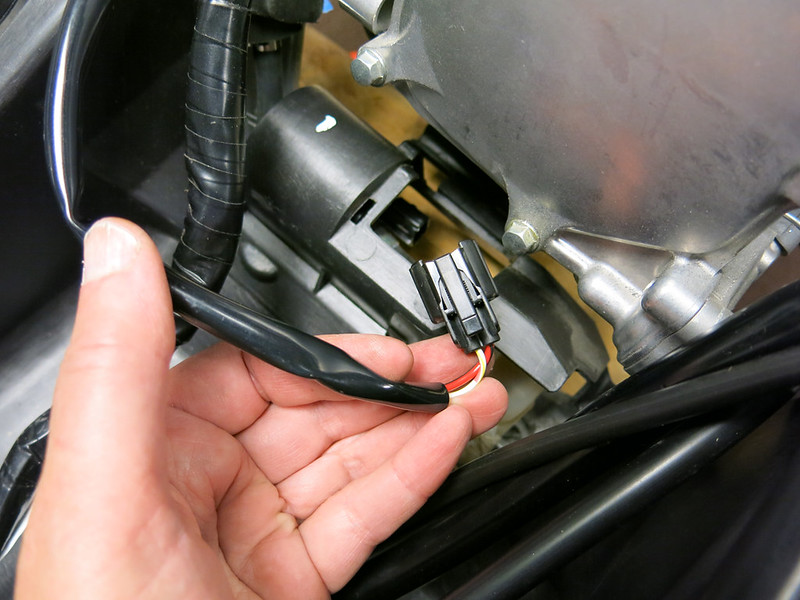
Next, we need to remove the gas tank which is actually pretty easy. (You might be able to do this project without removing the gas tank, but it’s a lot easier to just get it out of the way.) Disconnect the 3P connector for the fuel reserve sensor.
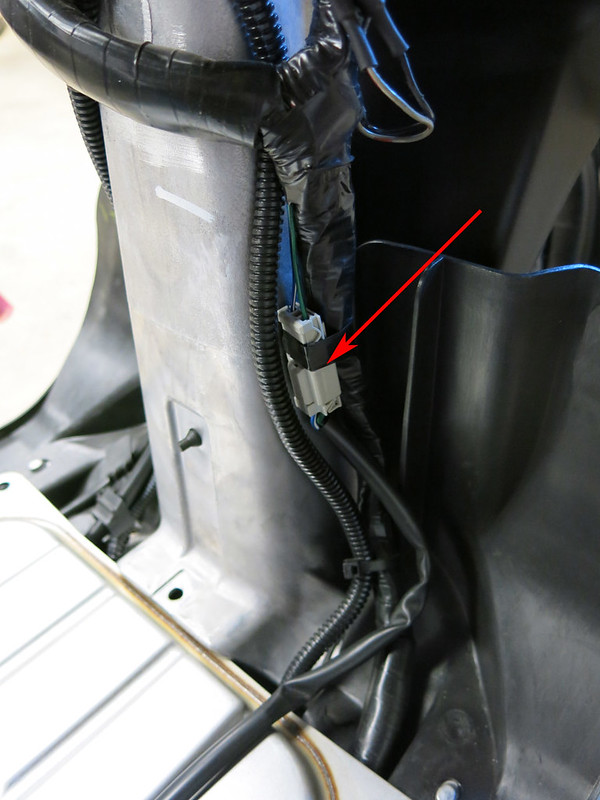
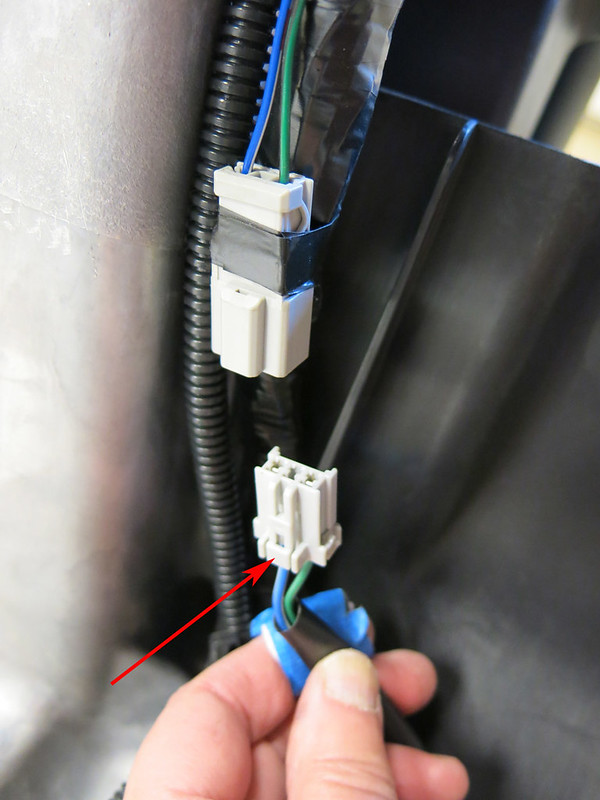
You have to push on the little clip to get it off.
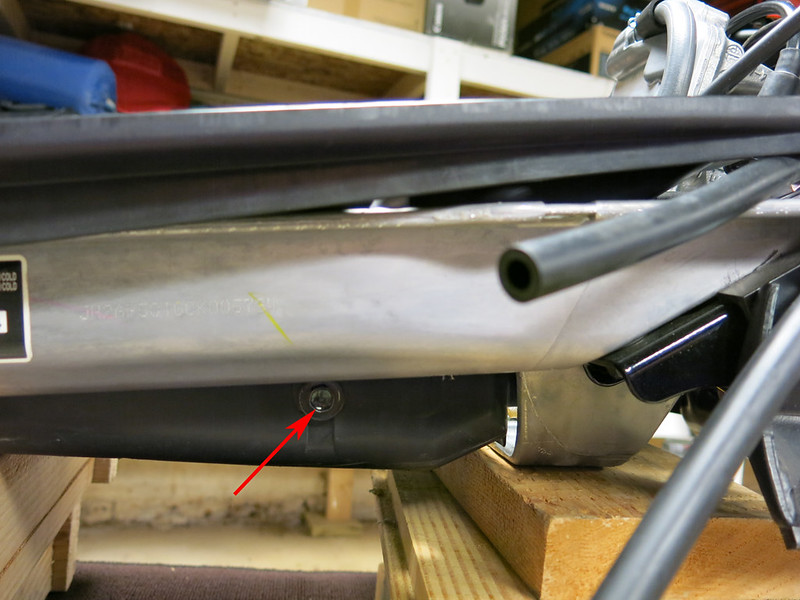
Gently lift the gas tank a few inches to find that on the bottom left of the tank there is a short fuel line connecting the gas tank to the fuel filter.
Slide the hose clamp back off of the fuel filter (you need to pinch the hose clamp to move it… I found needle nose pliers work well on these hose clamps). Carefully pull the fuel line off the fuel filter and pinch the hose so that you don’t leak gas. Clamp the fuel line and prop up the gas tank out of the way. Make sure it’s not leaking.
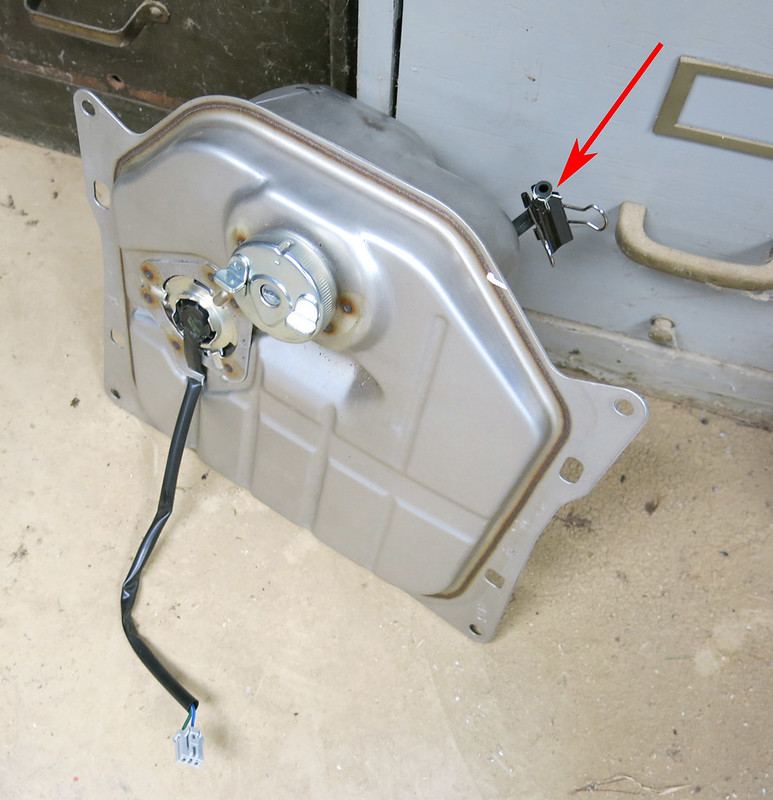
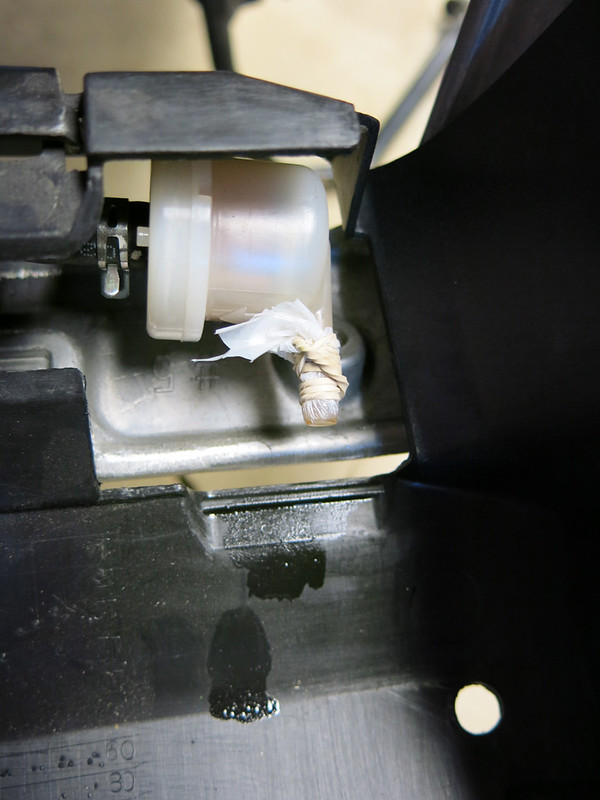
I also capped off the end of the fuel filter on the scooter because it was driipping a bit.
Part 2. Clean up those brackets
We have to remove 2 brackets (and a clamp I’ll show you later) from the Ruckus because they are in the way of our MOJO mount.
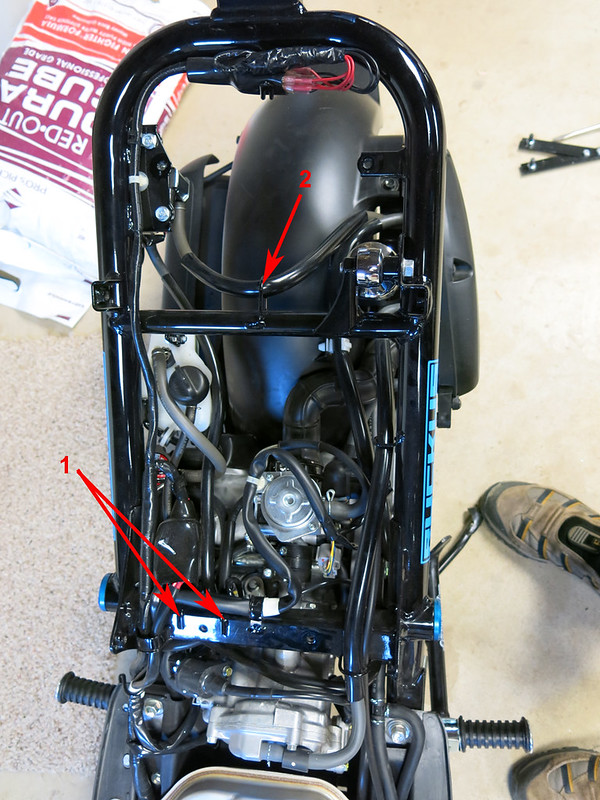
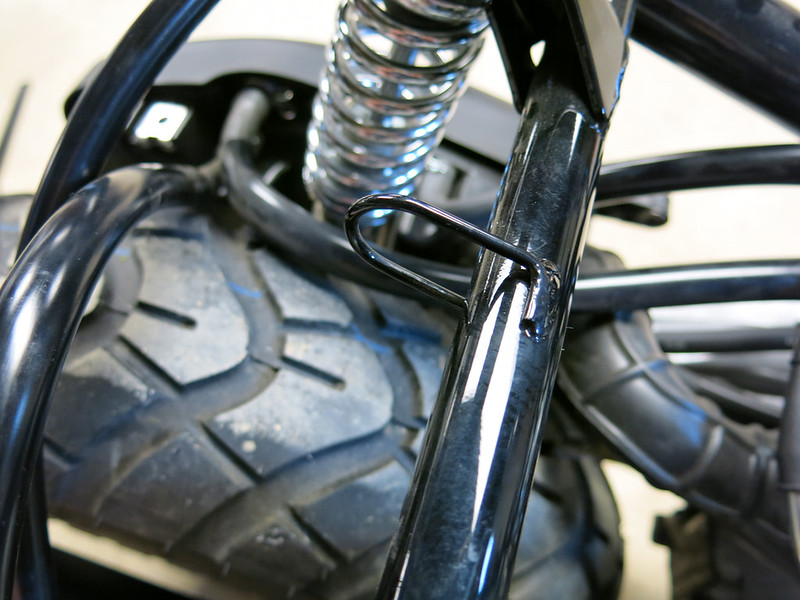
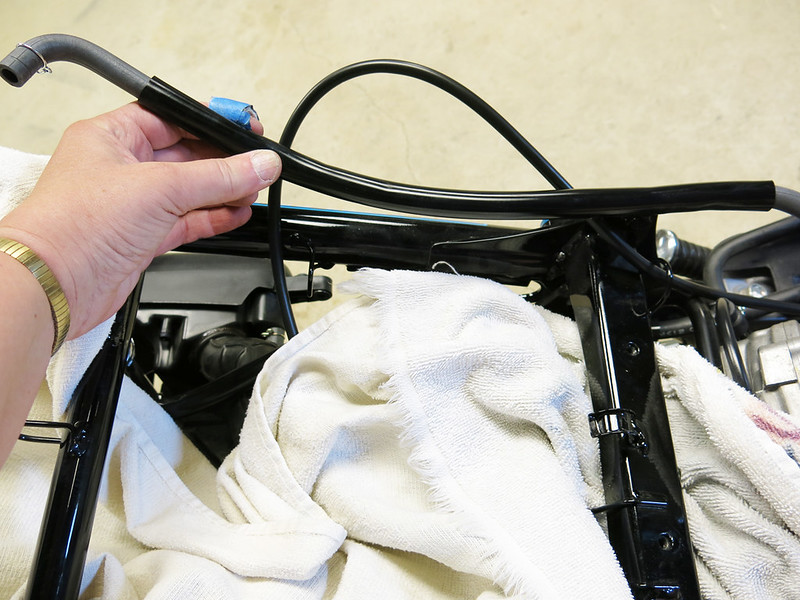
Bracket 1… We will need to mount this MOJO bar to the front cross member on the Ruck. So, we need to get the hoses and retaining bars out of the way.
We need to first free the fuel line and air suction hose from this bracket.
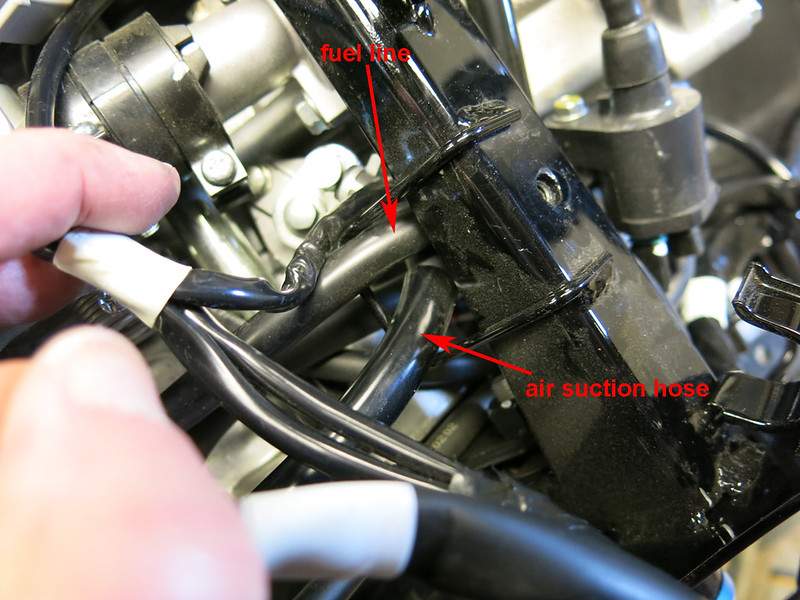
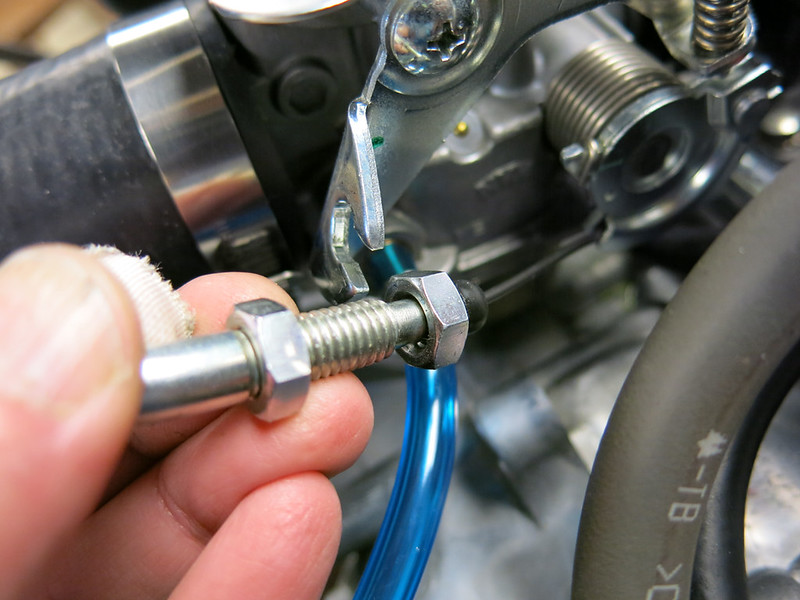
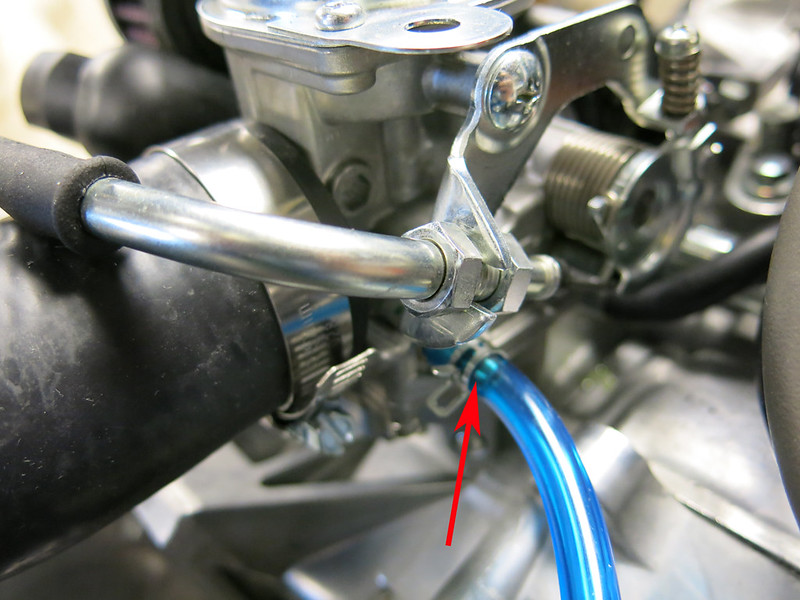
First the fuel line. We need to detach the fuel line from the carburetor.

I put a little cup under the fuel line to catch drips. Was glad I did.
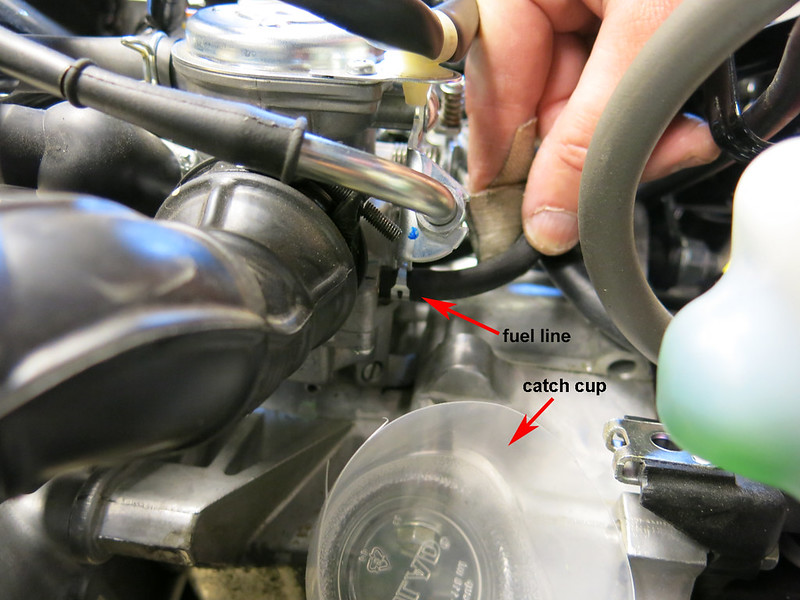
Remove the hose clamp and gently pull the fuel line off the carburetor. Keep the cup under the hose to catch the drips.
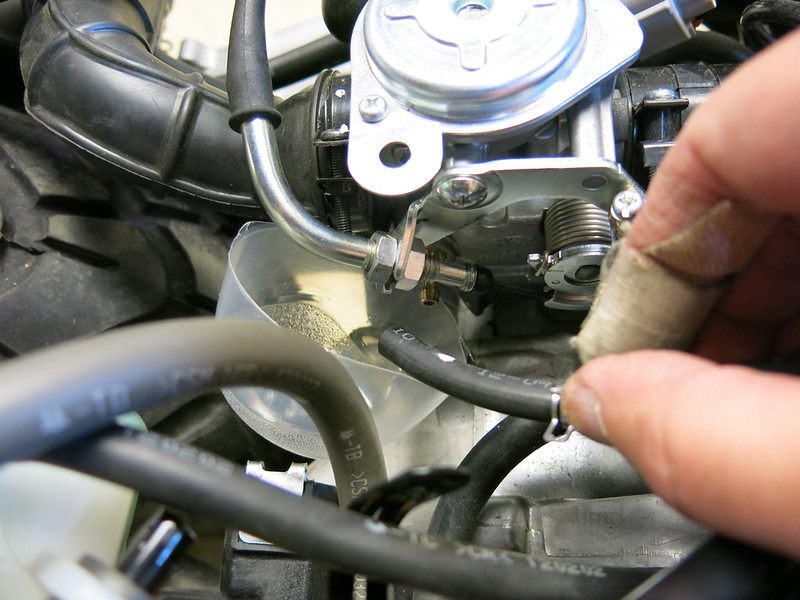
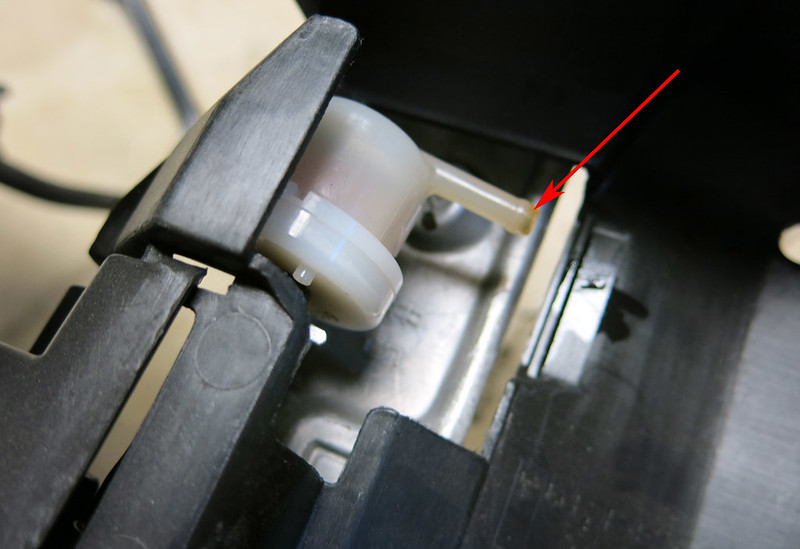
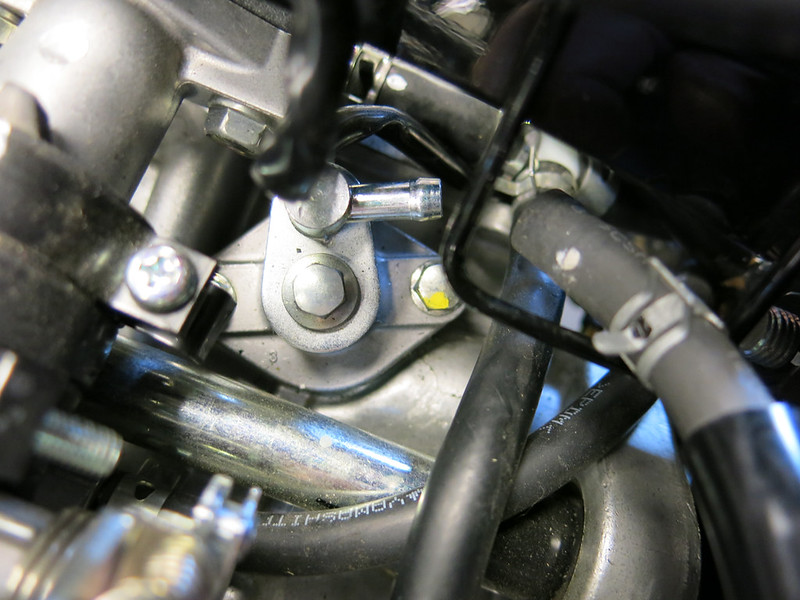
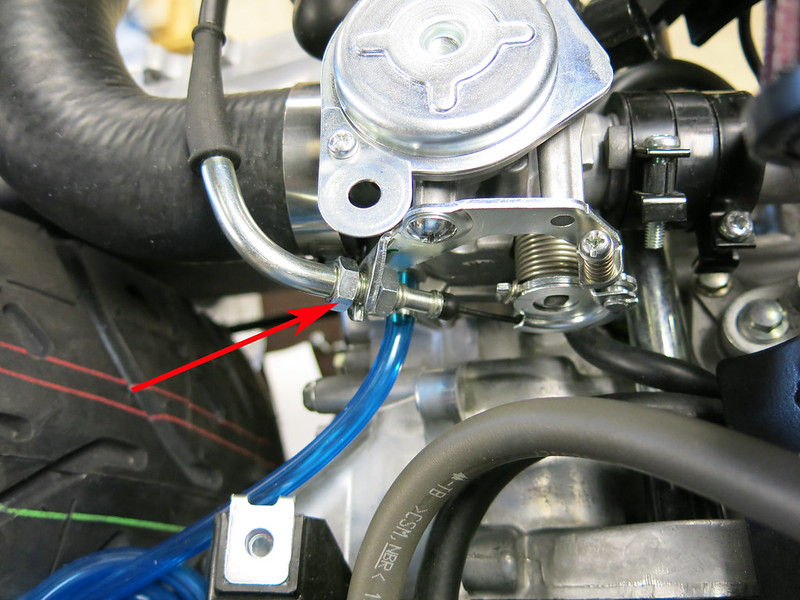
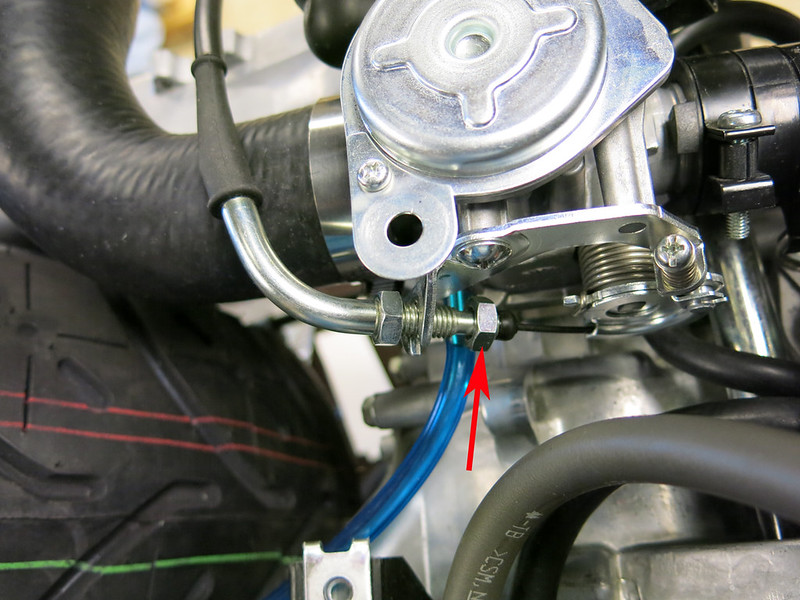
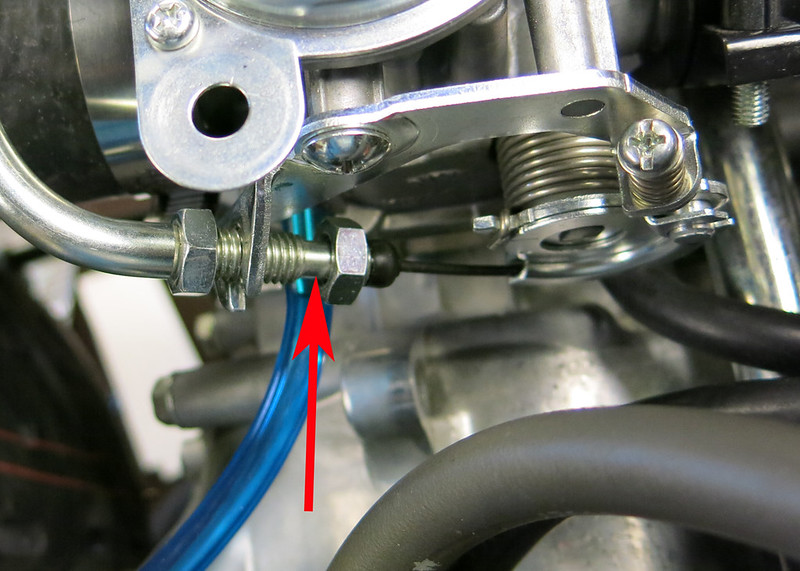
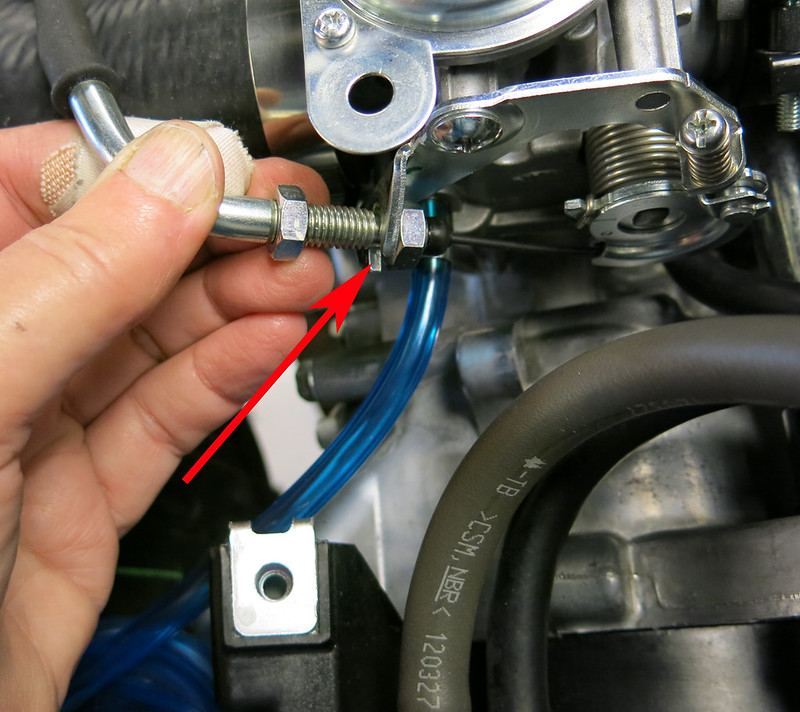
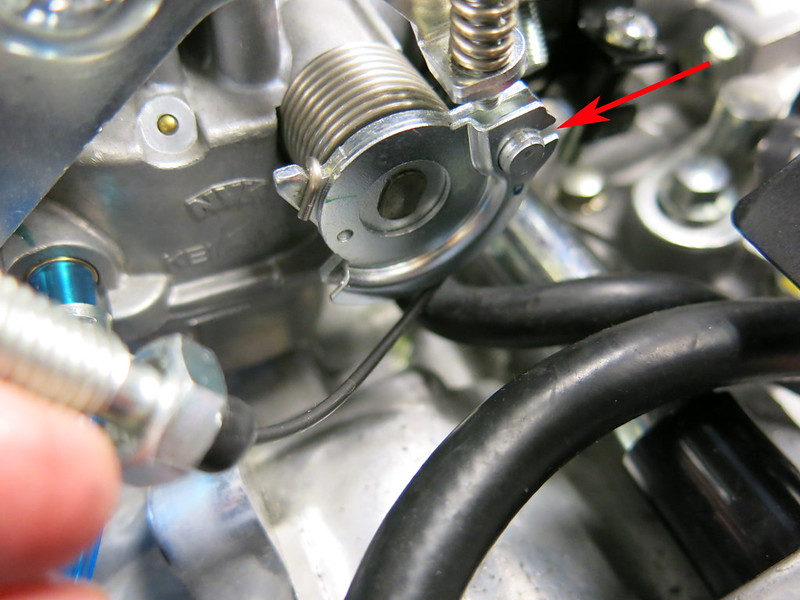
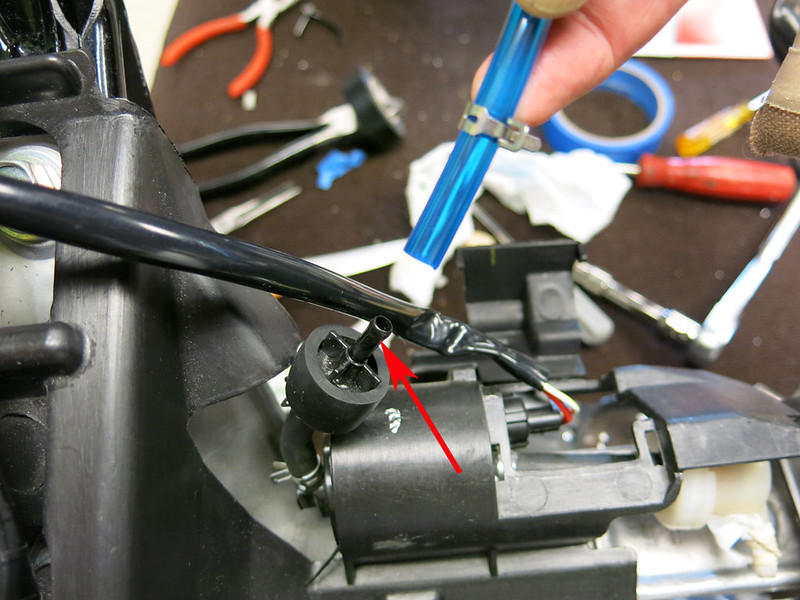
Now we need to remove the other end of the fuel line from the fuel check valve.
Save the hose clamps. You’ll need them later for your new fuel line.
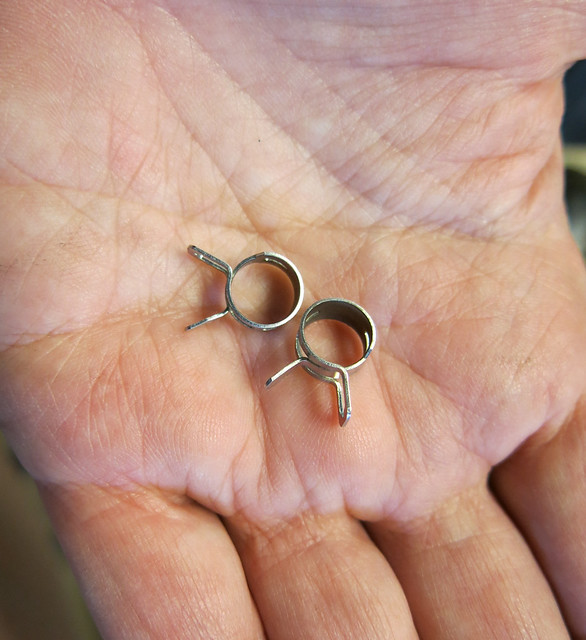
Toss the stock fuel line. You won’t need it anymore.
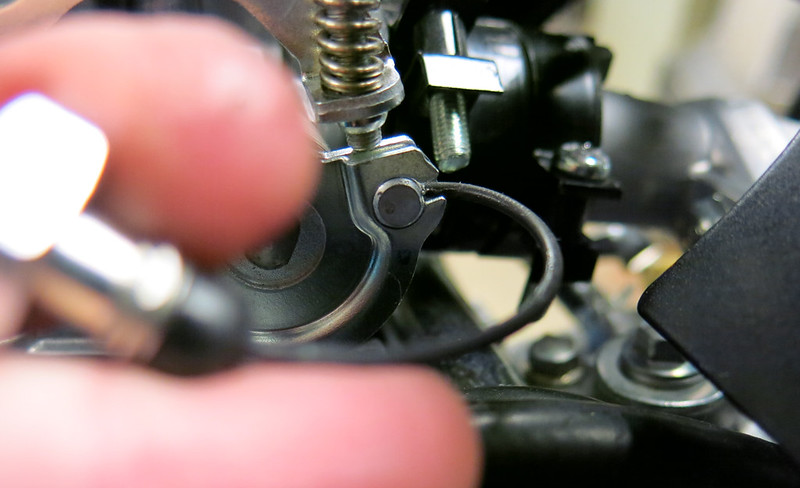
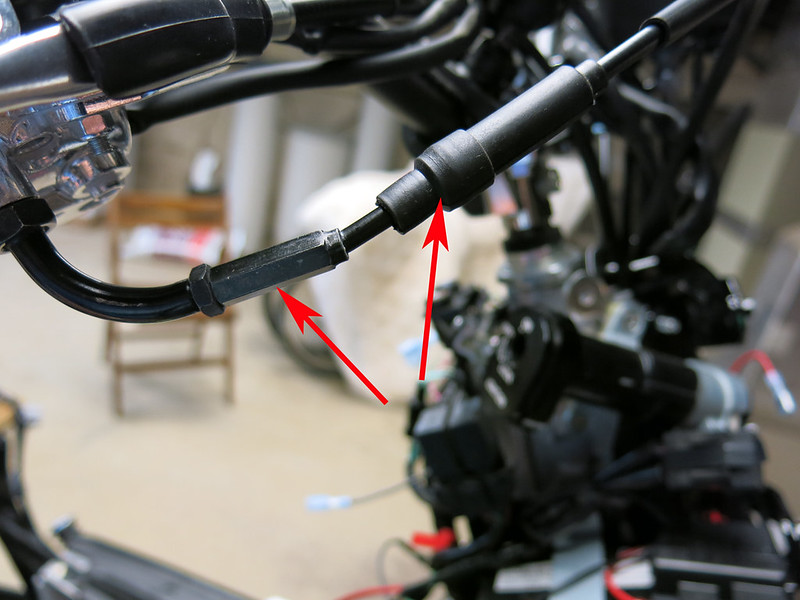
Now that we have gotten fuel line out of the way, it’s time to remove the air suction hose that also goes through the bracket. The air suction hose goes to the PCV solenoid. Just unplug it at the engine, pull it through the bracket on the Ruckus (you will reattach it to the engine after you move the engine back).
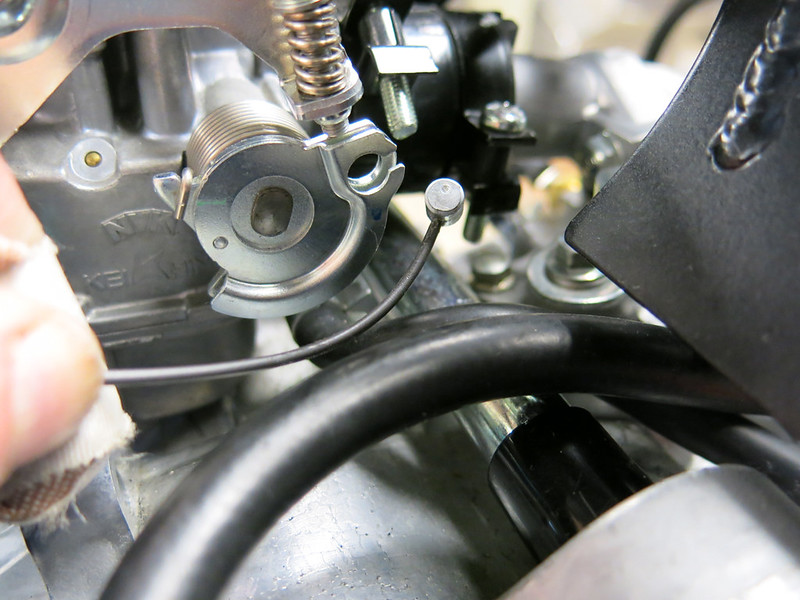
The bracket on the front cross bar is now free of hoses.
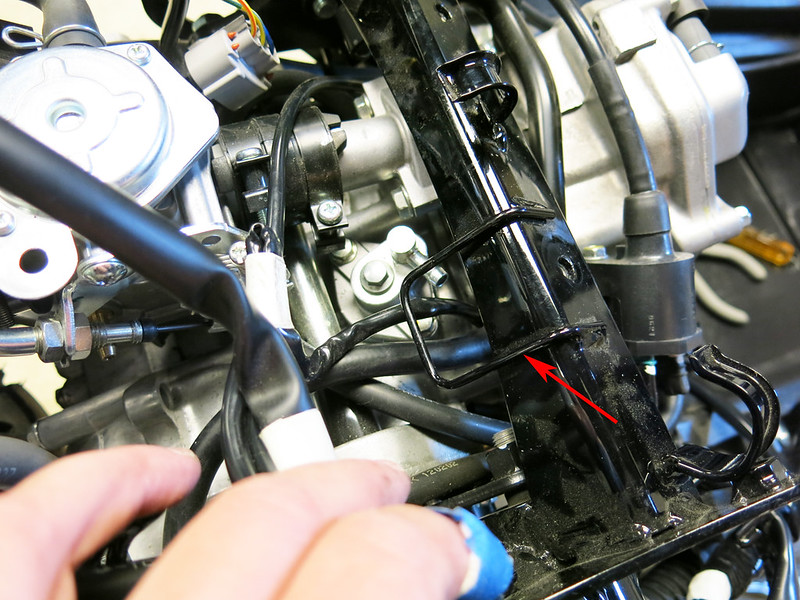
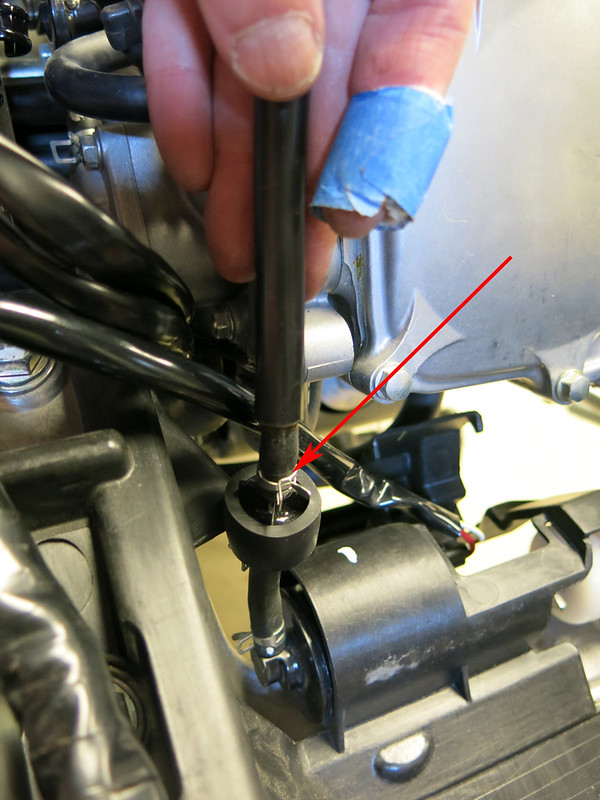
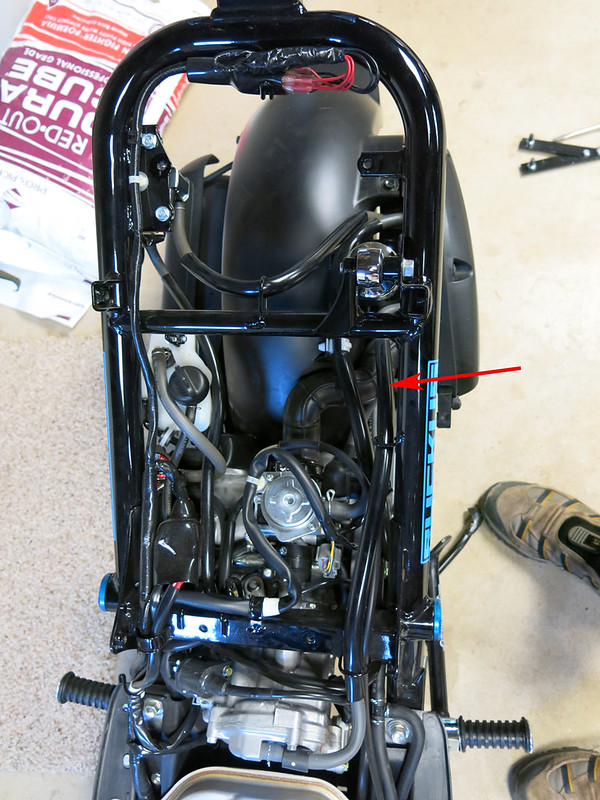
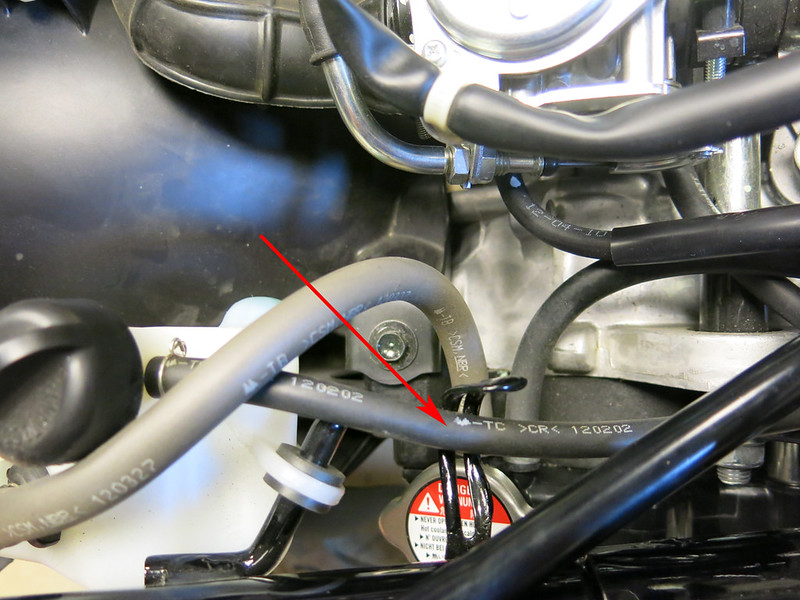
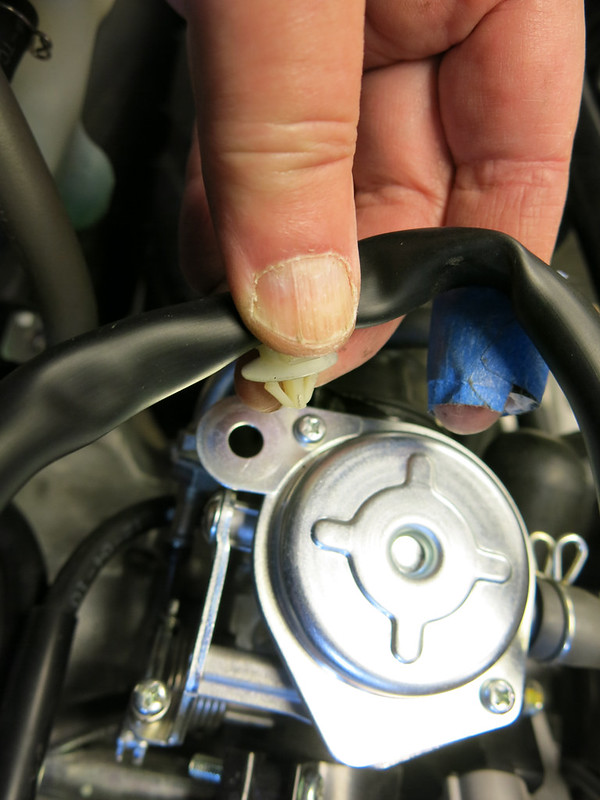
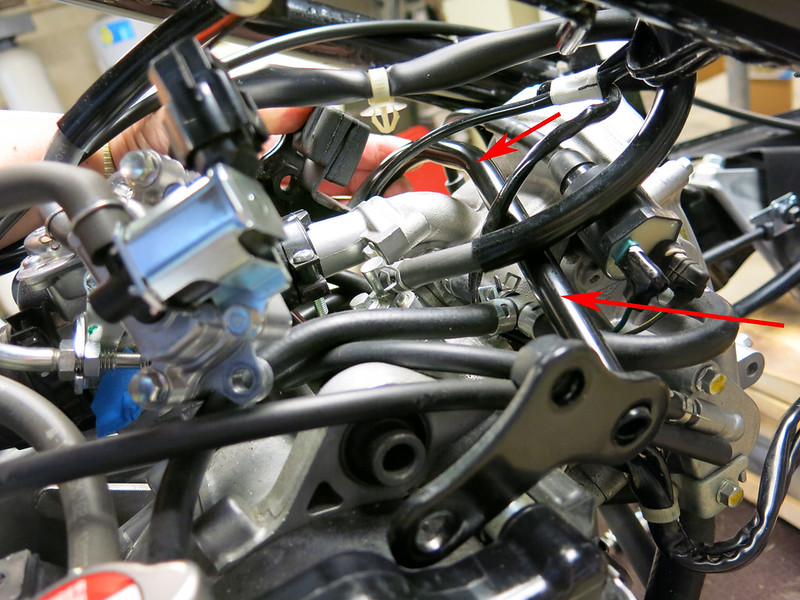
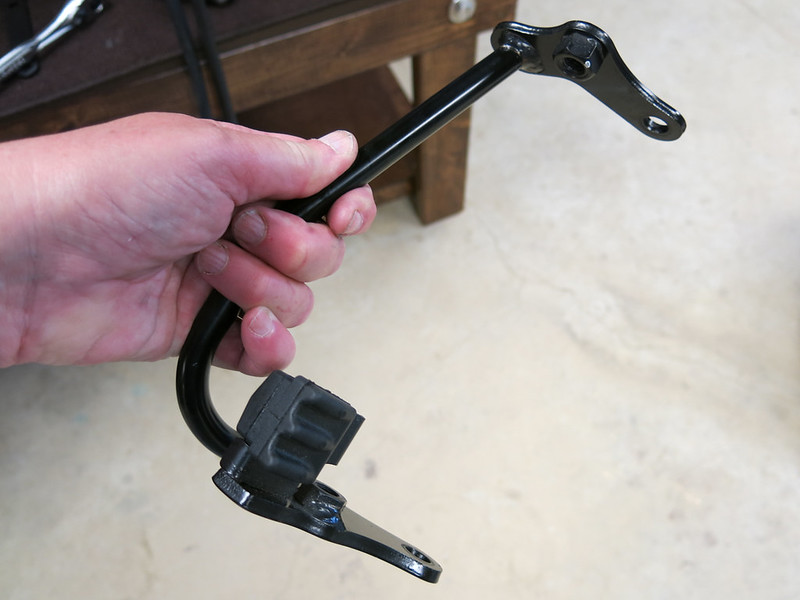
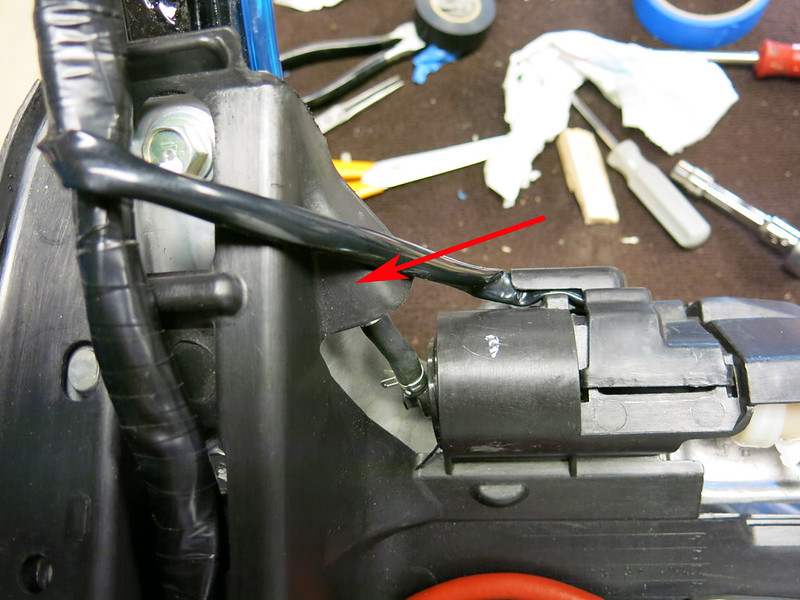
Now we need to free up a rear bracket on the Ruckus because our new MOJO engine mount will need to go there. This hose needs to be taken off the PCV solenoid because it goes through the bracket on the Ruckus frame.
So I took it off the PCV and then reattached it.
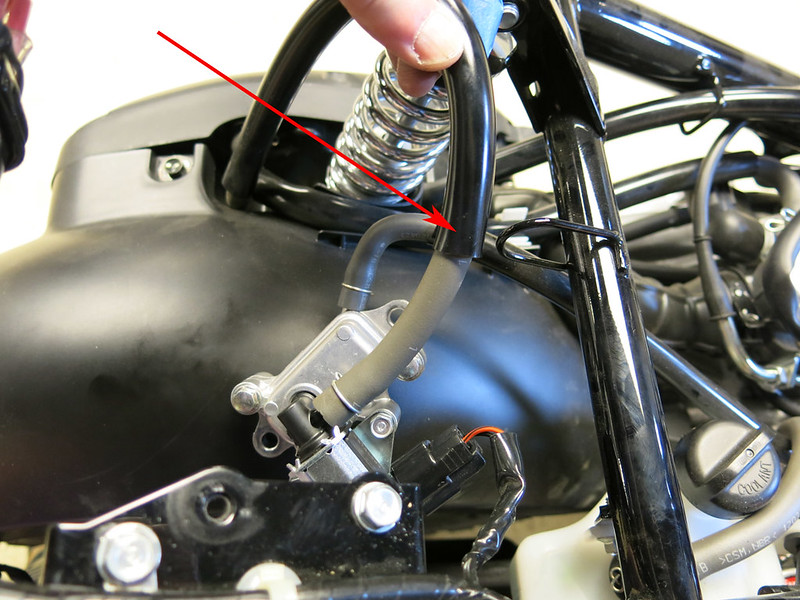
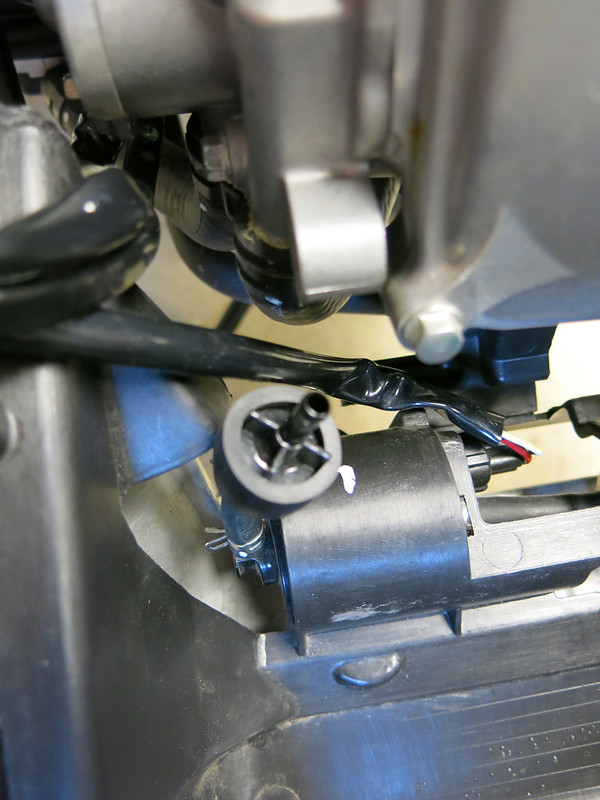
The rear frame bracket now is free.
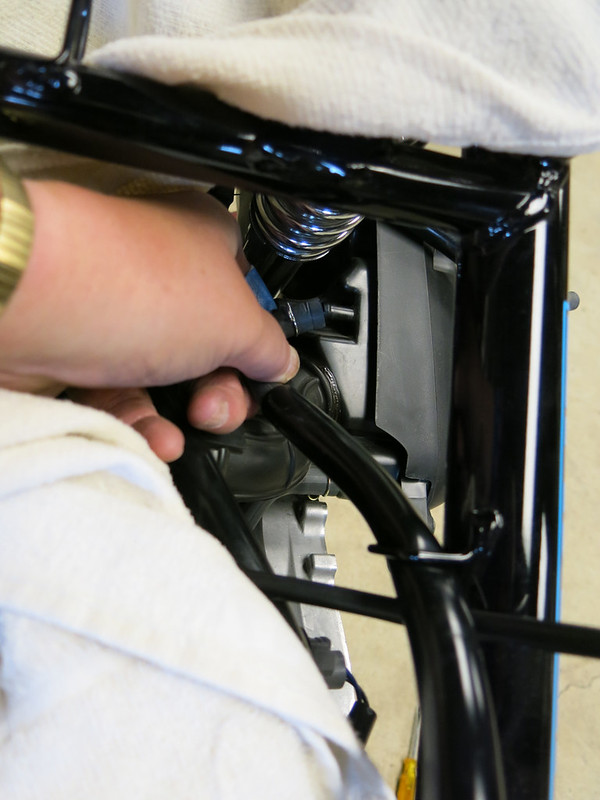
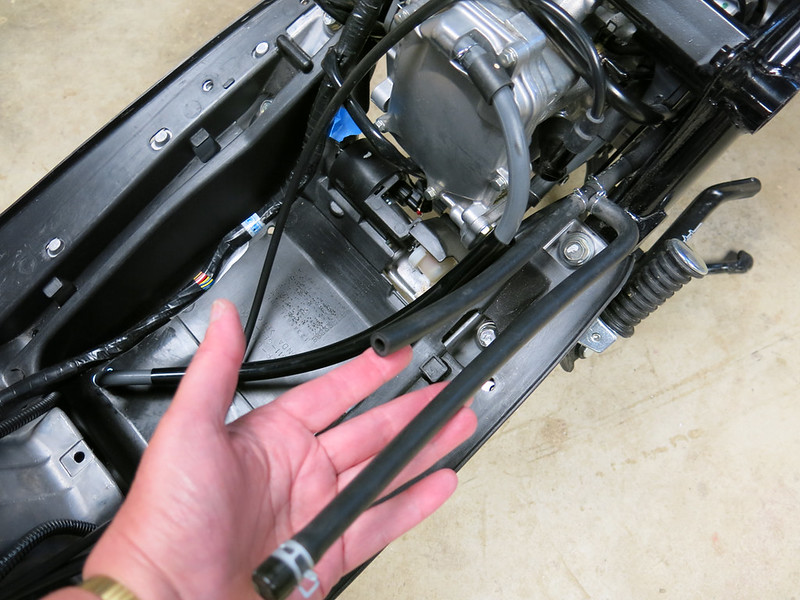
Take this air supply hose off the air box and slide it back through the bracket on the scoot. (Label it and the port on the air box if your memory is like mine and you might forget where to attach it again.)
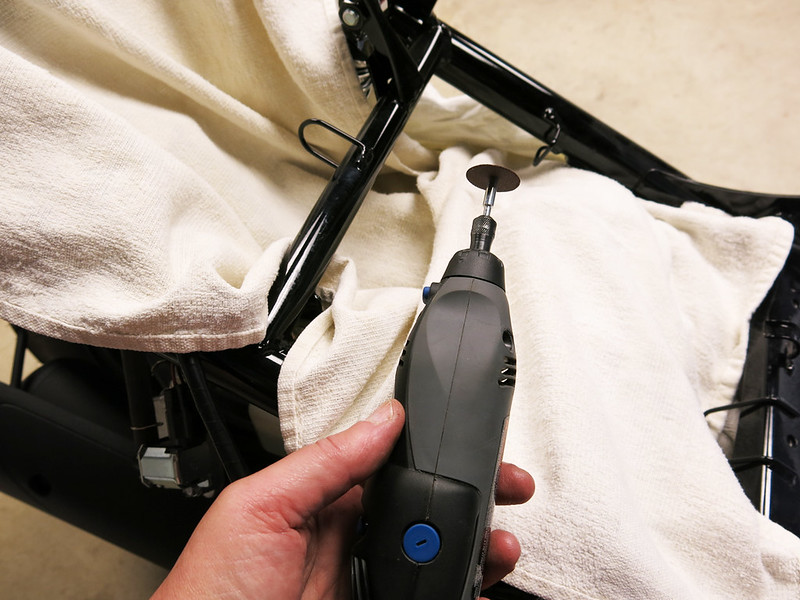
Time for some Dremel work. Get out your safety glasses.
(Tip: You can wait to cut the brackets off with the dremel until after you unbolt the engine later on. It makes it easier to get at the brackets.)
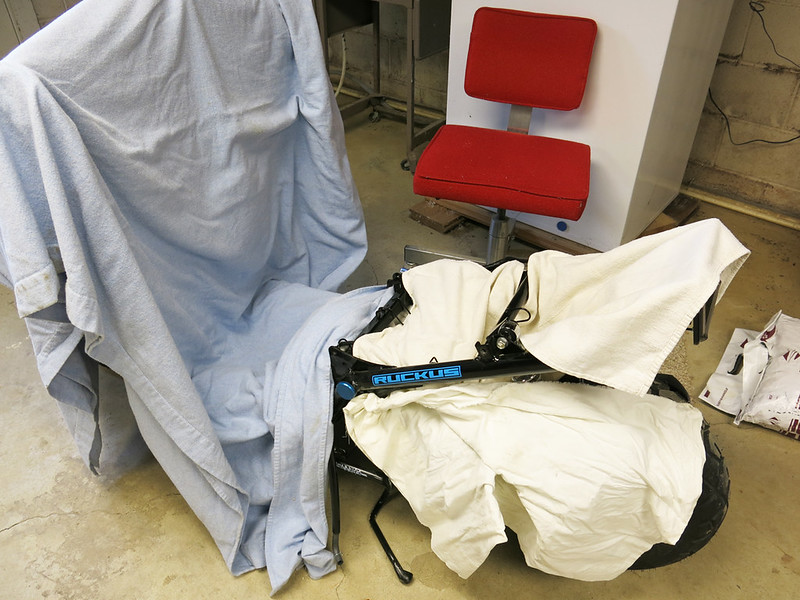
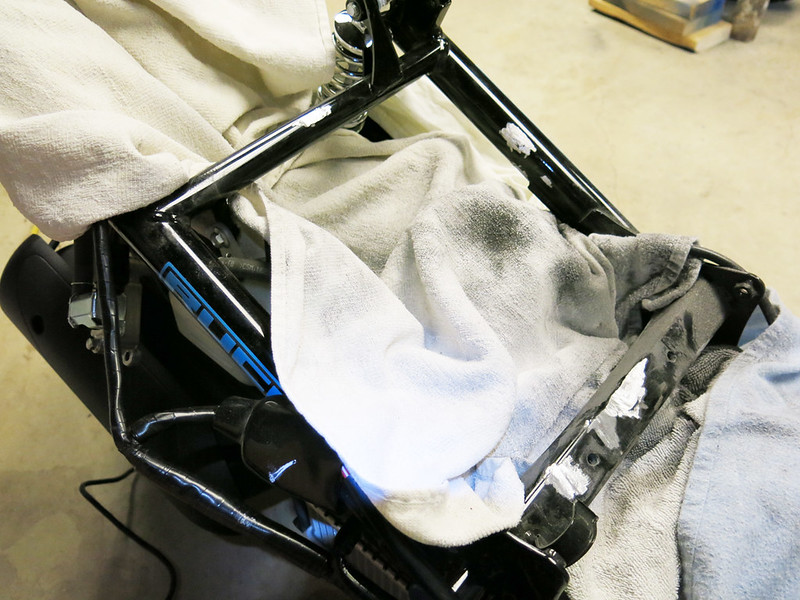
The patient. (I covered things up with towels to avoid getting metal shavings into the engine, etc.)
The scalpel.
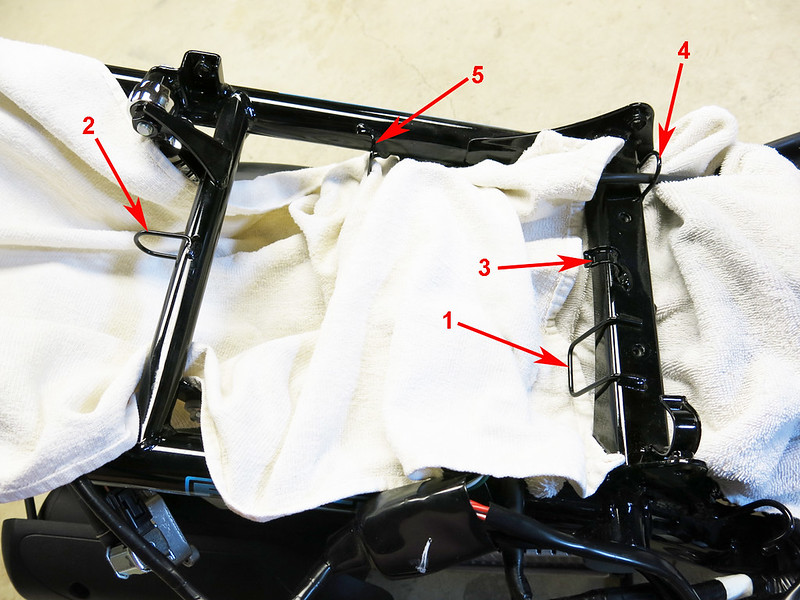
You need to remove brackets 1, 2, and 3 for the MOJO kit to fit. I also removed bracket 4 (be careful not to cut your throttle cable if you cut this one… or move your throttle cable before you start cutting … I’ll show you how to do that later). I also removed bracket 5, but you may want to keep that bracket if you want to reroute the air hose back though it later.
After the Dremel surgery… it ain’t purdy, but it will be hidden by the luggage board.
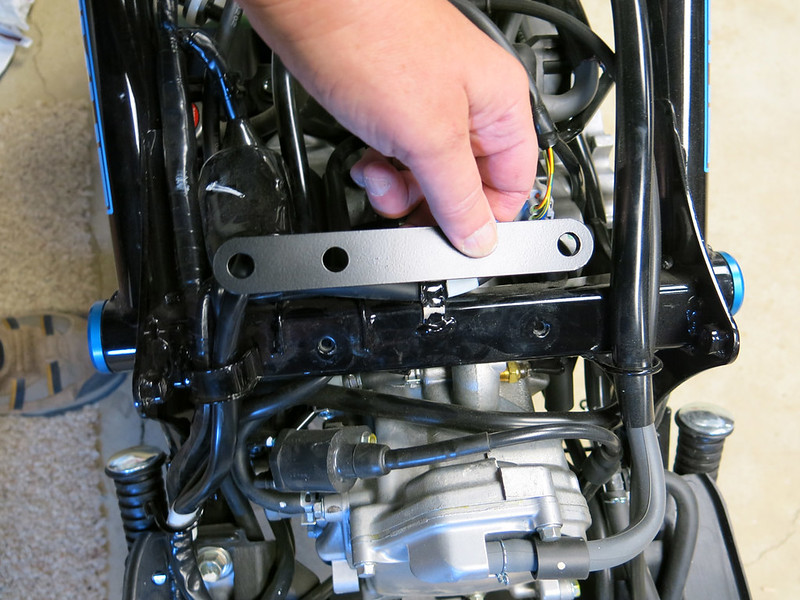
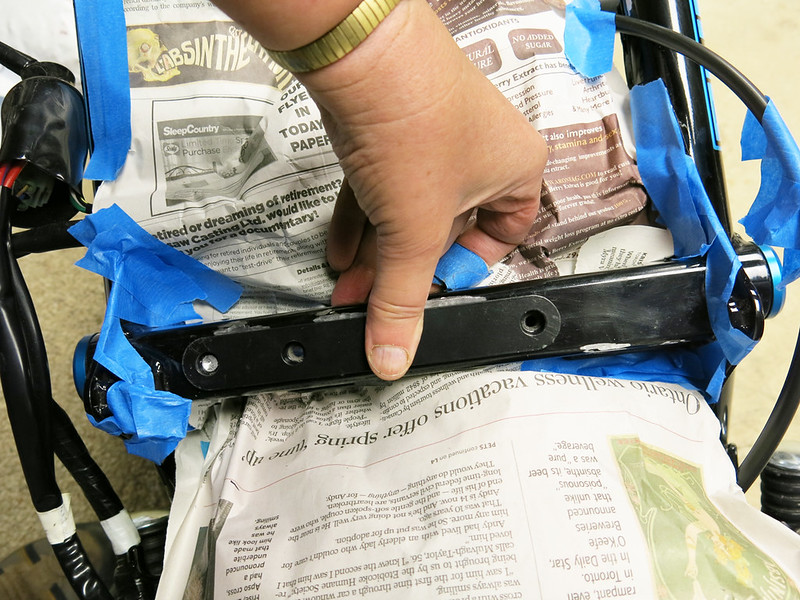
Then put the MOJO bracket in place. Two of the holes will line up with the stock holes in the cross member. The other hole (far left in the picture) will need to be marked and drilled.
Drill all three holes to 7/16".
Note: The two holes that existed have nuts welded to the back of them for the stock floorboard bolts. I took a floorboard screw and put it the hole and part way into each nut and gave it a couple of good hits with a hammer to see if they would break loose. One did and one did not. I had to use the dremel later on (when I moved the engine back so I could get at it) to finish cleaning up the holes.
Here are the 3 holes drilled and I hit it with a little bit of primer and paint to avoid rust.
Note: If I wasn’t running a luggage board, I would have taken more time to make this look better. But, the dremel marks will be hidden on my scoot.
Part 3. Free the frame of wires and hoses
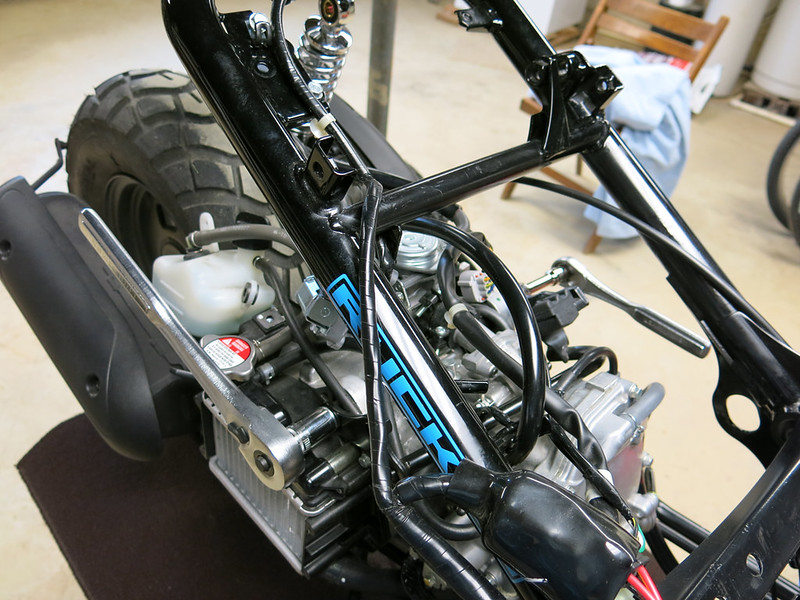
Now we need to free up a few last hoses and a few wires before we can unbolt the engine and move it back.
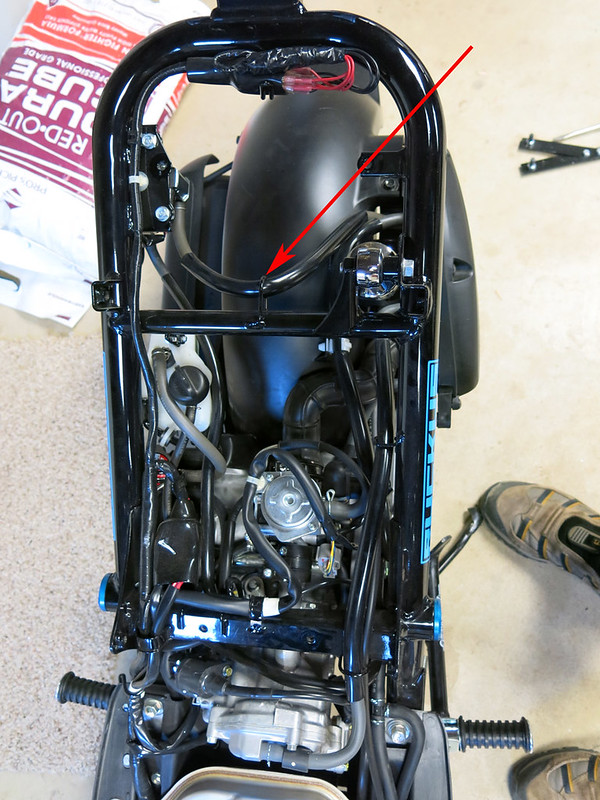
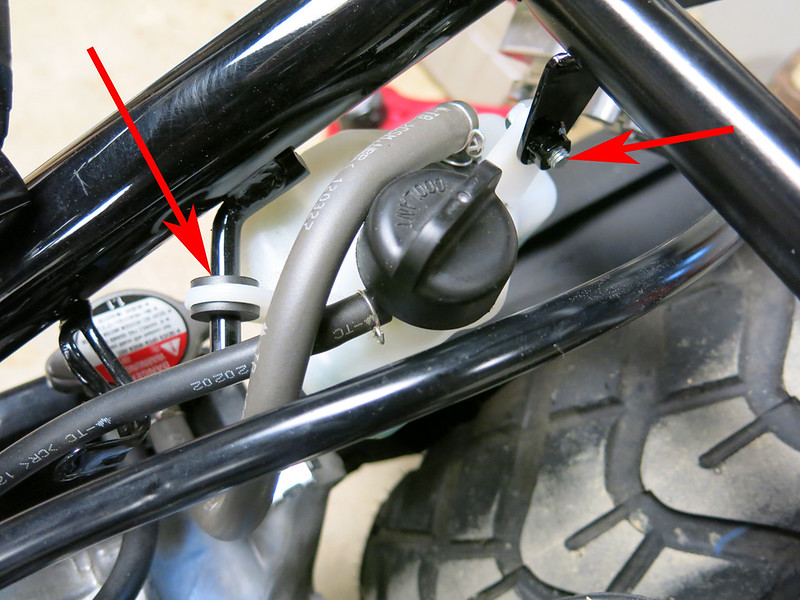
Take the coolant tank off the frame by removing the bolt and then slide the grommet off the bracket. I let the bottle kind of hang there.
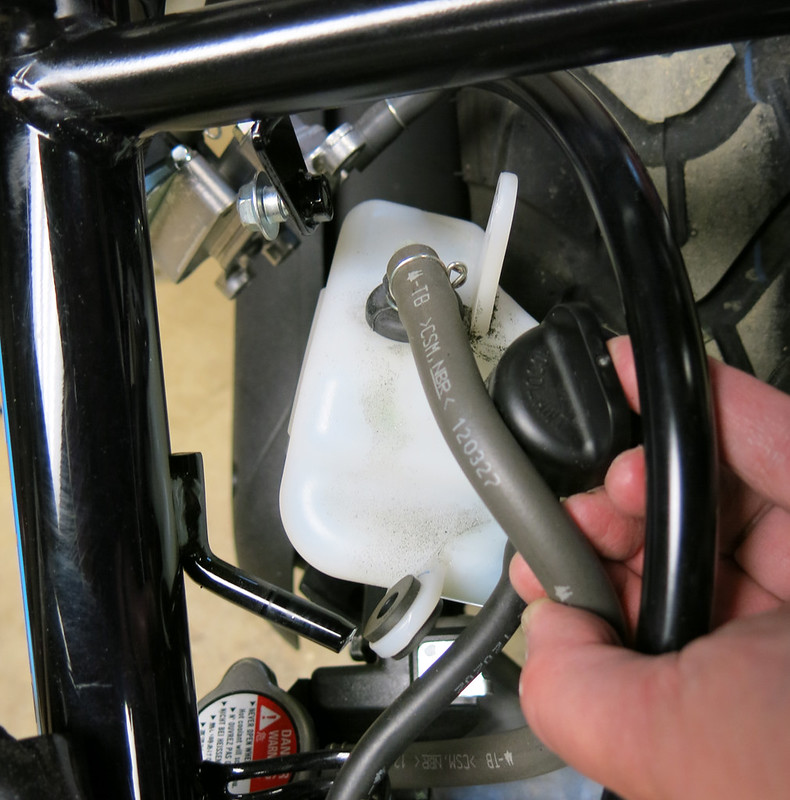
The overflow hose from the coolant tank can be unclipped from its retaining bracket. It isn’t attached to anything. It just goes to the front of the engine where it can drip on the ground if there is too much coolant in the overflow tank.
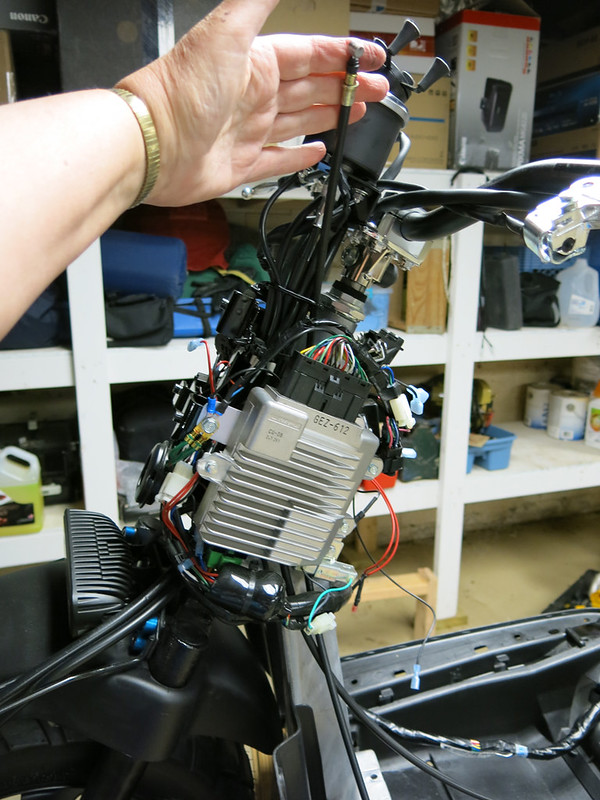
Now to free up the main wire harness…
Pull back this sleeve covering several connectors.
There are 3 bullet connectors and 2 plugs. Unplug them. They are all color coded so you won’t mix them up. (Thank you, Honda!)
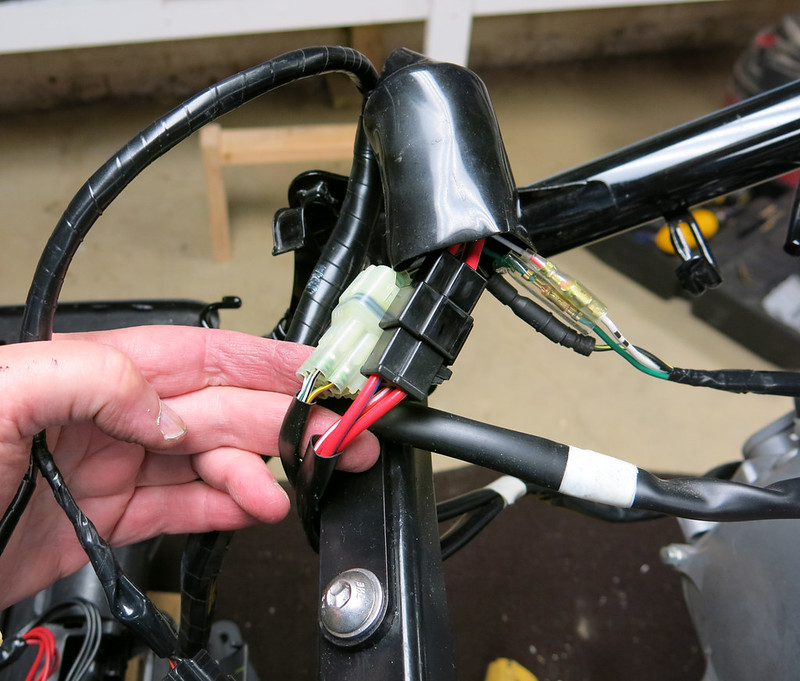
I find needles nose pliers work great on the bullet connectors.
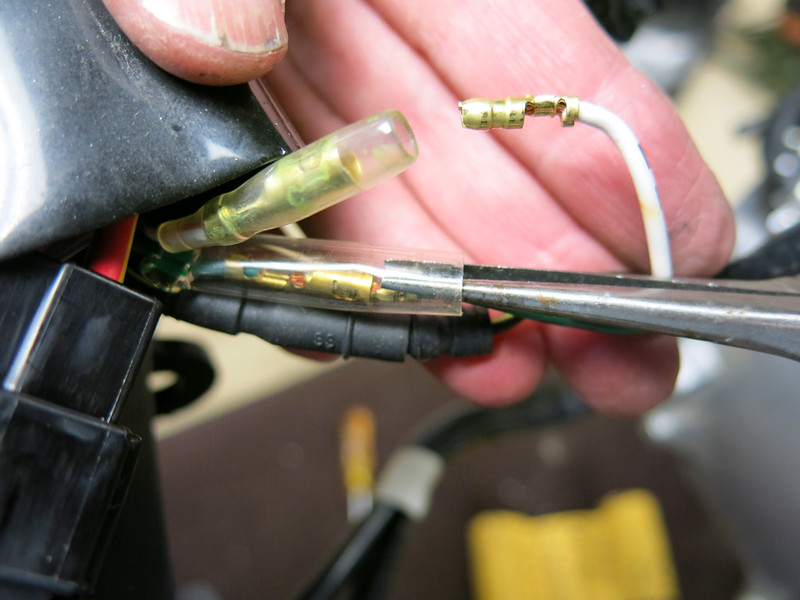
The black connector came undone easily by pressing the tab.
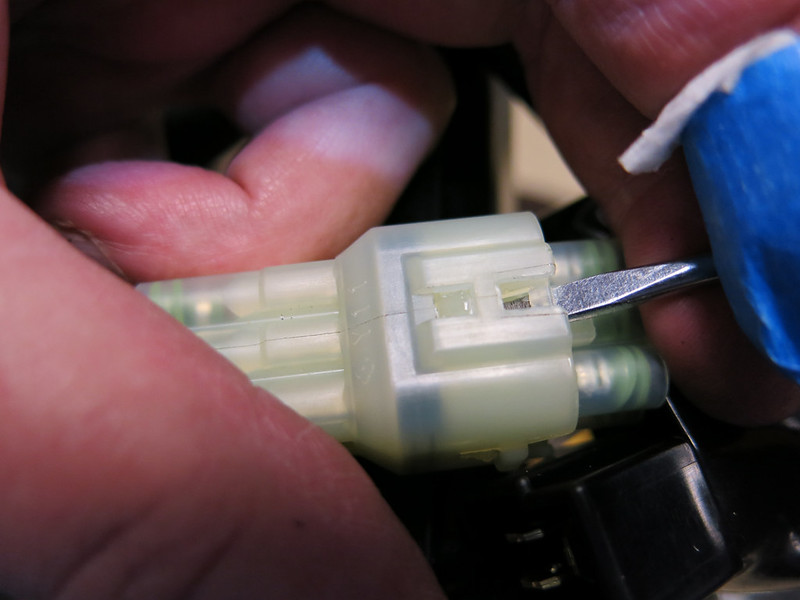
The white one was a pita until found the trick. Use a small flat-head screwdriver and slide in under the tab as shown here, then the plug will come apart for you.
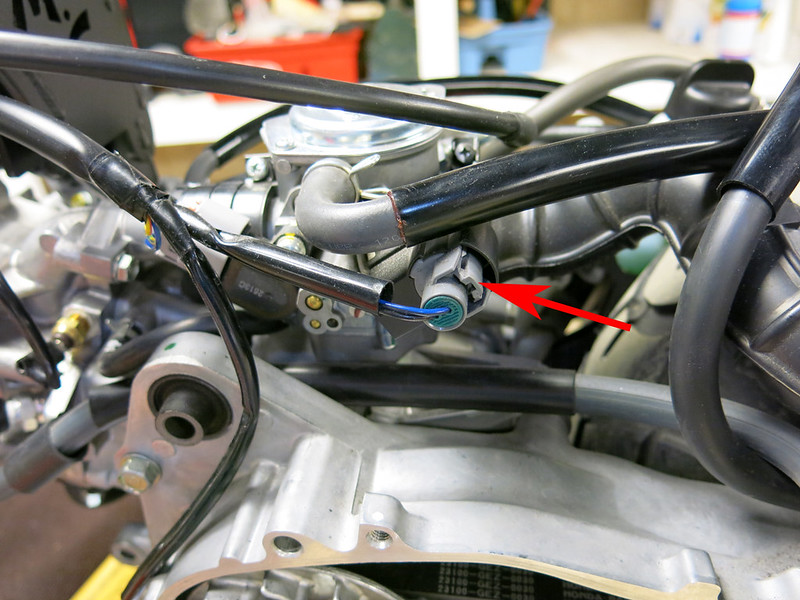
Unplug the 2P connector for the SE (starting enrichment) valve on the left side of the carburetor.
Unplug the 3P connector for the throttle position sensor on the front of the carburetor.
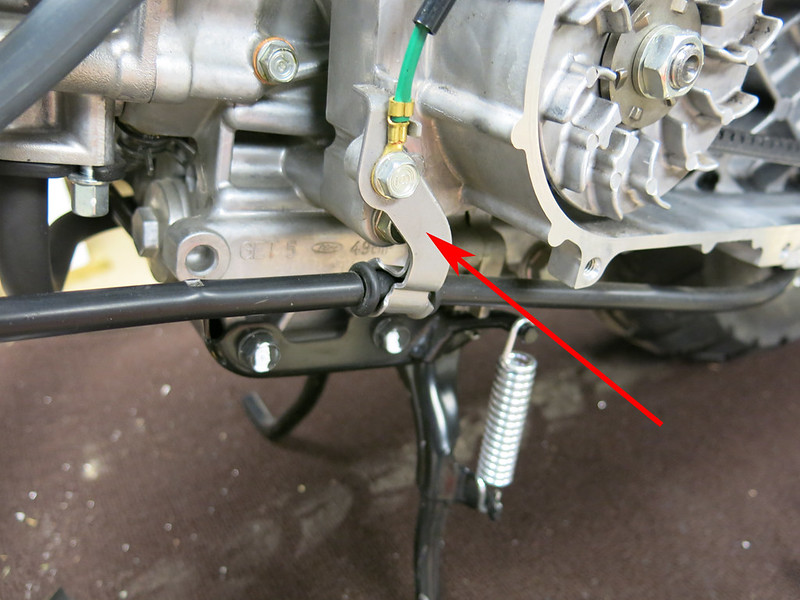
Disconnect the ground cable. You will have to do this anyway because it holds one of the rear brake line brackets.

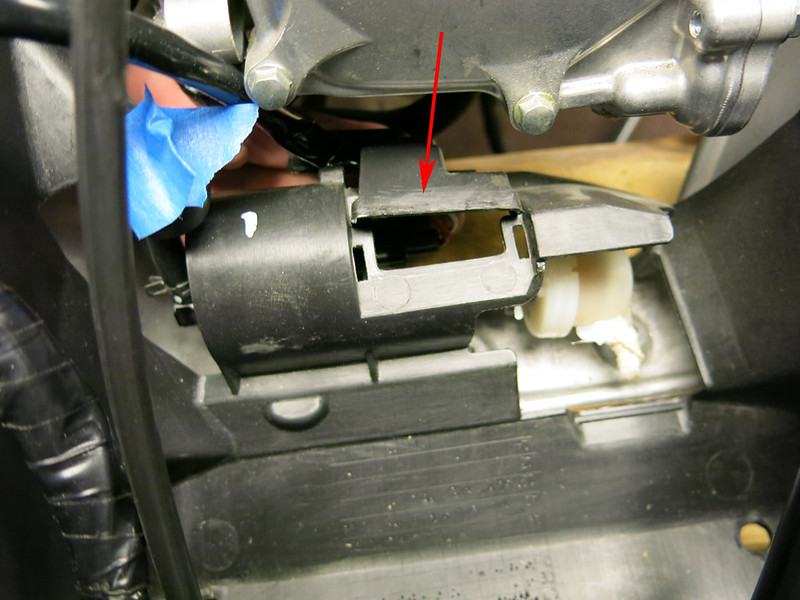
Take out the plastic clip that holds the taillight harness to the frame and release it from the black retainer (just above the PCV solenoid). (You don’t have to remove the taillight assembly).


Remove this clamp from the top of the carburetor.
Disconnect the 2P fuel pump electrical connector. Open the little door and then unplug it.
Remove the throttle cable and main wire harness from the channels on the sides of the gas tank. You will need to unbolt the clamp holding the brake cable.
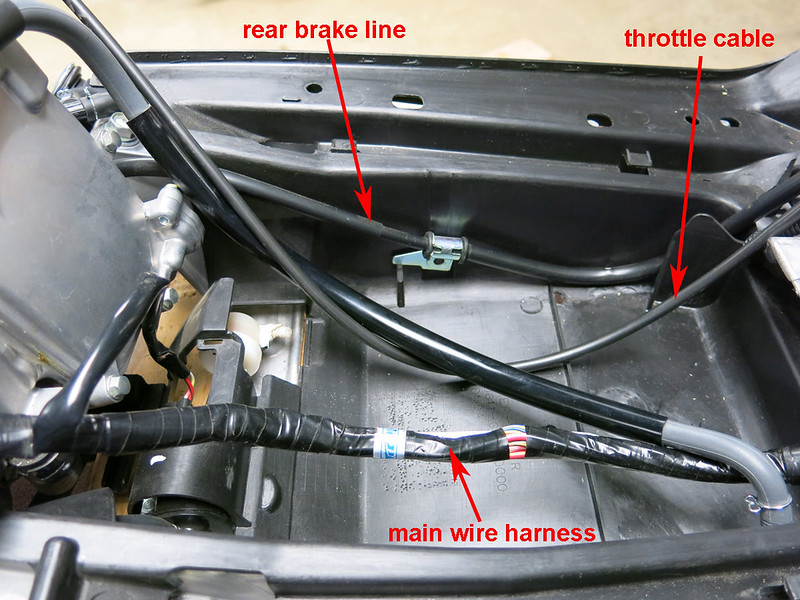
The brake clamp unbolts from the outside.
As you can see in the previous picture, the air supply hose is tucked beneath the lower plastic panel next to the frame. Slide the hose out.
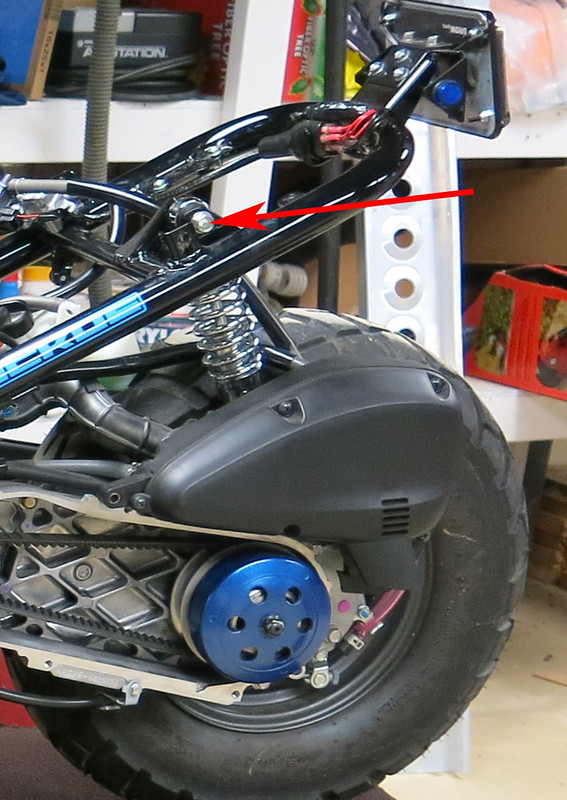
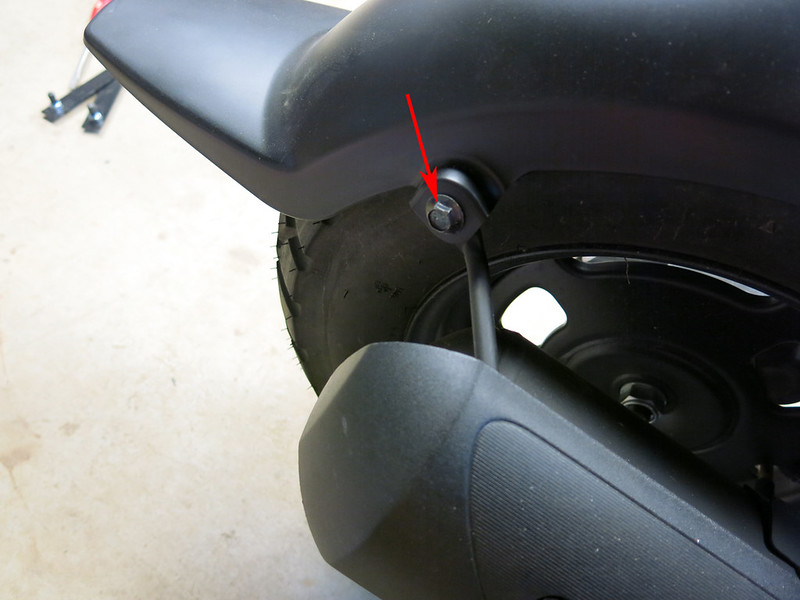
Remove the shock from the stock mount on the frame by removing the nut and bolt.
The wire harness should now be free to allow the engine to be moved back in the next step.
Part 4. Unmounting the engine
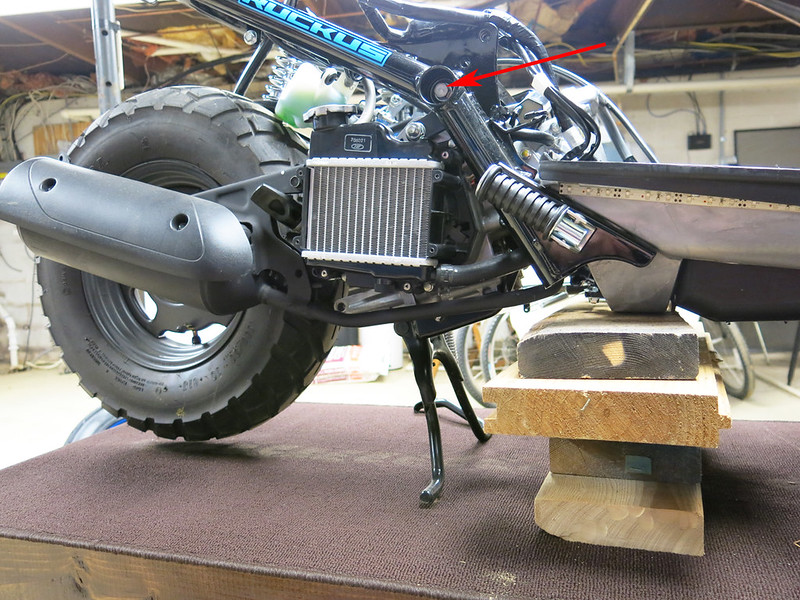
The engine and rear wheel are held up by the center stand. So, we need to put blocks under the frame to hold up the front end when we detach the rear end.
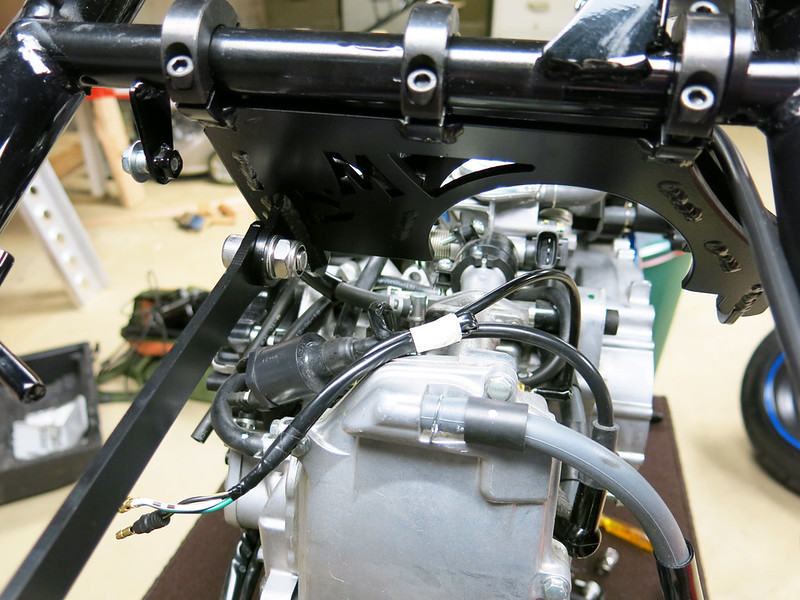
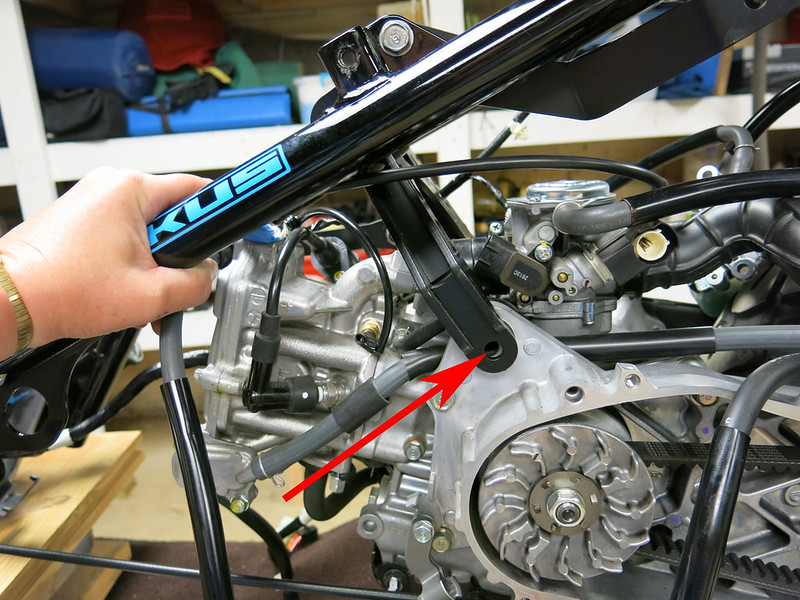
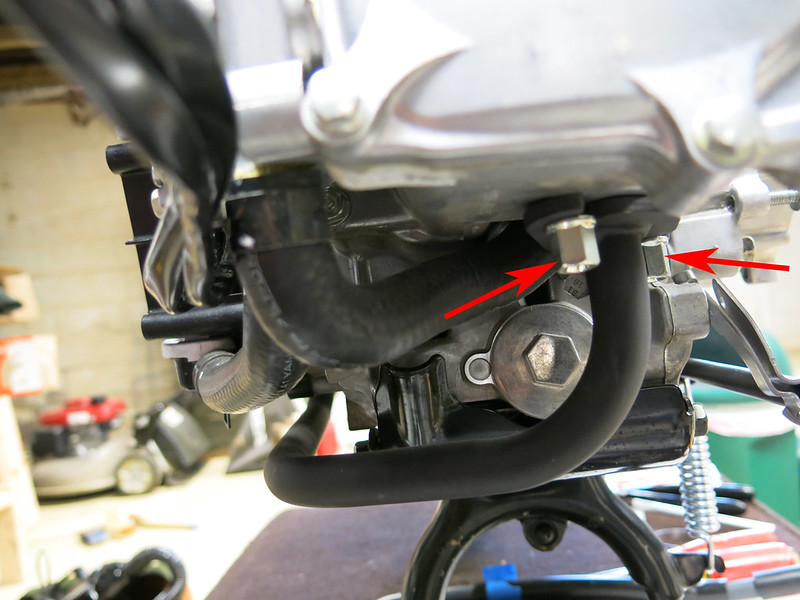
Now comes the moment we have been waiting for. Unbolt the engine! Get out a 14mm and 17mm and unbolt the engine mount. Start on the right side and unscrew the bolt shown in the picture.
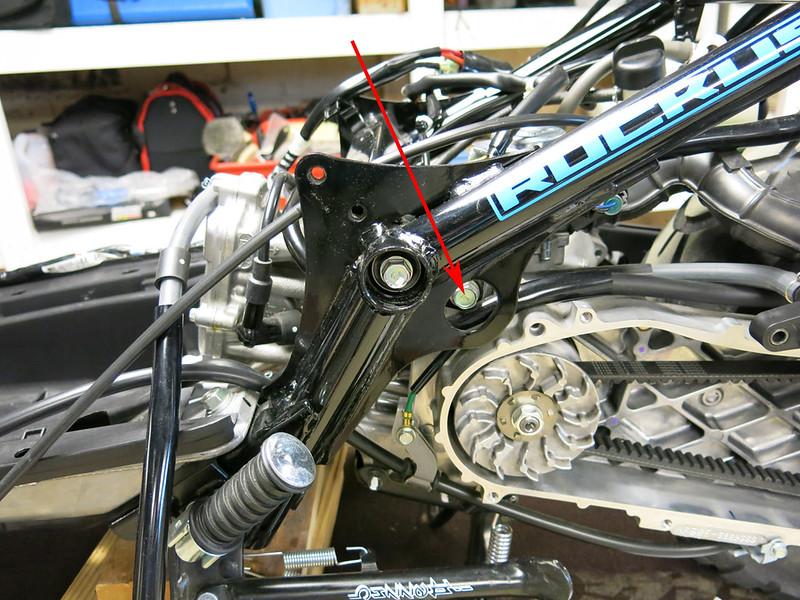
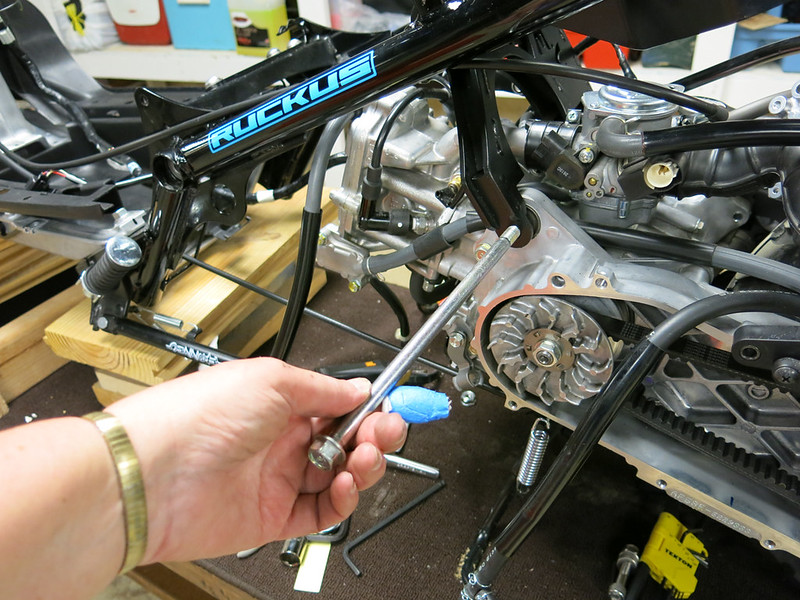
Go the left side and undo the bolt in the other side. The engine is free from the frame now.

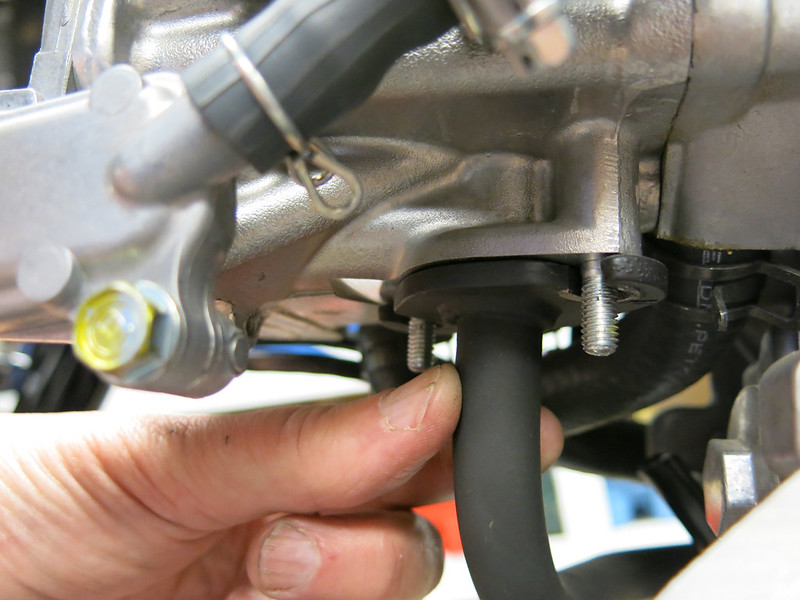
Now we need to take the stock engine mount off the engine. It is held on by a VERY long bolt that goes all the way through the engine shown in this picture.
Carefully slide the engine and wheel back. Now you can get at the bolt better from both sides. The nut is on the right side and the bolt comes out through the left side of your scooter.
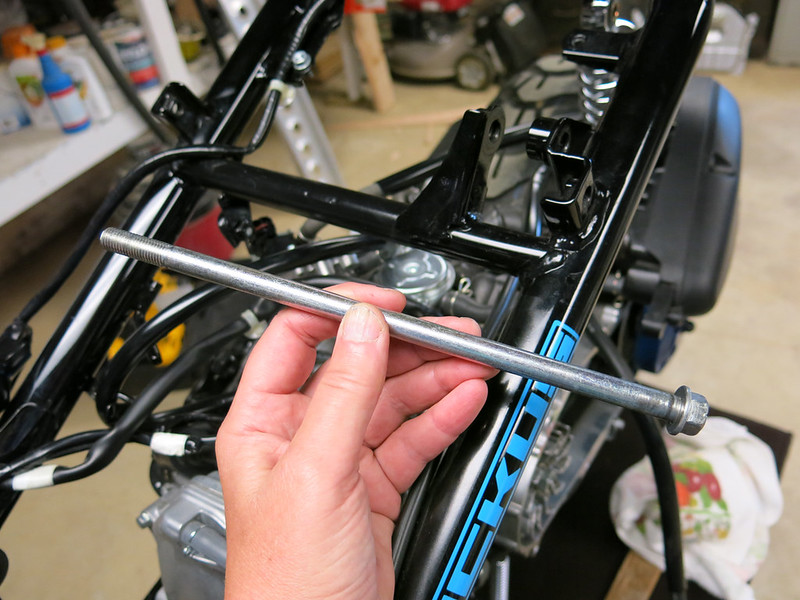
Don’t lose the nut and bolt. You’ll need them.
Now take the engine mount out. You won’t need it anymore. You are getting MOJOed!
Part 5. Installing The MOJO Mount
Now the fun really begins. We get to start putting new stuff on the scoot!
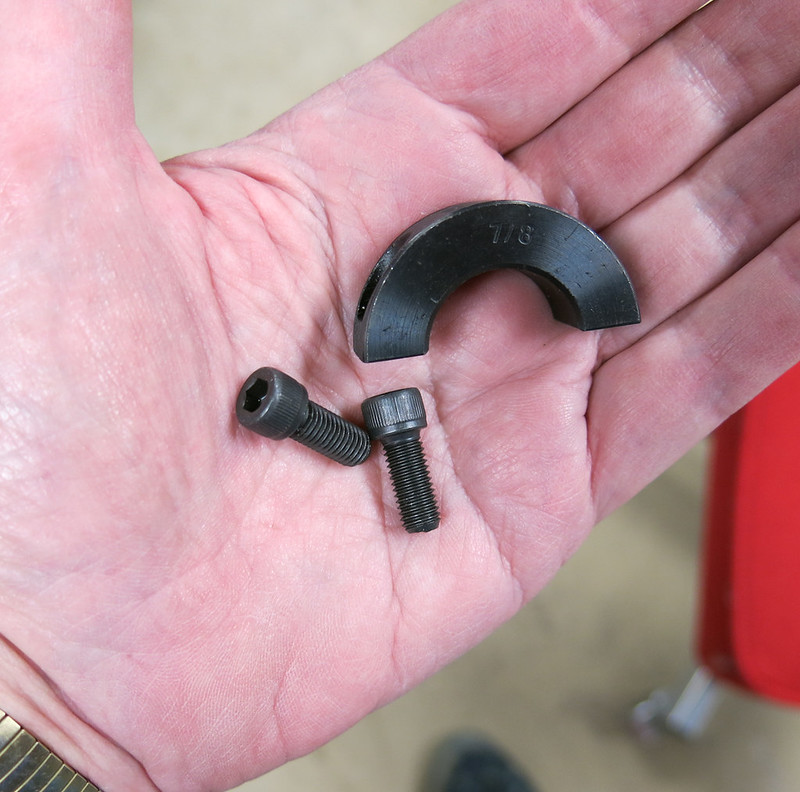
Get out these brackets and bolts from your MOJO kit.
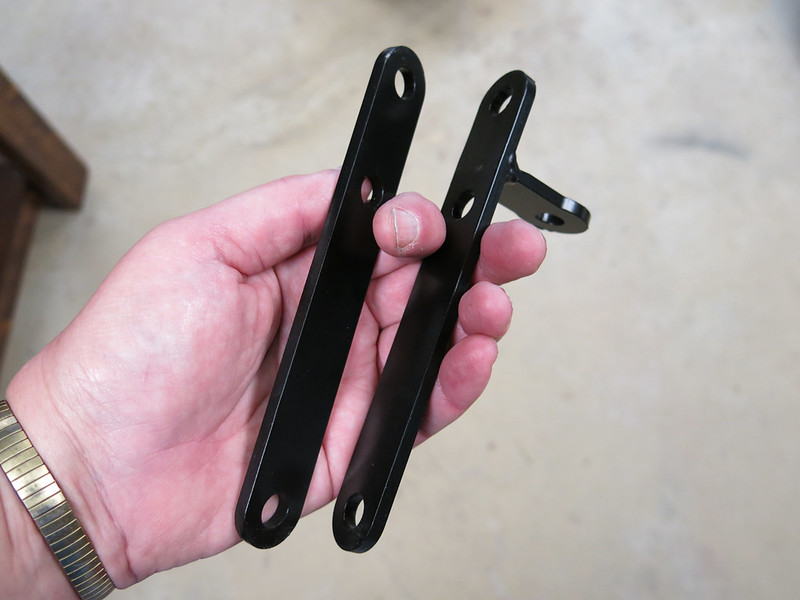
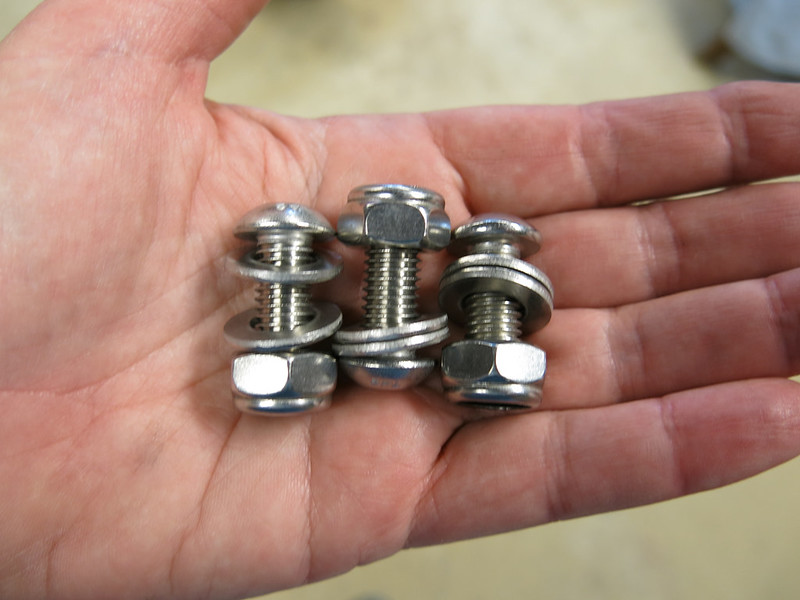
Put the flat bar on top of the cross member, line up the holes and put a bolt with a washer in the holes from the top. then put the “L” bracket on the underside lining up the bolts. Attach it with the 3 washers and nuts using blue Loctite. (Note: use Loctite on all bolts you put on your scoot!)
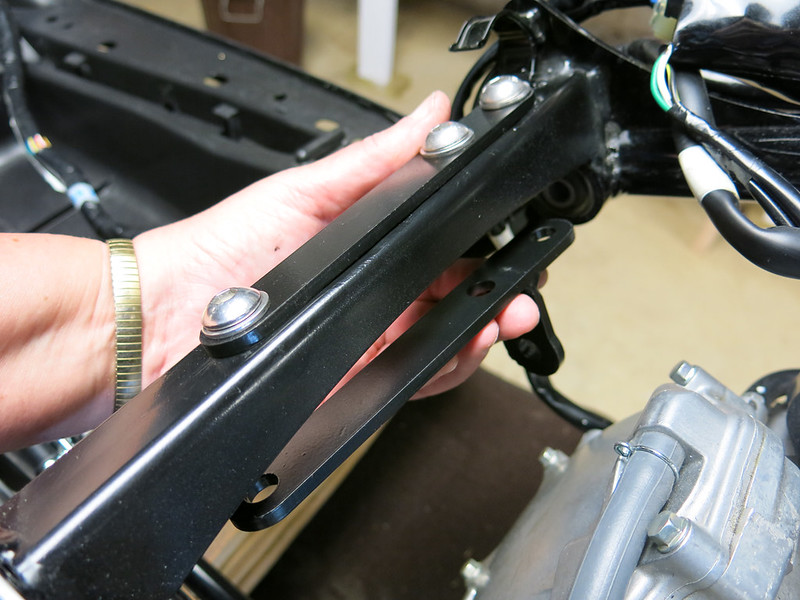
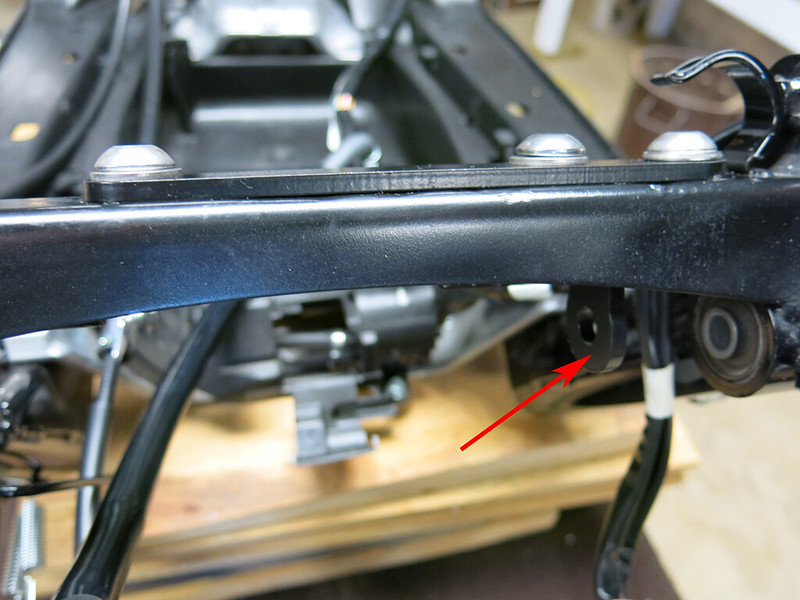
It should look like this with the “L” protruding below the cross member.
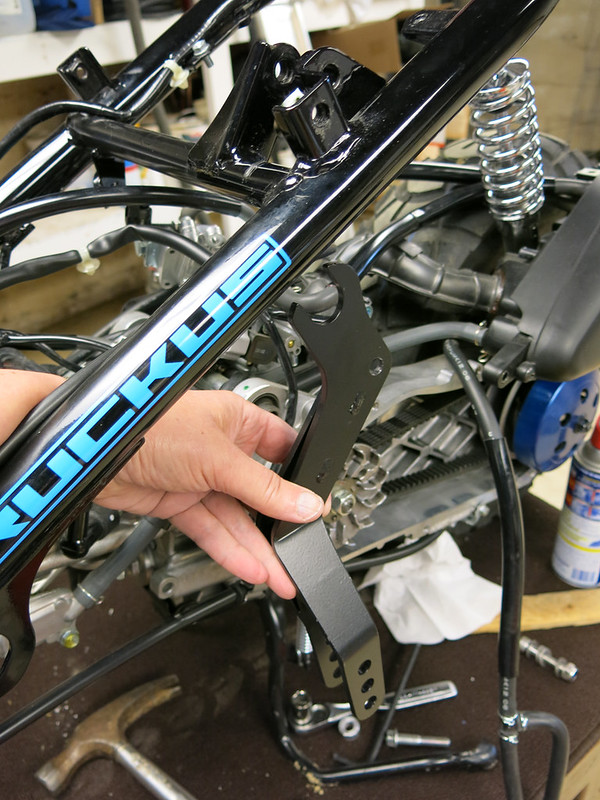
The MOJO shock mount is installed on the frame next to the stock shock-mount location. I found it worked best to start at an angle from below the cross bar to get the “C” end around the bar.

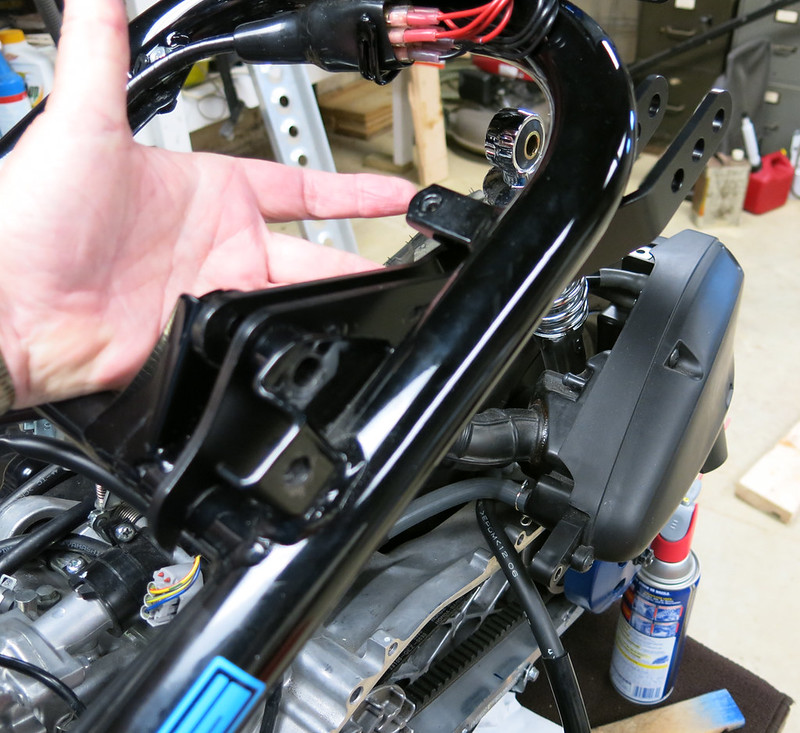
Then rotate the back of the shock mount up into position and insert the stock bolt in and tighten (Loctite!).
Now get out your MOJO Mount. It goes on your scoot in this orientation.
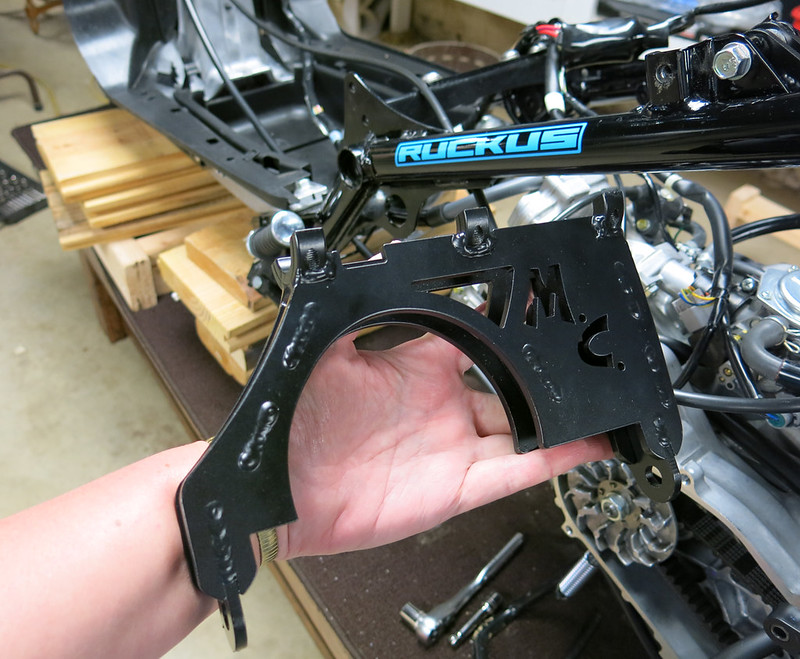
and the clamps and hardware that go on top of the MOJO Mount…
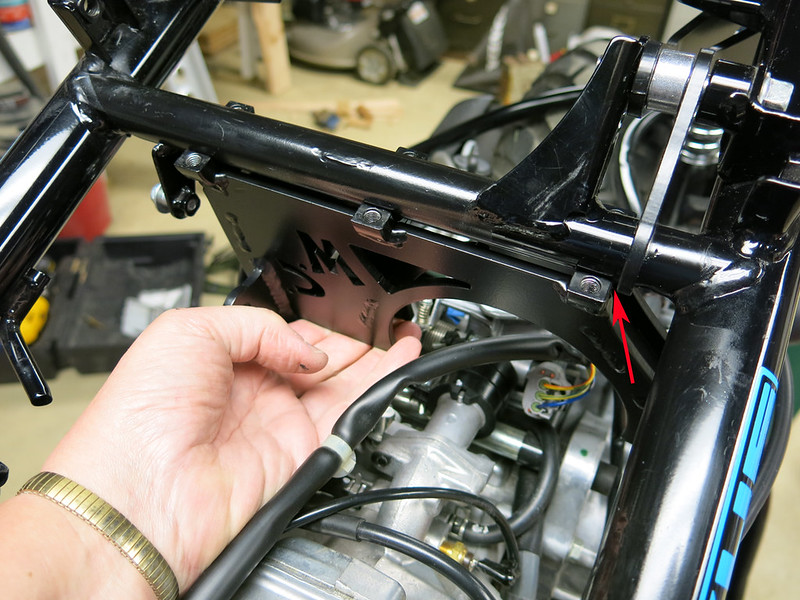
Place the MOJO Mount beneath the center cross member on your scooter. Note in the picture that the MOJO Mount should butt up against the shock bracket. (Between the MOJO shock bracket and the stock shock mount welded to the frame.)
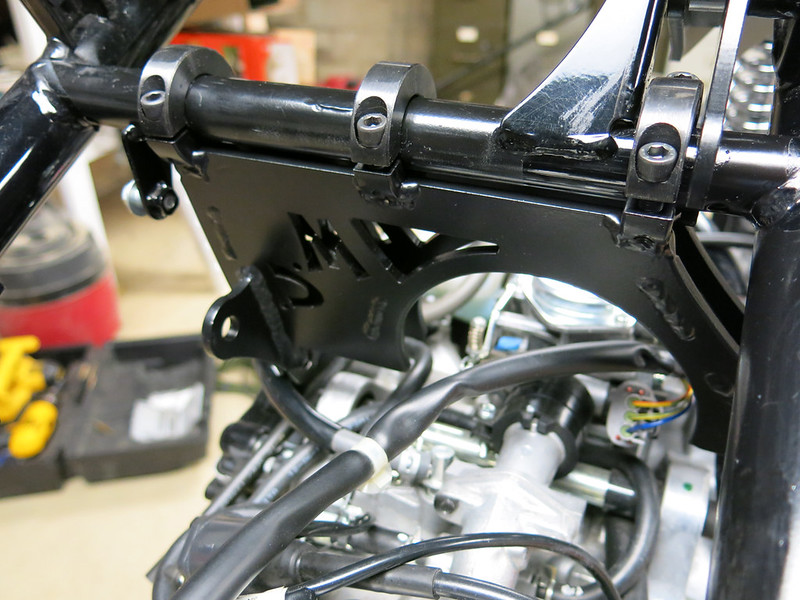
Bolt on all 3 top clamps leaving them a bit loose for adjustment for now.
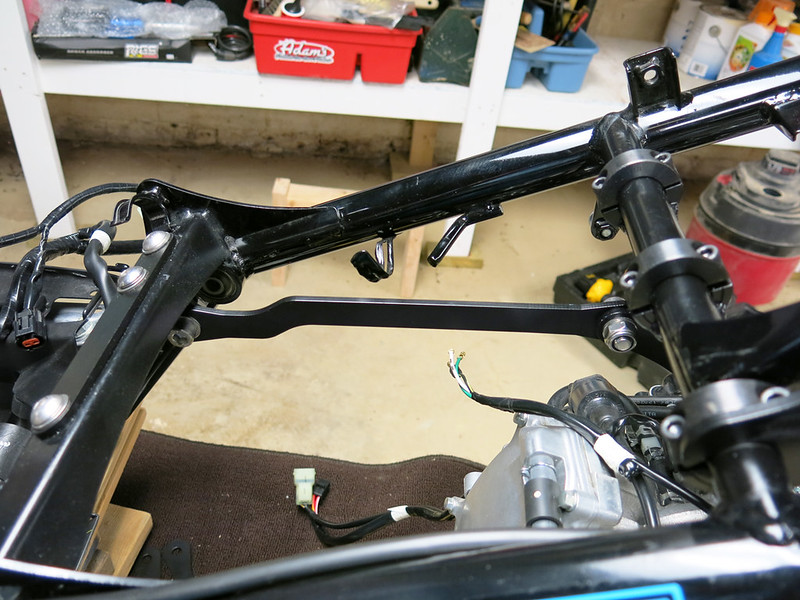
Now you need to pick your stretch. I went with the 12 1/2" stretch because I think it looks awesome. Note the orientation of the bars.
But, with the 12 1/2" stretch be aware that you may have some tight clearances with your brake line, air box, shock, etc. AND you will need longer rear brake and throttle cables. If you go with an 8" or 10" stretch you may be able to use your stock cables and your fitment of your airbox and exhaust might work (but they might not). In any case… in this DIY I am using the 12 1/2" stretch.
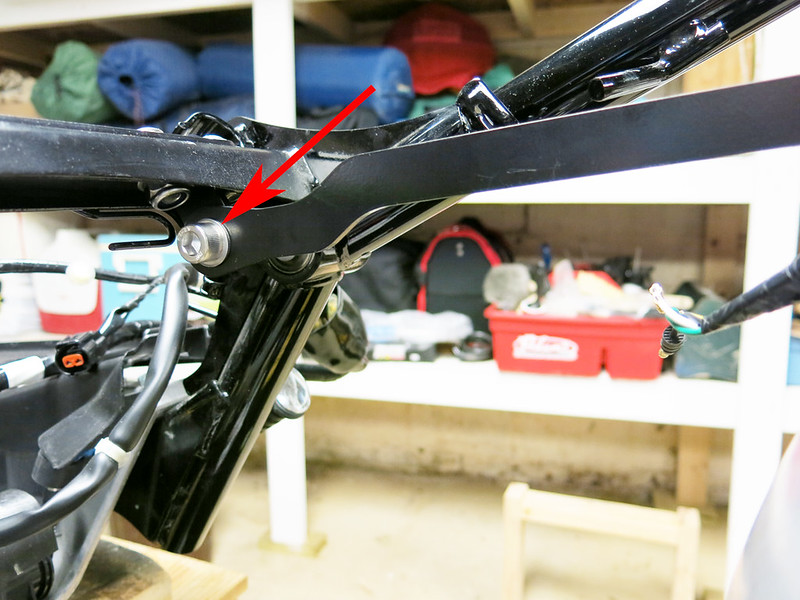
Attach the rear of the stretch bar to the outside of the tab on the MOJO Mount.
Attach the front of the stretch bar to the inside of the tab on the bar you bolted under the cross member.
Now we need to slide the engine forward and line it up with the lower holes on the MOJO Mount.
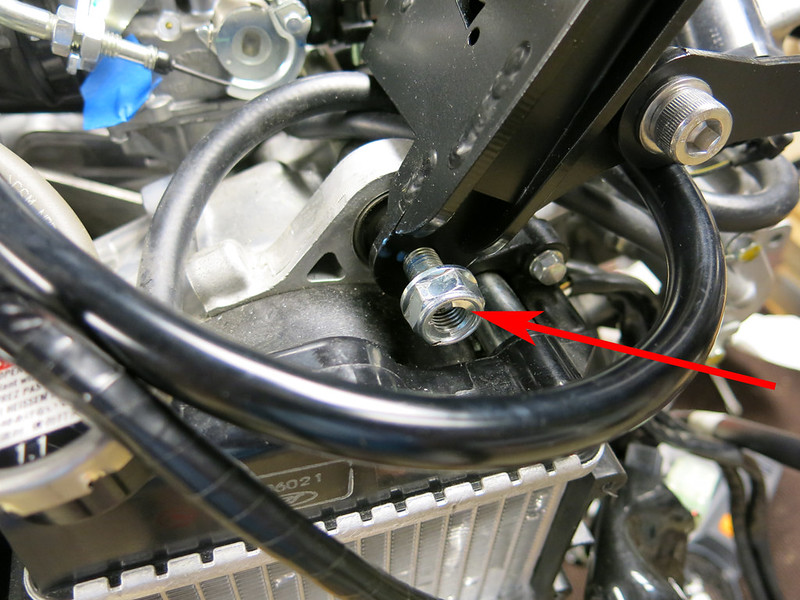
Slide the engine mounting bolt in from the left side of the scooter.
Once you get the long bolt through the engine, then on the right side of the scooter, put the nut on the bolt and tighten. Use Loctite!
Line up the top of the shock with the MOJO shock mount and insert the provided bolt. Loctite and tighten.
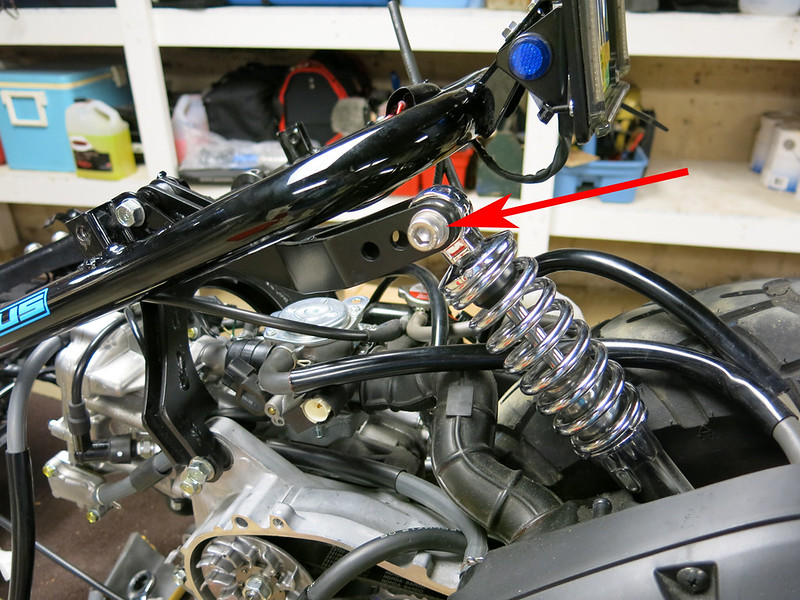
Loctite all bolts!
Now you can Loctite and tighten the clamps on the MOJO engine mount.
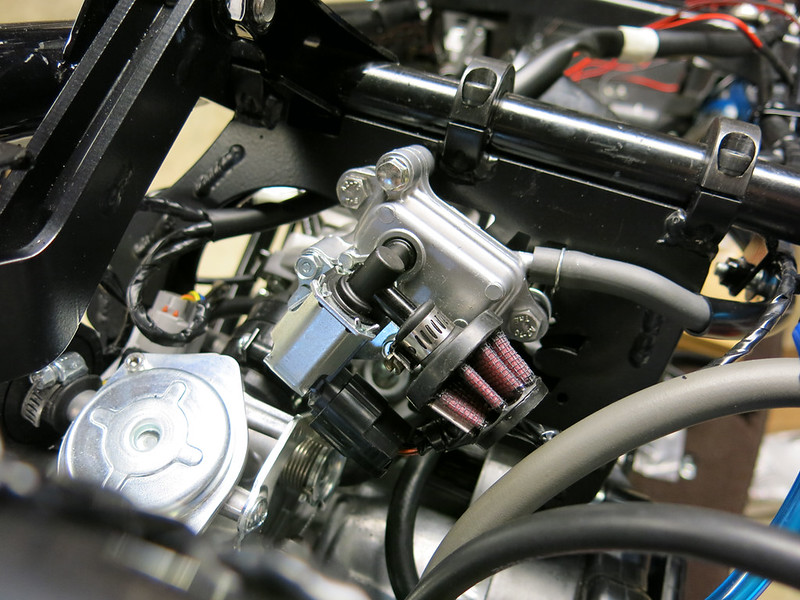
Note: my stock air box would not fit with the 12 1/2 stretch. It won’t clear the shock. I removed the stock airbox and did the Sanjuro filter mod which you can find here: viewtopic.php?f=34&t=10043
Now to install the fatty. It’s pretty simple. Remove the rear fender by removing these 2 bolts…

and this clip…

The fender will now be free to set on your pile of parts.
Next we take off the stock muffler and header. I did not reuse the stock exhaust system because it would not fit with my fatty. I bought a new muffler and header (thanks to RuckCartel!) that works with the new tire. You may be able to get your stock exhaust to work depending on the stretch length you chose and whether you are willing to do a little bending of the header and bracket. I chose to buy a new header and muffler set up.
To remove the exhaust system, first remove the 2 header bolts (under the scooter where the header attaches to the engine).
Then remove these 2 bolts on the muffler bracket (you have already removed one bolt on the fender).
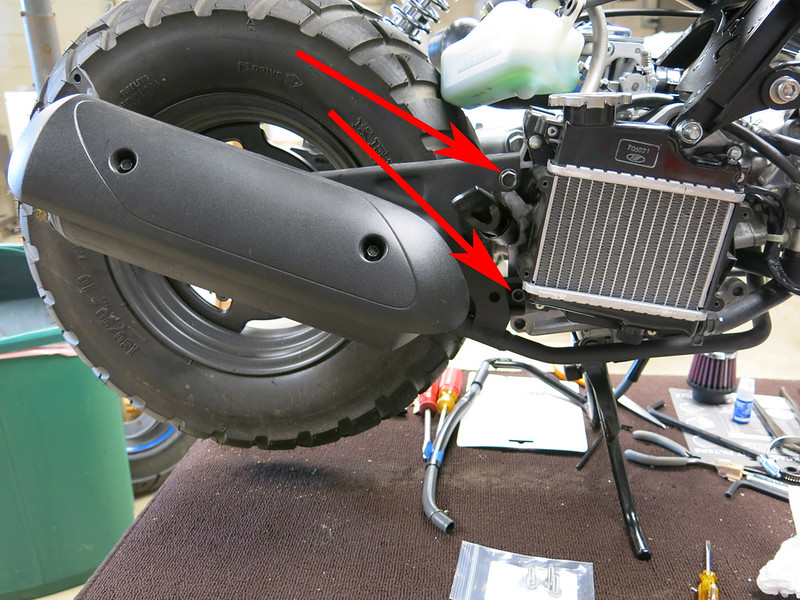
The header and muffler will come off as a unit.
Next, remove the lug nut and washer that hold the stock wheel.
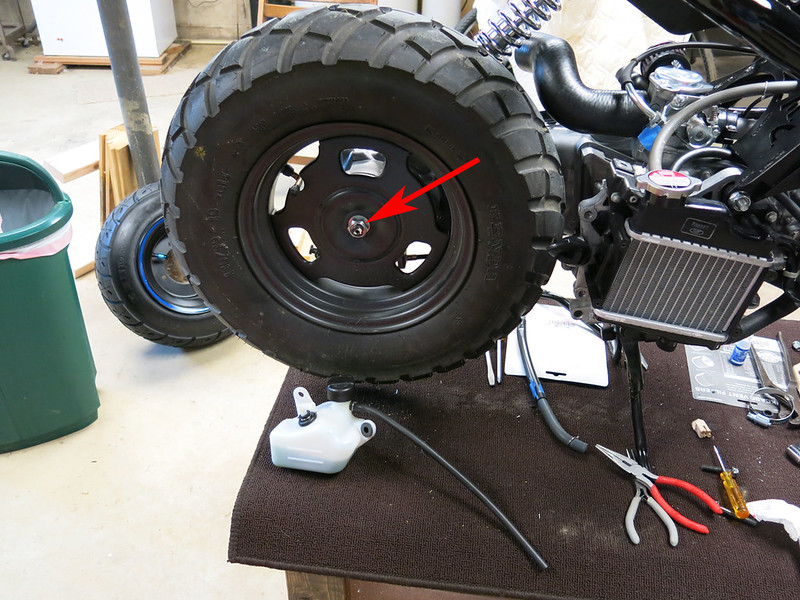
Slide the stock rear wheel off the scooter.
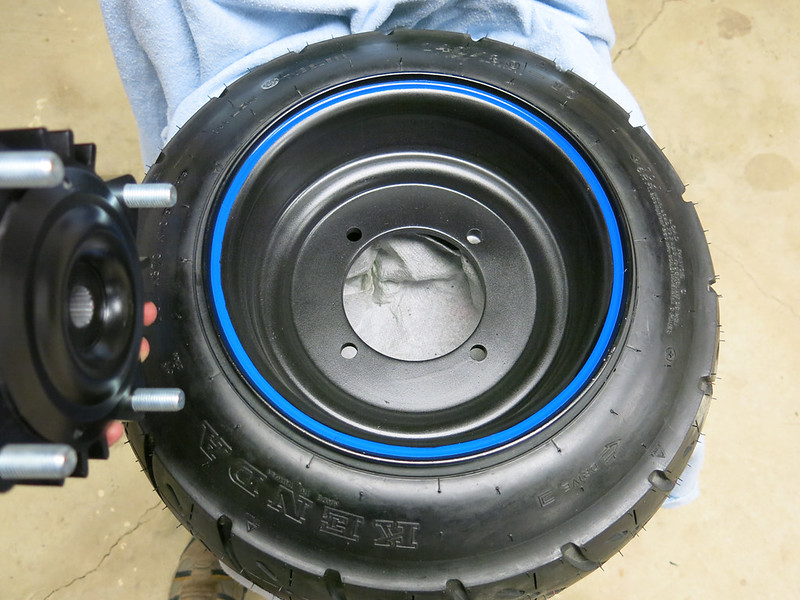
Place the fatty wheel on a soft surface valve-stem side down and carefully set the lugs of the Kymco hub into the wheel holes.
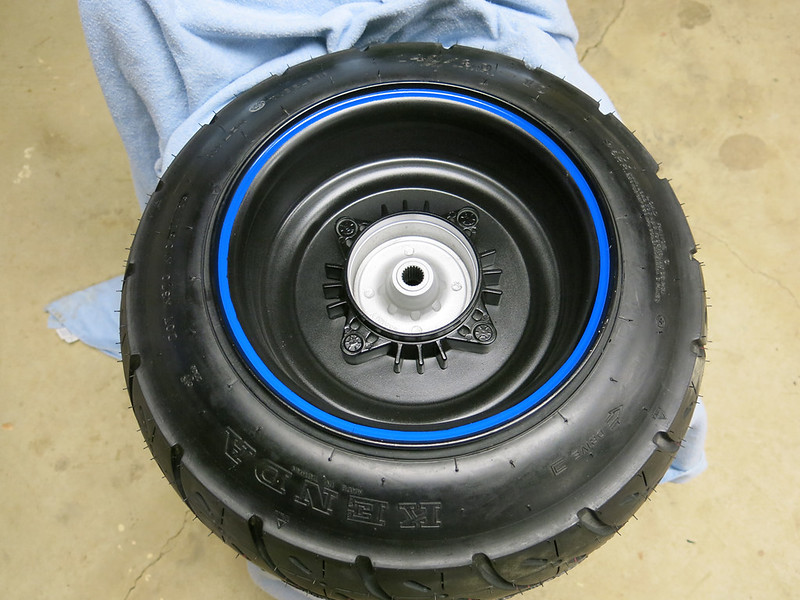
While holding the hub in place behind the wheel with one hand, tilt the wheel upright and put on the lug nuts on with the other hand.

Once the lug nuts are tightened (can we say LOCTITE!!?) put the wheel on the center lug of the scooter. Be careful. It takes some wiggling to get it by the dip stick.
Put on the stock washer and lug nut. Loctite and tighten! (You may need a fairly long extension to get to this lug nut unless you have an impact wrench that reaches.)
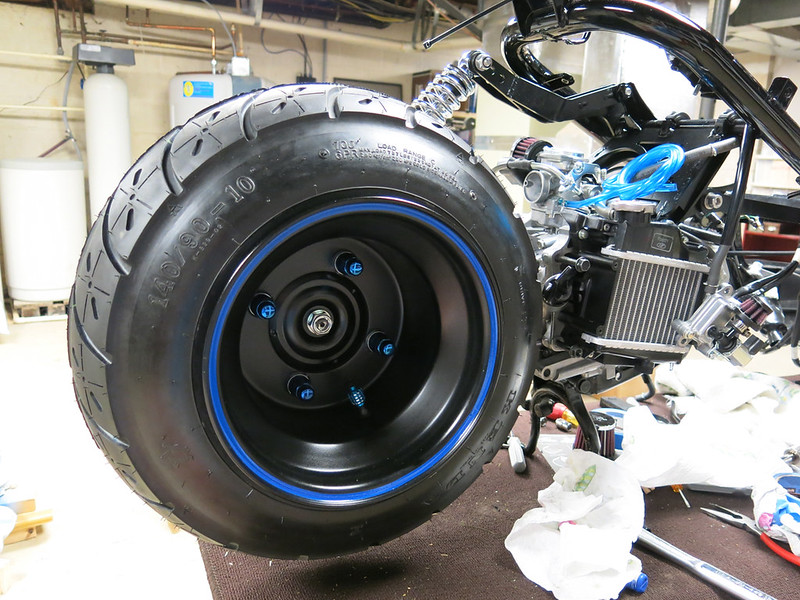
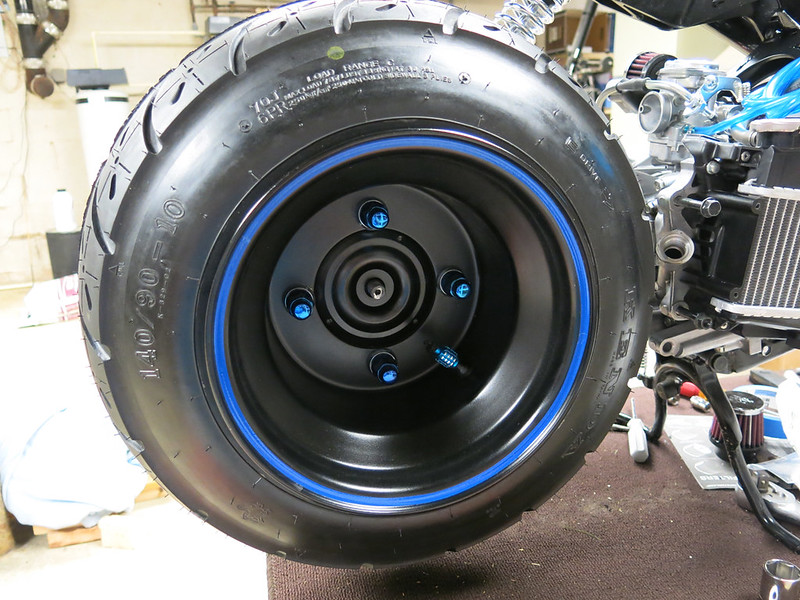
From behind… smack dab on center!
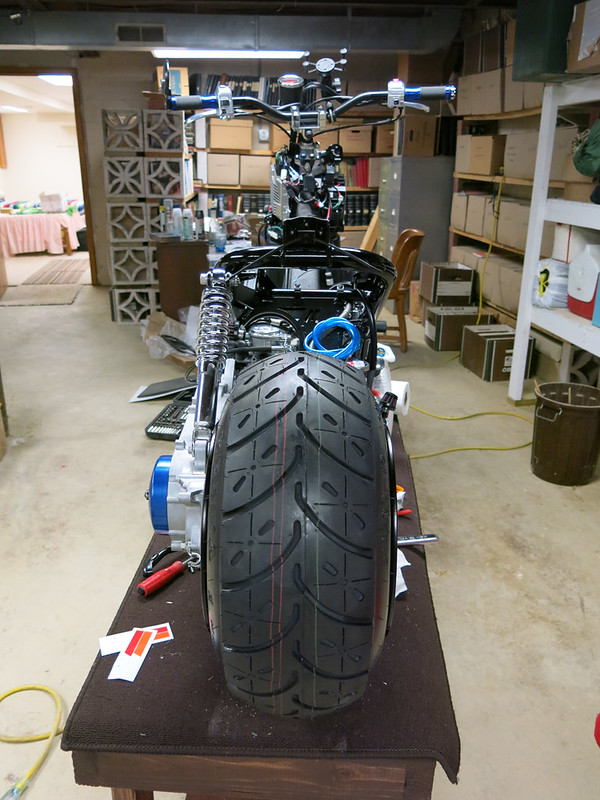
There she is, all MOJOed out!
Dang my cables are too short! If your cables fit fine, then you are good to go. Put it back together and ride. My cables aren’t long enough, so a new brake line and throttle cable are in order as well as the new fuel line.
Part 6. Longer throttle and brake cables and fuel line
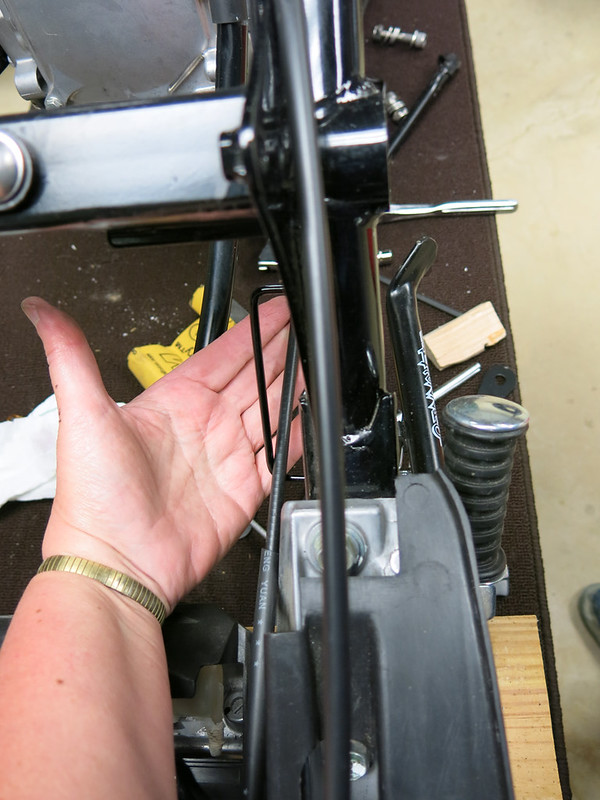
Rear Brake Cable:
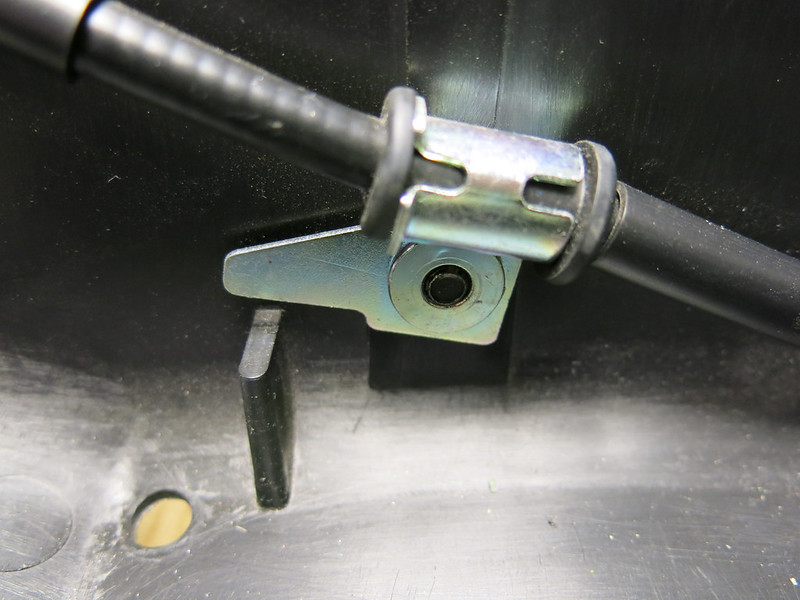
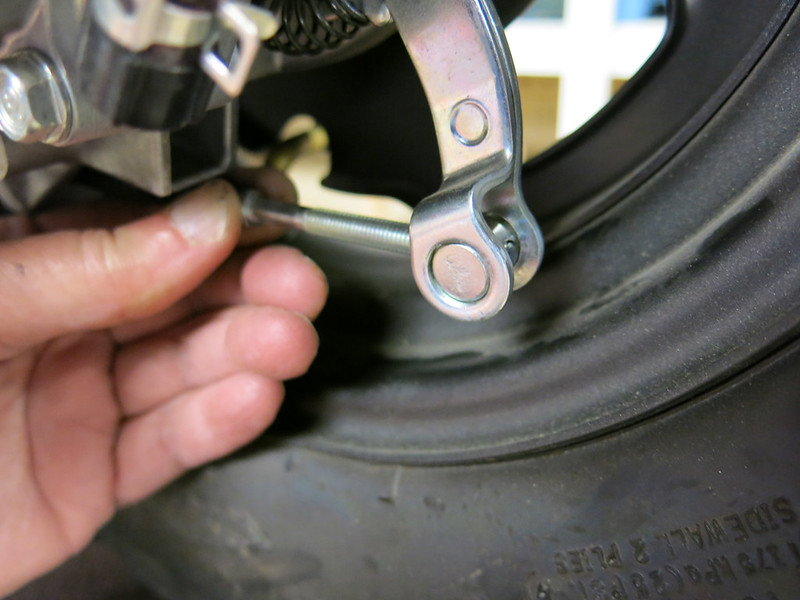
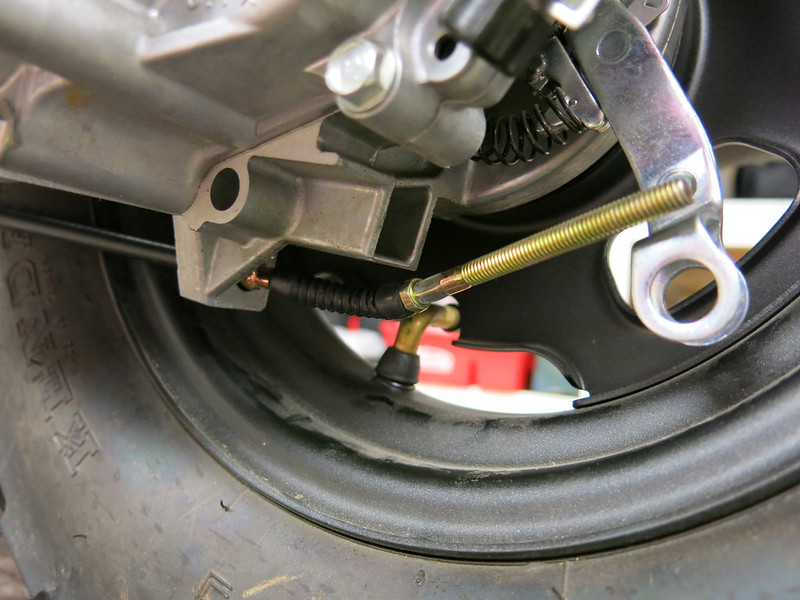
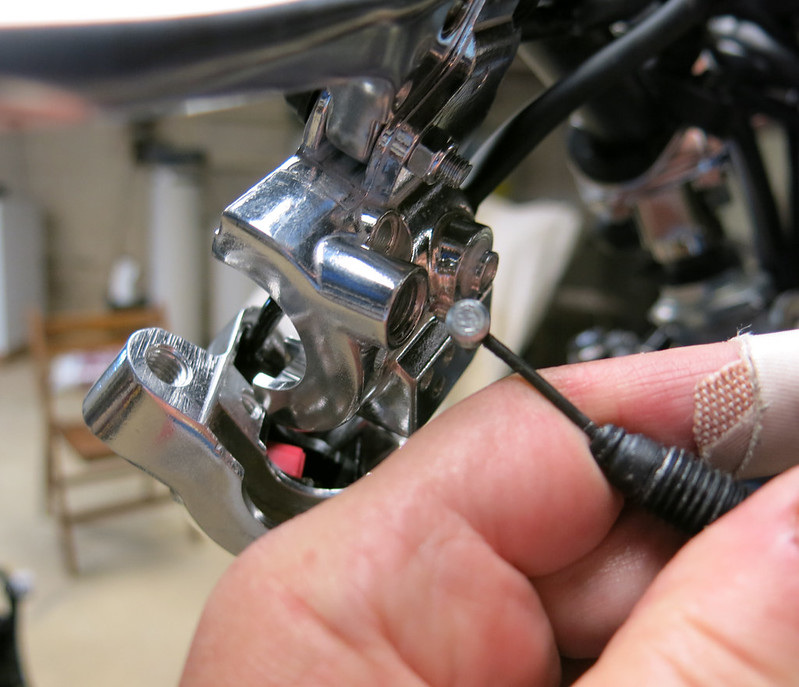
To remove the rear brake cable, start at the back wheel and unscrew the adjusting nut.
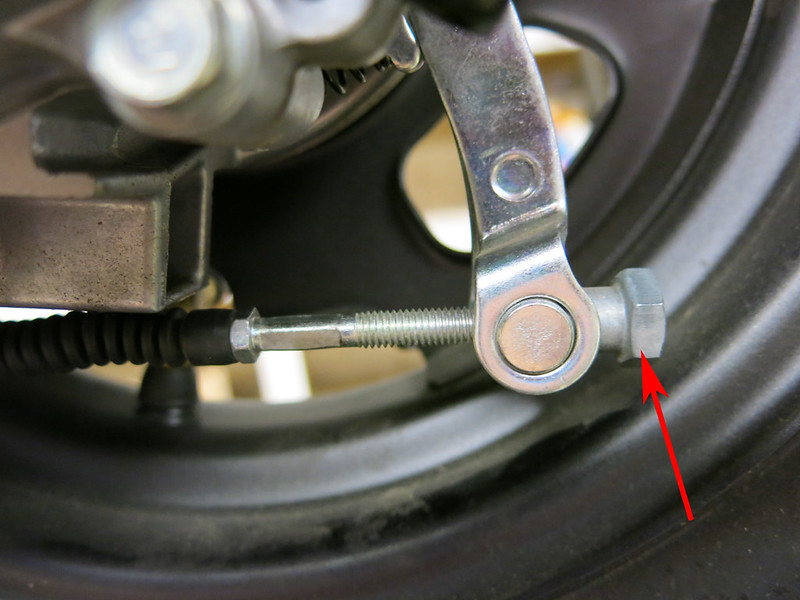
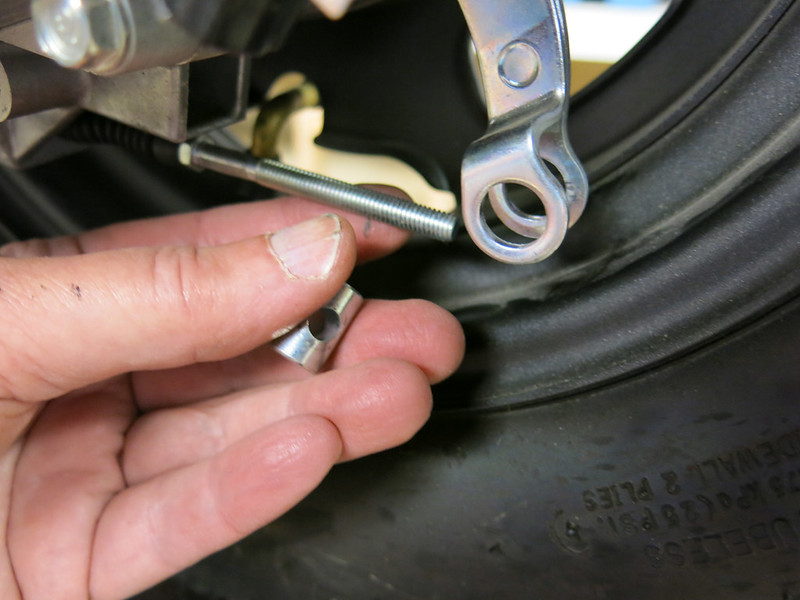
Slide the brake cable out through the hole in the join pin (the little drum).
Once the brake cable if out of the hole, slide out the join pin. Don’t lose it. You may need it.
Slide the brake cable through the brake cable holder.
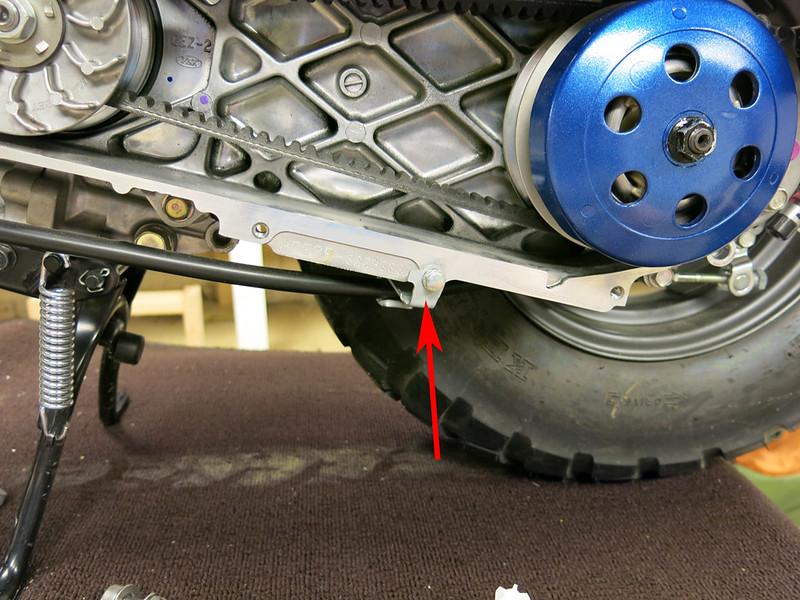
Unbolt the bracket attached to the CVT.
If you haven’t already done so, unbolt the grounding bolt that holds another brake cable bracket.
You should have already removed the bracket in the gas tank well.
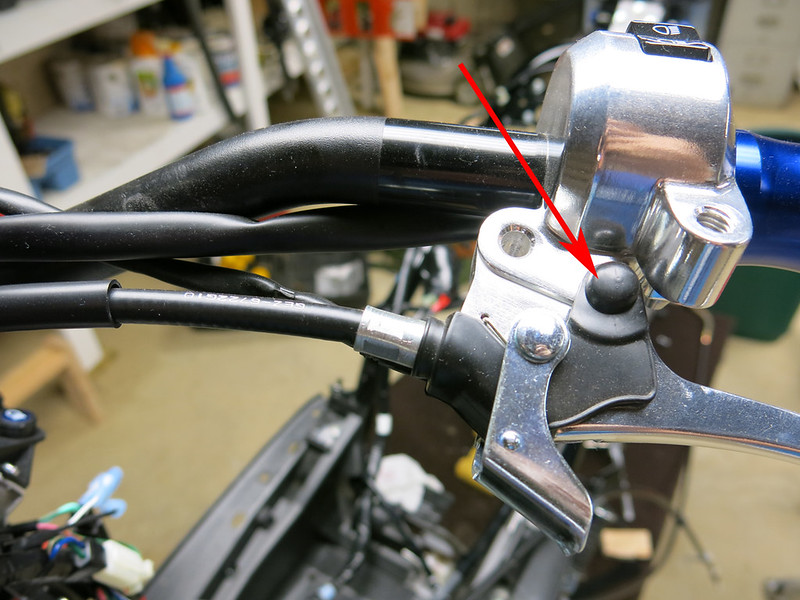
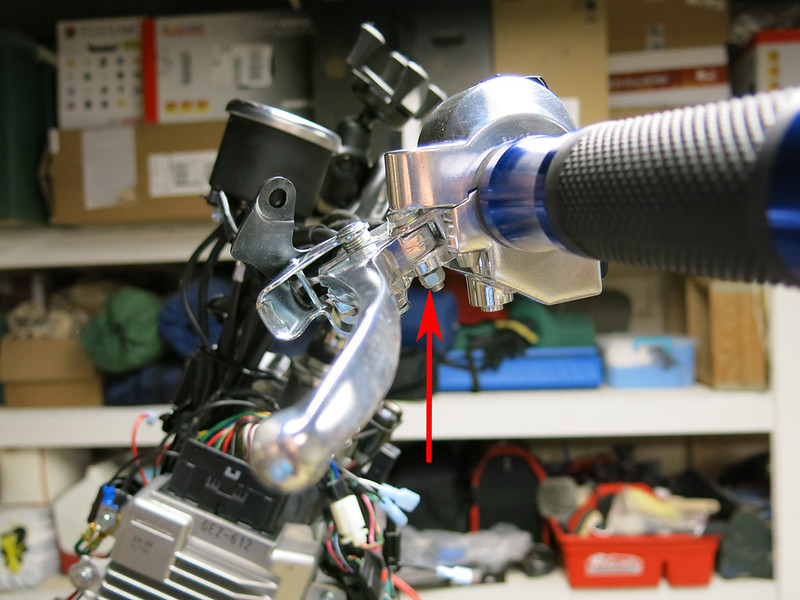
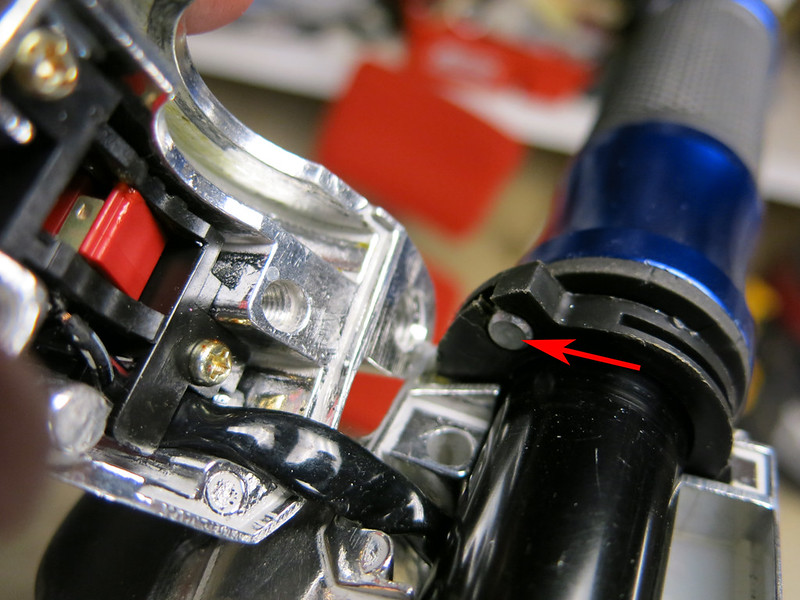
The brake cable connects on the left control of the handlebar. Remove the rubber dust cover by lifting it off the top of the nut.
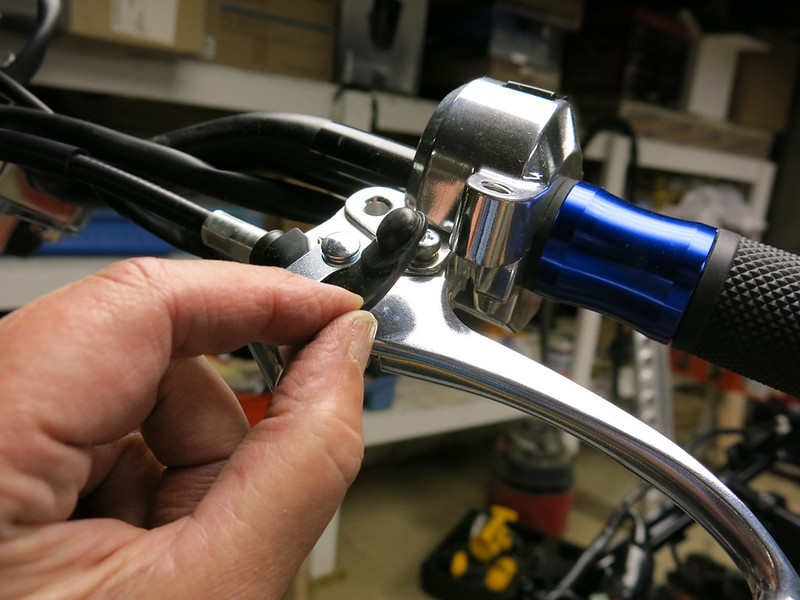
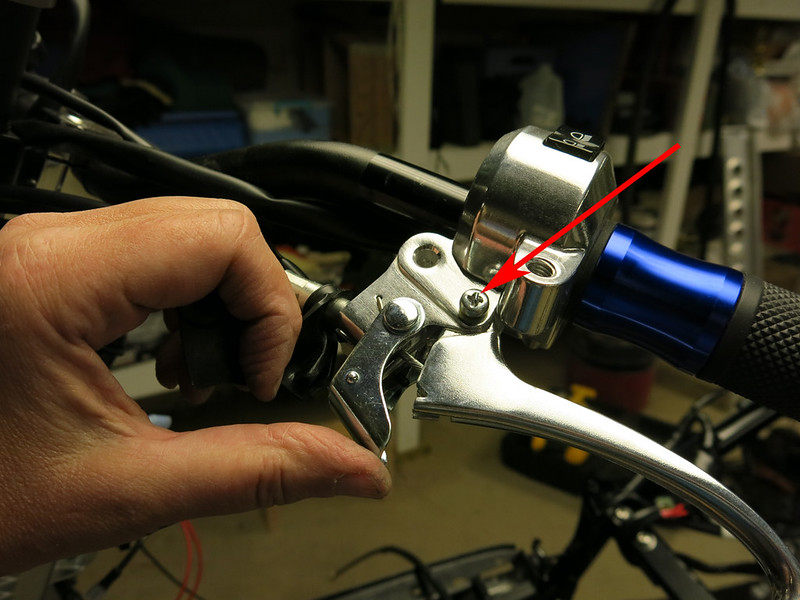
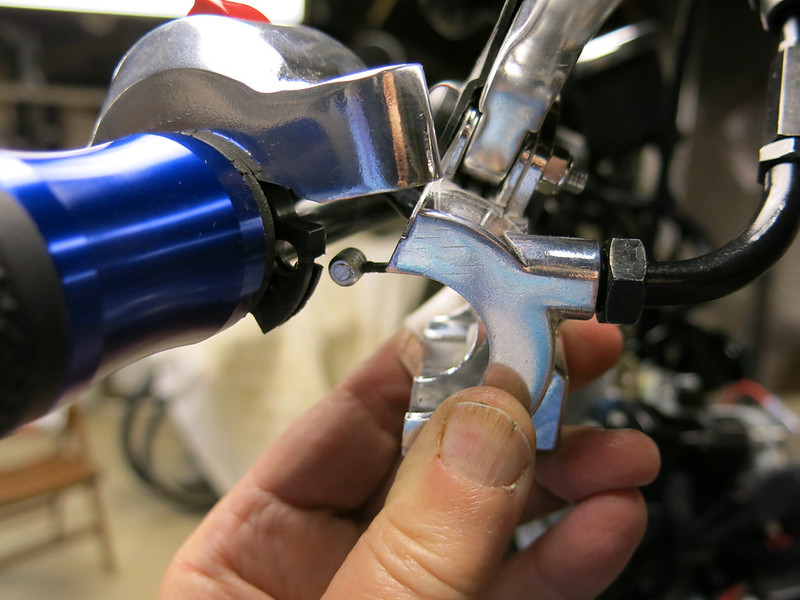
Remove the brake lever by removing the brake lever nut and screw. This is important… start by removing the nut on the bottom first! Then remove the screw from the top.
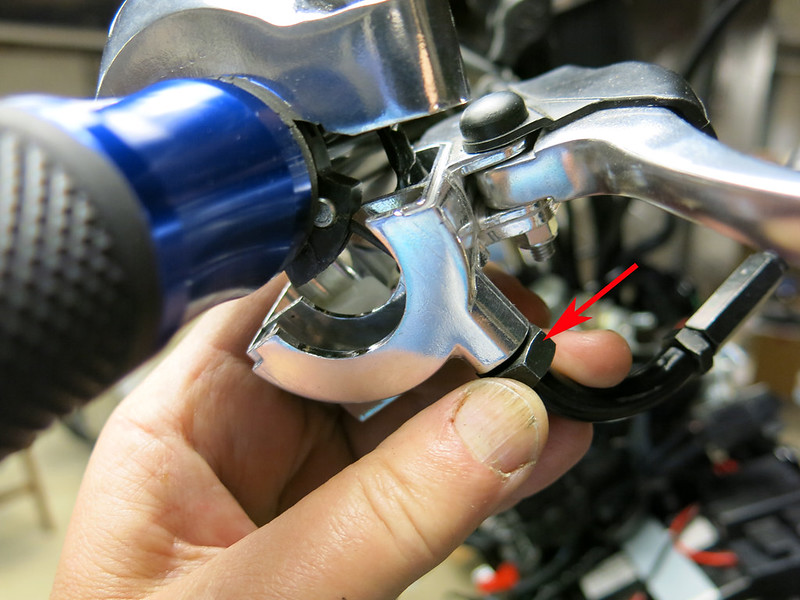
Slide the lever out of the channel. You can see the brake cable in this bottom view. Note the slot in the lever.
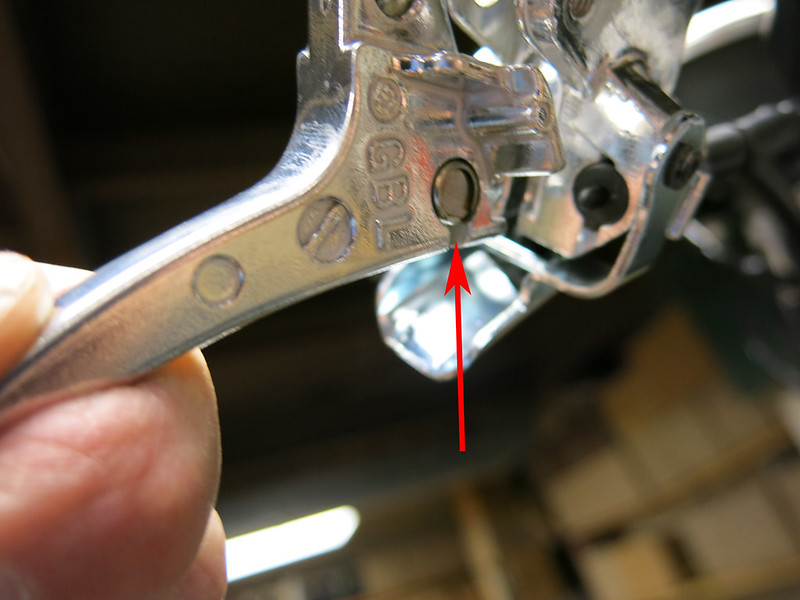
Rotate the lever until the slot lines up with the cable so the little drum will slide out.
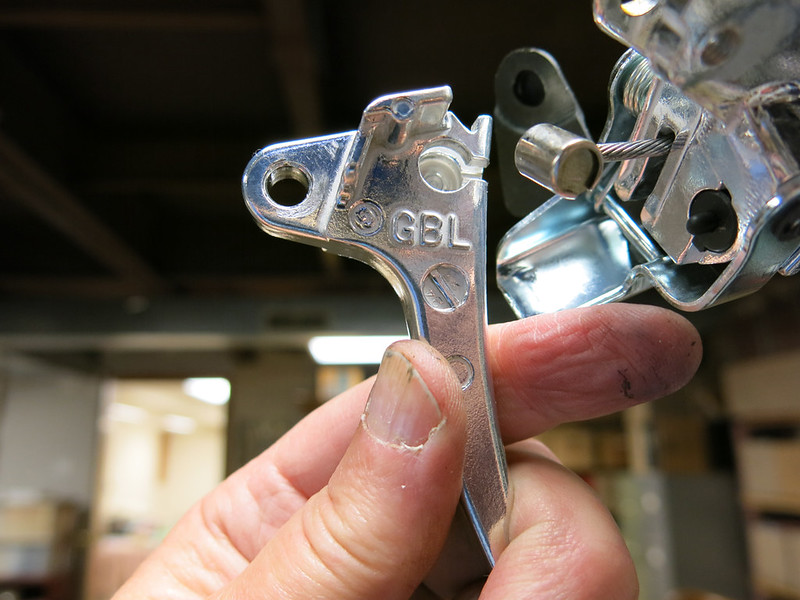
Now you can slide the cable out of the slot on the control and pull the cable free.

Slide the cable out through the wire harness inside the battery box. Your brake cable is now free.
The new brake line goes in the same way, but in the reverse order. Slide the cable up through the battery box wire harness.
I ran mine through this bracket on the rear frame.
Run it through the cable holder. Yes. You need to do this even though it’s a tight fit with a fatty. You do not need the spring if your cable came with one. Your brakes have a built in return spring.
Put in the join pin and put on the adjusting nut.
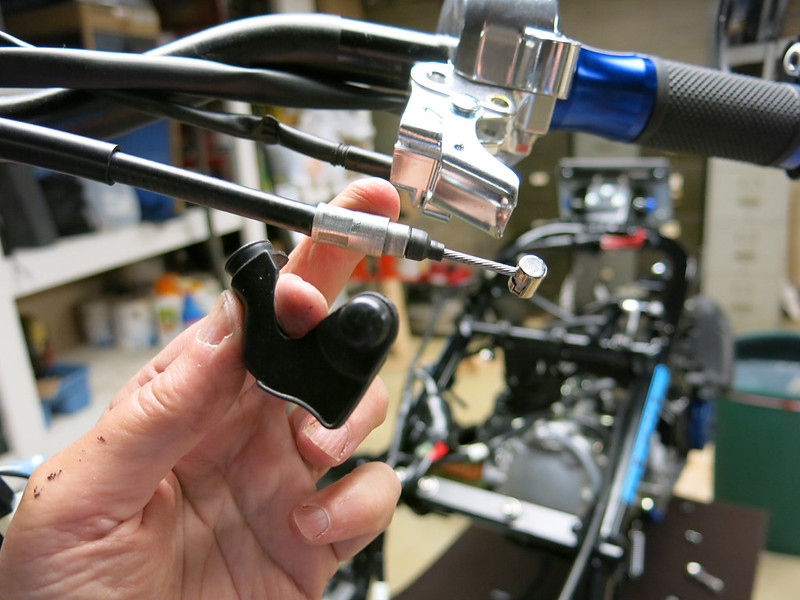
Then to connect it at the front (controls), slide the rubber dust cover onto the cable. Put the cable in the slot and slide the butt of the cable into the control and attach it to the lever.
Put the cable back into the 3 cable brackets on the scooter: at the back of the CVT cover, at the rear ground bolt, and in the fuel tank well.
To adjust the new cable, you can turn the adjustment nut on the cable by the rear wheel.
Throttle Cable:
To remove the throttle cable, unscrew the 2 bolts at the controls. (If you have never taken these out before, then be warned that they strip easily! I have replaced mine with socket-head bolts)
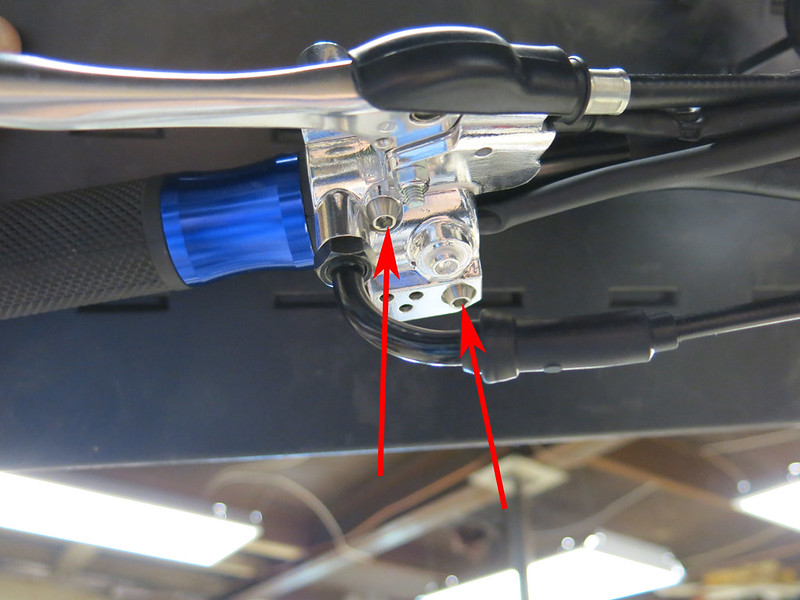
Once open, you will see the throttle cable in a groove held there by the barrel at the end of the cable.
Note the groove in the throttle control. Rotate it forward so the cable and slip through that groove and free the end of the cable.

Loosen the lock nut on the cable.
Rotate the cable to unscrew the end from the control and pull it out of the housing.
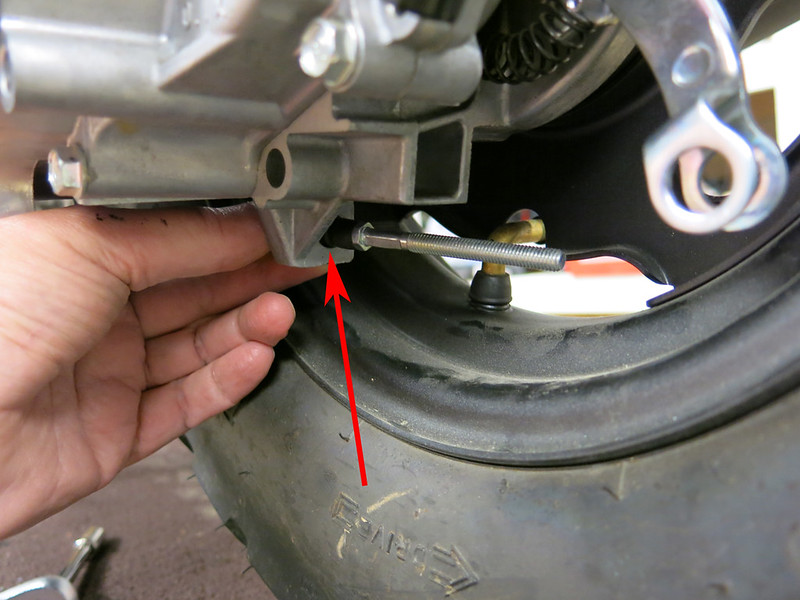
Now for the carburetor end… loosen the adjusting nut.
Unscrew the lock nut.
Keep turning the nut until it exposes the gap on the otherwise threaded section of the cable.
Slide the cable toward the back of the scooter until the gap lines up with the opening in the bracket on the side of the carburetor and slide the cable out.
Now you can unwind the cable down around the bracket until it can be slid through the slot and the end of the cable released.
Remove the cable down through the battery box and pull it off the scooter.
Install the new cable in reverse order of removing it. Most of your adjustment will come from the adjusting nut on the carburetor. You can make small adjustments at the control end. Just remove the rubber sleeve on the adjustment nut and loosen the lock nut to turn it.
Fuel line:
The new fuel line is very simple. Just attach it to the carburetor and reuse the stock clamp.

Then route the fuel line and trim it to length (not too short!). Make sure there are no kinks. Attach the other end to the fuel check valve.
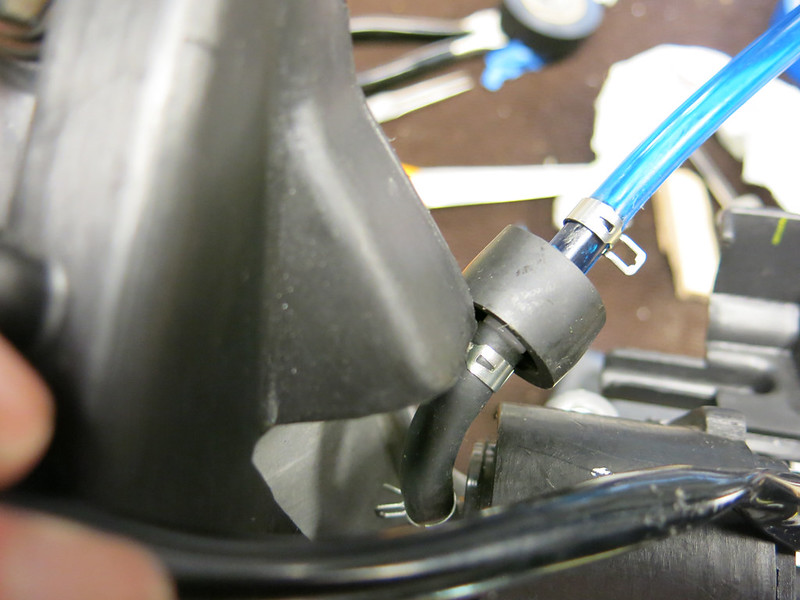
Tuck the check valve behind the plastic flap.
Part 7. Finishing touches and suggestions
Route all wires and hoses to your liking. Zip ties are your friend! And make all connections you took apart.
Make sure you tighten all bolts using Loctite!
Put the stock plastics back on the scooter and install the battery box. Go ride!
Here are few last suggestion to add on that make this installation easier.
Airbox:
The airbox might clear an 8" or 10" stretch, but not the 12 1/2" stretch. I found it a lot easier to get rid of the air box and do the Sanjuro filter mod (viewtopic.php?f=34&t=10043) with a MNNTHBX intake mount (viewtopic.php?f=124&t=47139). That mod also cleans up a lot of the ugly unneeded tubing in the engine area.
You will need to rejet if you do the Sanjuro air system mod. Rejetting is not hard at all. I had never done it before. There is a great thread to show you how to rejet here: http://battlescooter.proboards.com/inde … hread=2685
Coolant tank:
Also I got a new coolant overflow tank because the stock tank would not reach the engine from its stock location (and it’s ugly). You at least need to move the stock coolant tank back or get longer hoses.
I decide to buy an IceTube from RuckinRonk. It looks great and it mounts to the stock PCV bracket location. (So, I also had to move the PCV solenoid… see below).
Thread to buy IceTube: viewtopic.php?f=47&t=82151
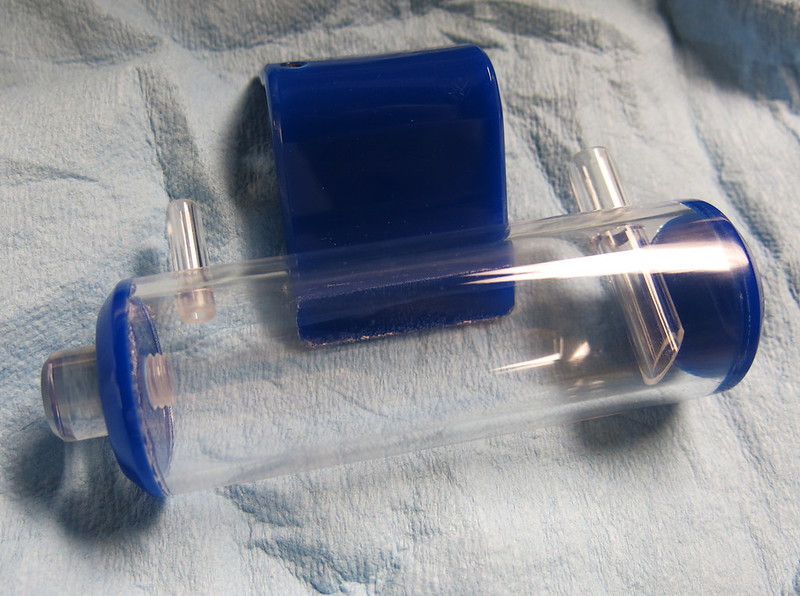
This way it sits above the radiator again, so the stock hoses are long enough for it.
PCV Solenoid:
I moved my PCV solenoid. You may not need to, but I’m not sure all the hoses will reach it at its stock position after the extension kit goes on your scoot.
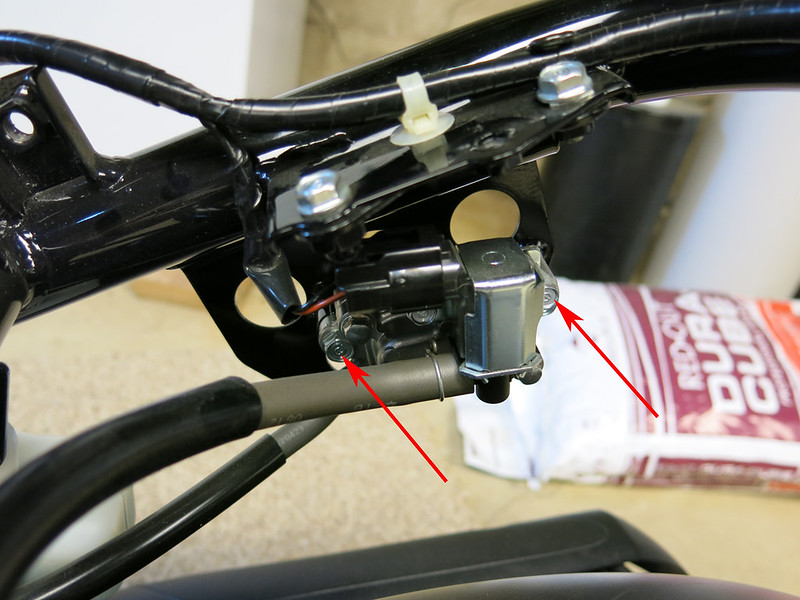
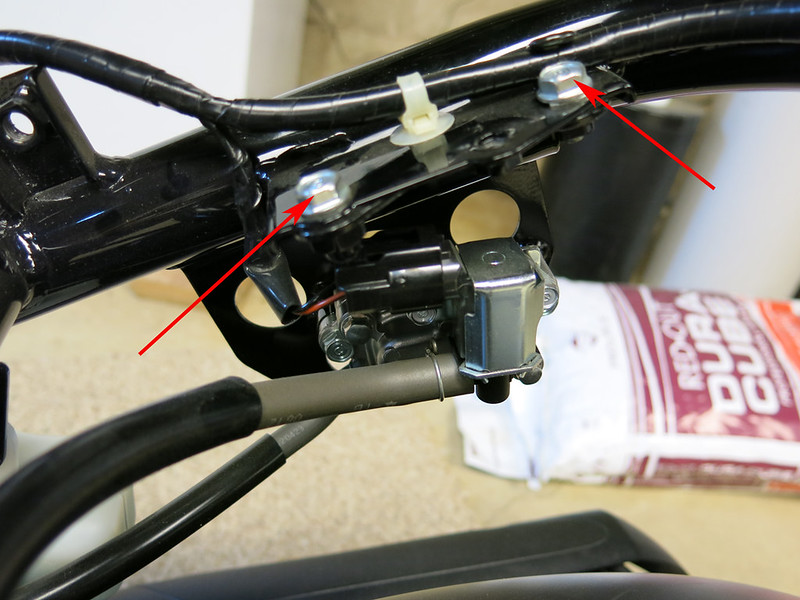
To take the PCV solenoid off, unscrew the 2 bolts shown to take it off the bracket (do this BEFORE removing the bracket. It’s a lot easier than trying to unbolt the bracket first. Ask me how know.)
Then remove the PCV bracket by removing these 2 bolts.
I mounted it using two 4 mm bolts, nuts, and washers to the back of my MOJO Mount. Fits great! And it is tucked up high enough where it’s not really visible.
Finally, your stock exhaust may not fit with the fatty. You might be able to get it to clear with some bending and fussing with the header. But, I bought a cusom exhaust from Ruckcartel to get around the issue and it just looks a lot better! Again, jettting will be needed if you replace the exhaust.
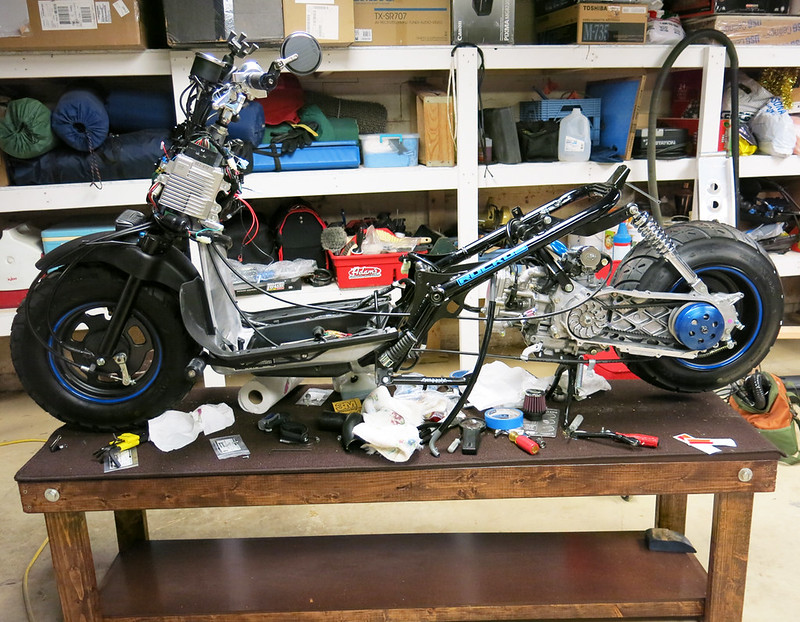
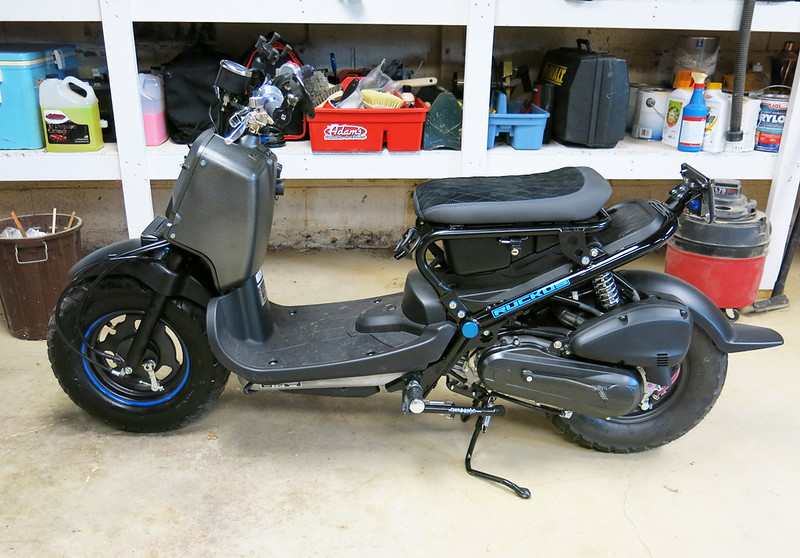
Here is my scooter before the stretch:
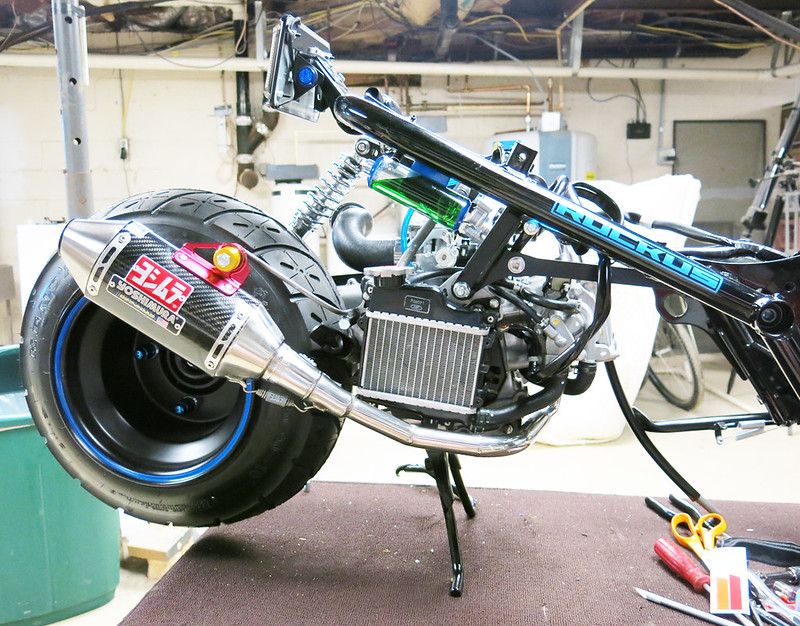
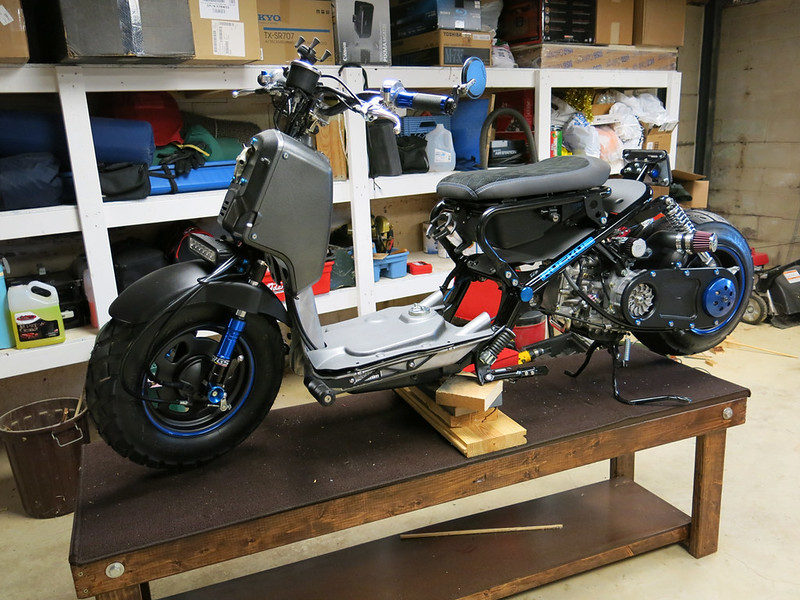
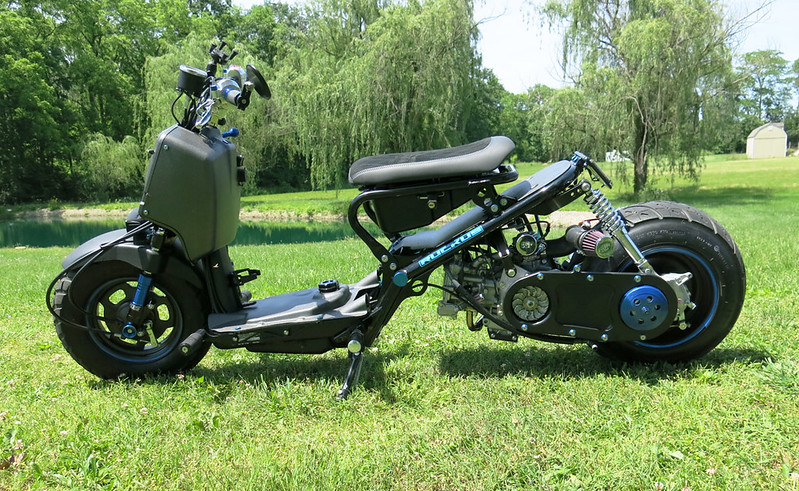
Here it is after:
I know this DIY got kind of long. (I tend to over do the pictures.) But, I hope this helps some folks.